Table of Contents
- The Administration Area of OTRS
- Basics
- Agents, Groups and Roles
- Customer Users and Customers
- Queues
- Salutations, Signatures, Attachments and Templates
- Auto Responses
- System Email Addresses
- Ticket Notifications
- S/MIME
- PGP
- States
- System Configuration
- Using Mail Accounts
- Filtering Incoming Email Messages
- Executing Automated Jobs with the GenericAgent
- Administrative Messages
- Session Management
- System Maintenance
- System Log
- Communication Log
- SQL Queries via the SQL Box
- Package Manager
- Web Services
- Dynamic Fields
- Calendars
- System Configuration
- Backing Up the System
- Email Settings
- Using External backends
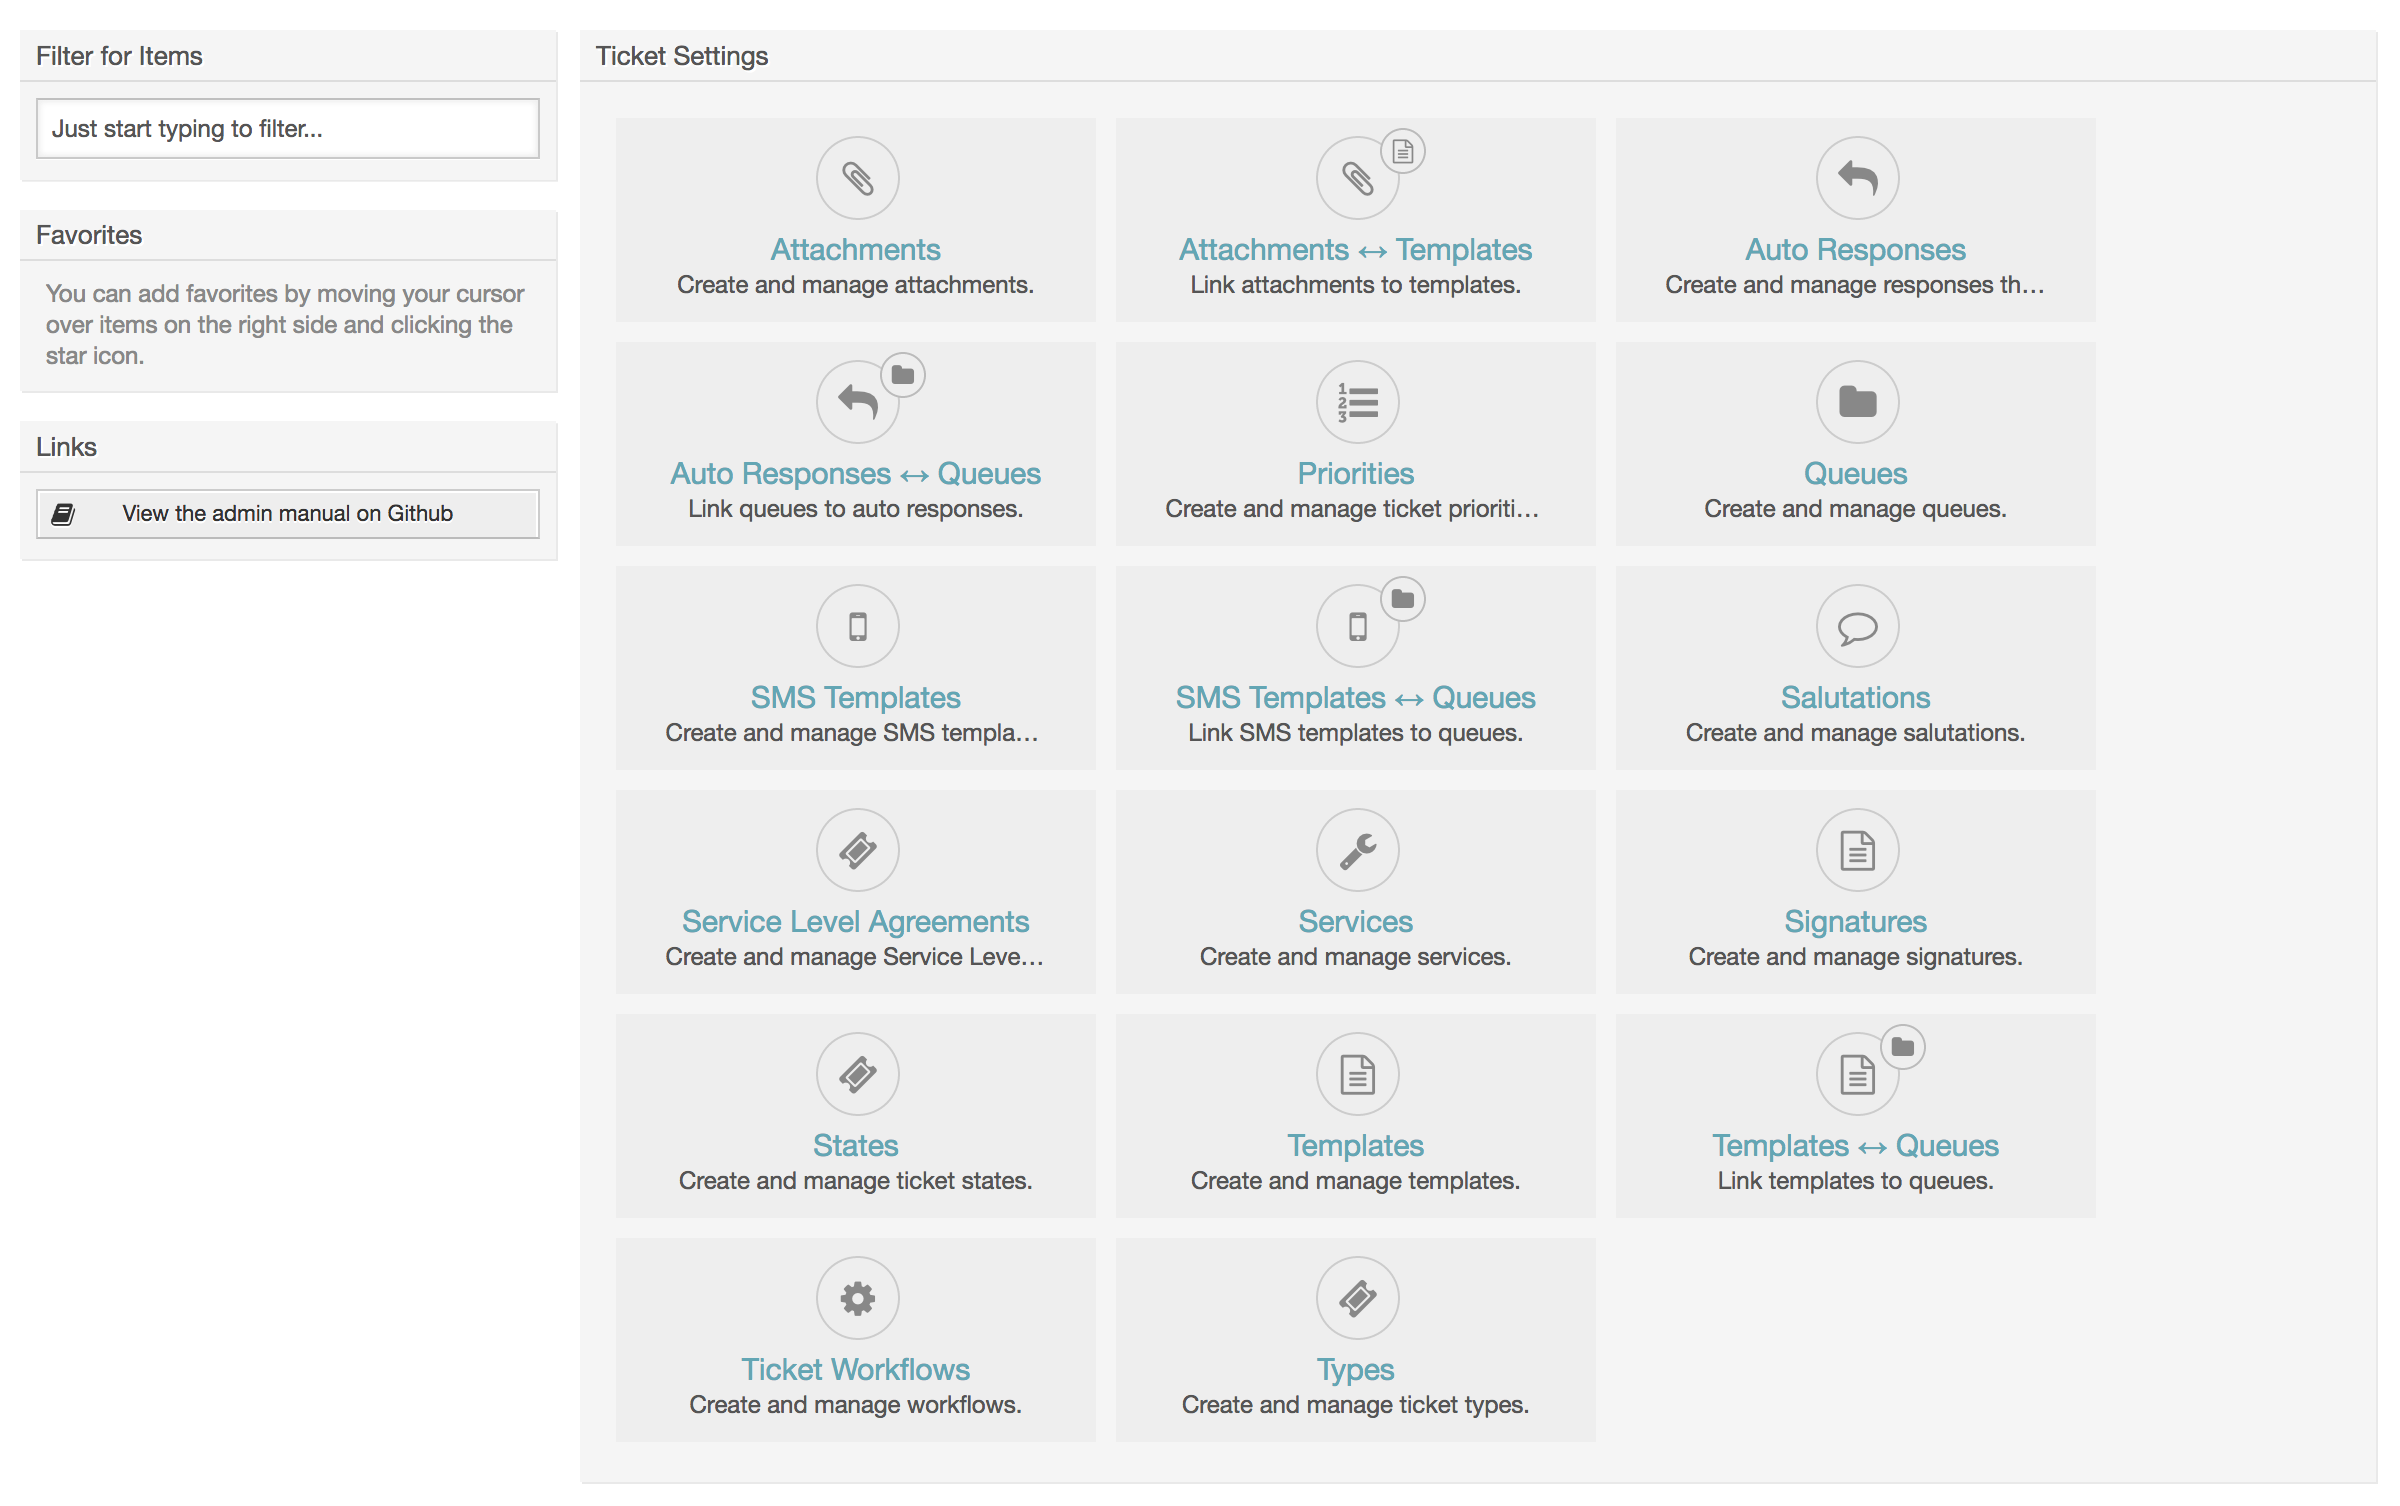
- Ticket Settings
- Date and Time Related Functions
- Customizing the PDF Output
- Statistics
- Dynamic Fields
- Introduction
- Configuration
- Adding a Dynamic Field
- Text Dynamic Field Configuration
- Textarea Dynamic Field Configuration
- Checkbox Dynamic Field Configuration
- Dropdown Dynamic Field Configuration
- Multiselect Dynamic Field Configuration
- Date Dynamic Field Configuration
- Date / Time Dynamic Field Configuration
- Editing a Dynamic Field
- Showing a Dynamic Field on a Screen
- Setting a Default Value by a Ticket Event Module
- Set a Default Value by User Preferences
- Generic Interface
- The OTRS Daemon
- Basics
- Agents, Groups and Roles
- Customer Users and Customers
- Queues
- Salutations, Signatures, Attachments and Templates
- Auto Responses
- System Email Addresses
- Ticket Notifications
- S/MIME
- PGP
- States
- System Configuration
- Using Mail Accounts
- Filtering Incoming Email Messages
- Executing Automated Jobs with the GenericAgent
- Administrative Messages
- Session Management
- System Maintenance
- System Log
- Communication Log
- SQL Queries via the SQL Box
- Package Manager
- Web Services
- Dynamic Fields
- Calendars
The following system configuration settings are available to OTRS administrators by accessing the Admin page of the OTRS web interface - adding agents, customers and queues, ticket and mail settings, installing additional packages such as FAQ and ITSM, and much more.
Agents who are members of the admin group can access the Admin area by clicking the Admin link in the navigation bar (see figure below). Agents without sufficiently elevated access rights will not be able to access this link.
By clicking the link Agents, you get access to the agent management screen of OTRS (see figure below). Administrators can add, change or deactivate agent accounts. Furthermore they can also manage agent preferences, including the language and notification settings for the individual agent's interface.
Note
An OTRS agent account may be deactivated but not deleted. Deactivation is done by setting the Valid flag to invalid or invalid-temporarily.
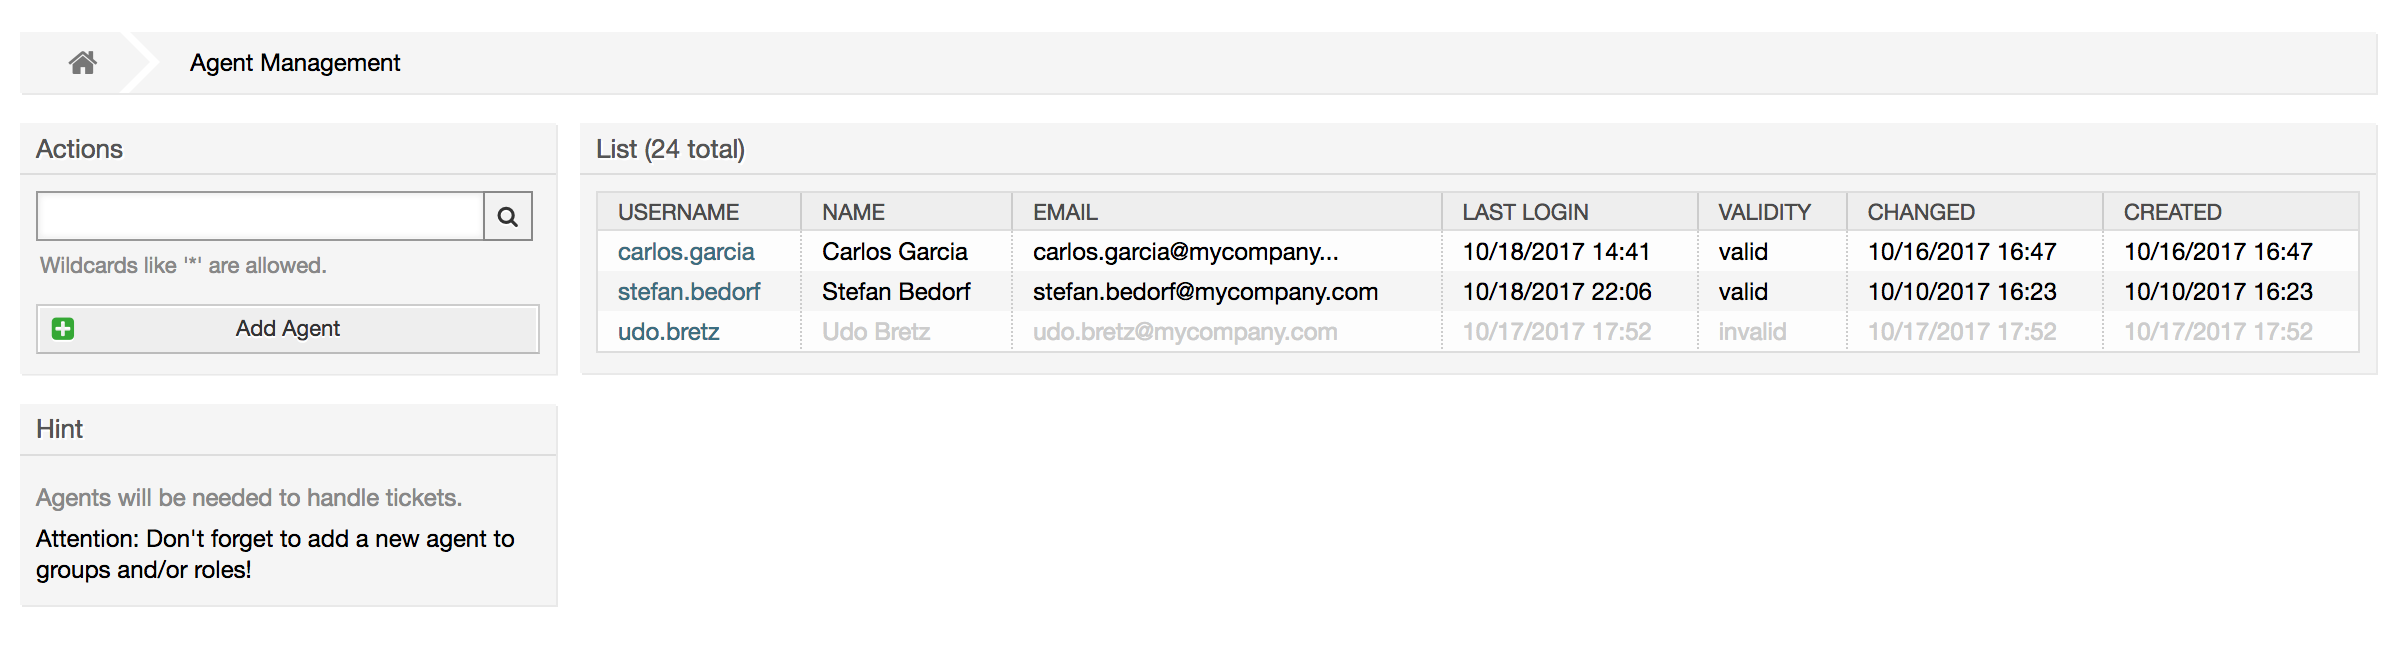
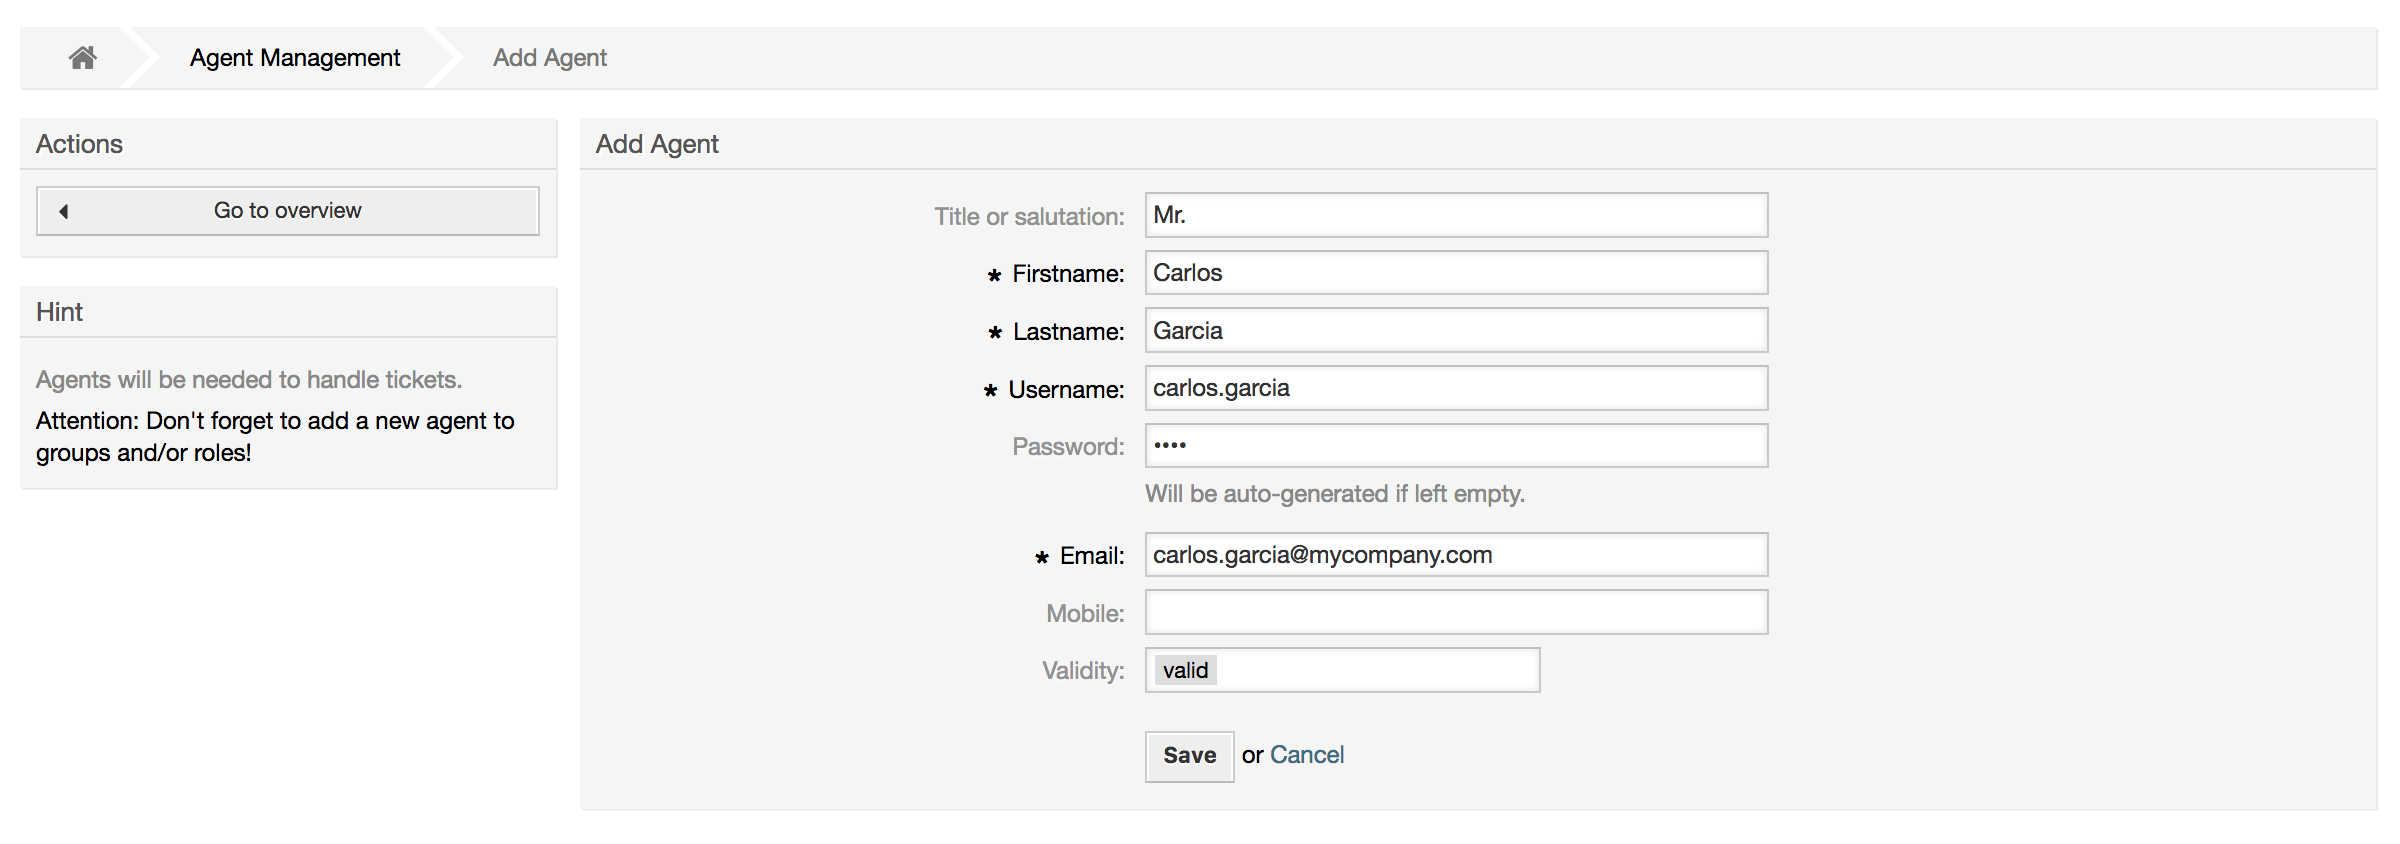
To register an agent, click on the Add agent button, enter the required data and press the Submit button at the bottom of the screen, as shown in Figure.
After the new agent account has been created, you should make the agent a member of one or more groups or roles. Information about groups and roles is available in the Groups and Roles sections of this chapter.
Every agent's account should belong to at least one group or role. In a brand new installation, there are three pre-defined groups available, as shown in Table 4-1.
Table 4.1. Default groups available on a fresh OTRS installation
| Group | Description |
|---|---|
| admin | Allowed to perform administrative tasks in the system. |
| stats | Qualified to access the stats module of OTRS and generate statistics. |
| users | Agents should belong to this group, with read and write permissions. They can then access all functions of the ticket system. |
Note
In a brand new OTRS installation, the agent 'root@localhost' belongs by default to the admin, stats and users groups.
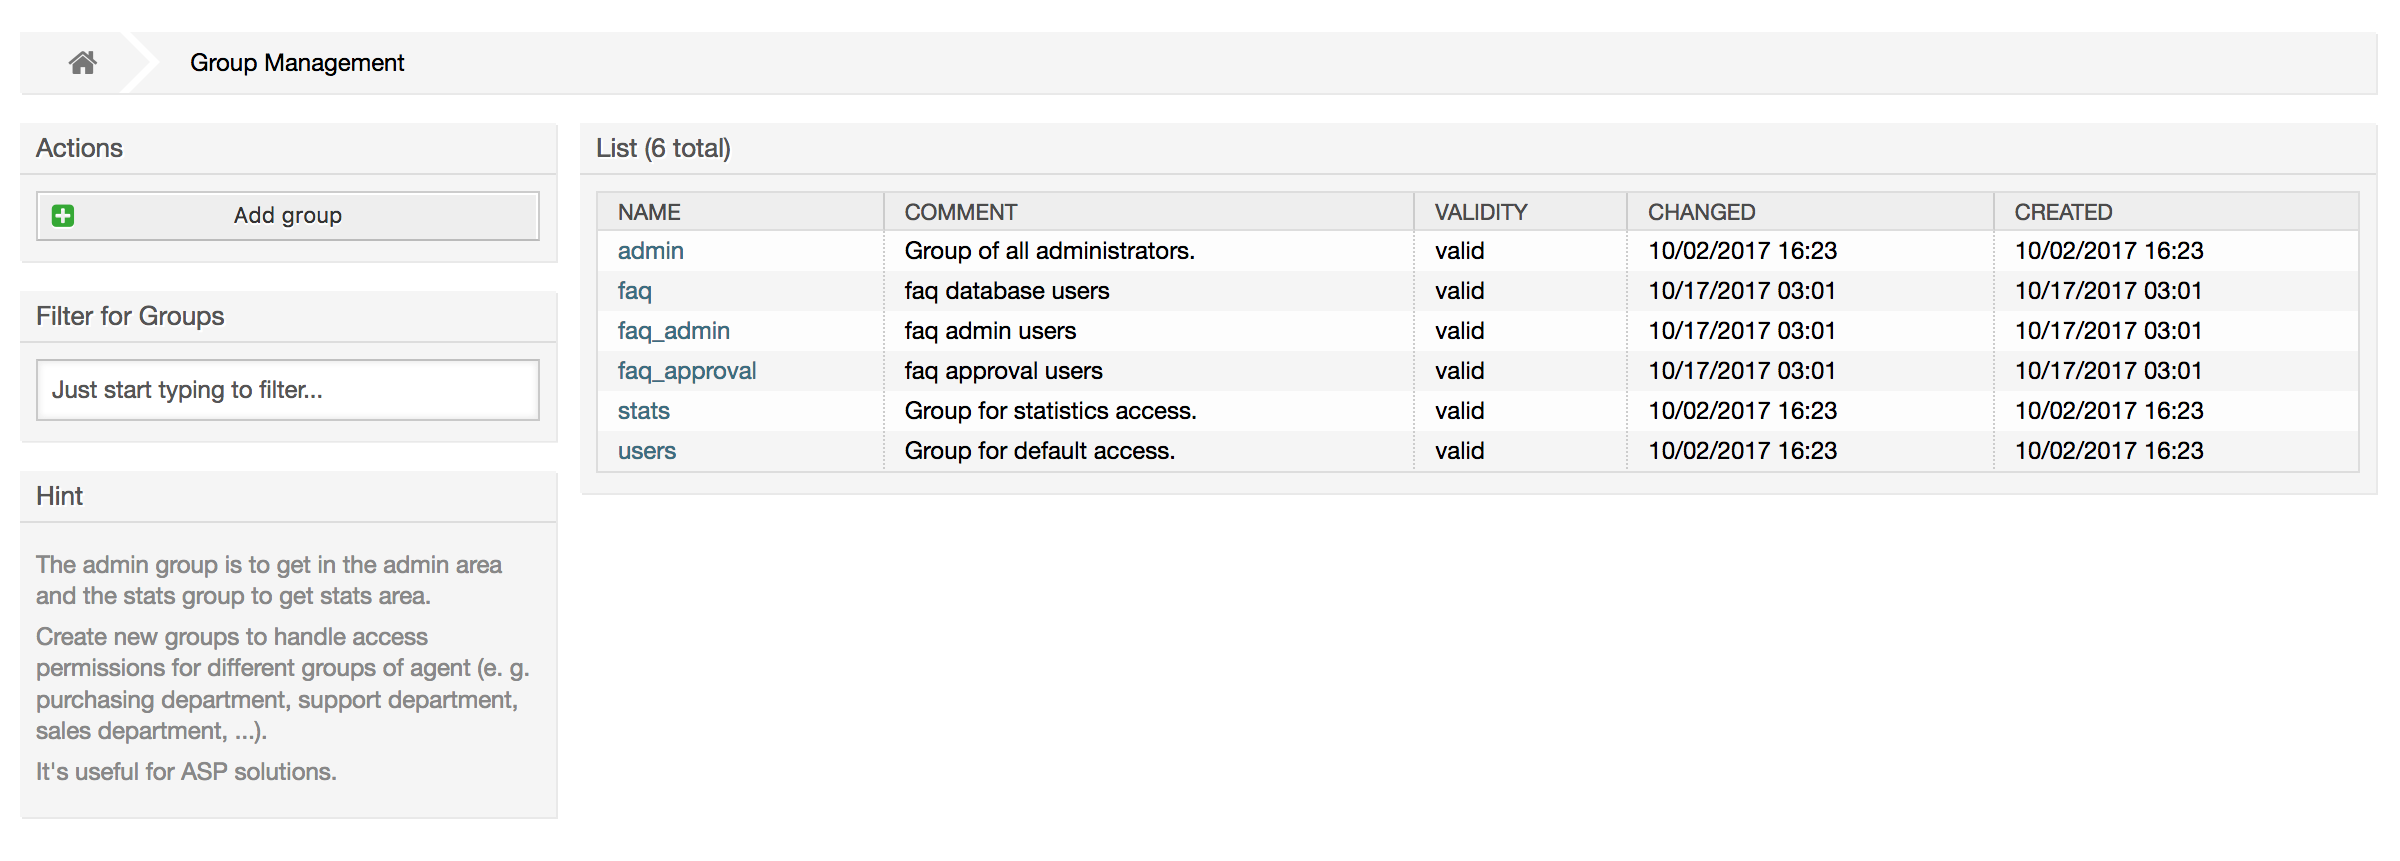
You can access the group management page (see figure below) by clicking the Groups link in the admin area.
Note
As with agents, an OTRS group may be deactivated but not deleted. Deactivation is done by setting the Valid flag to invalid or invalid-temporarily.
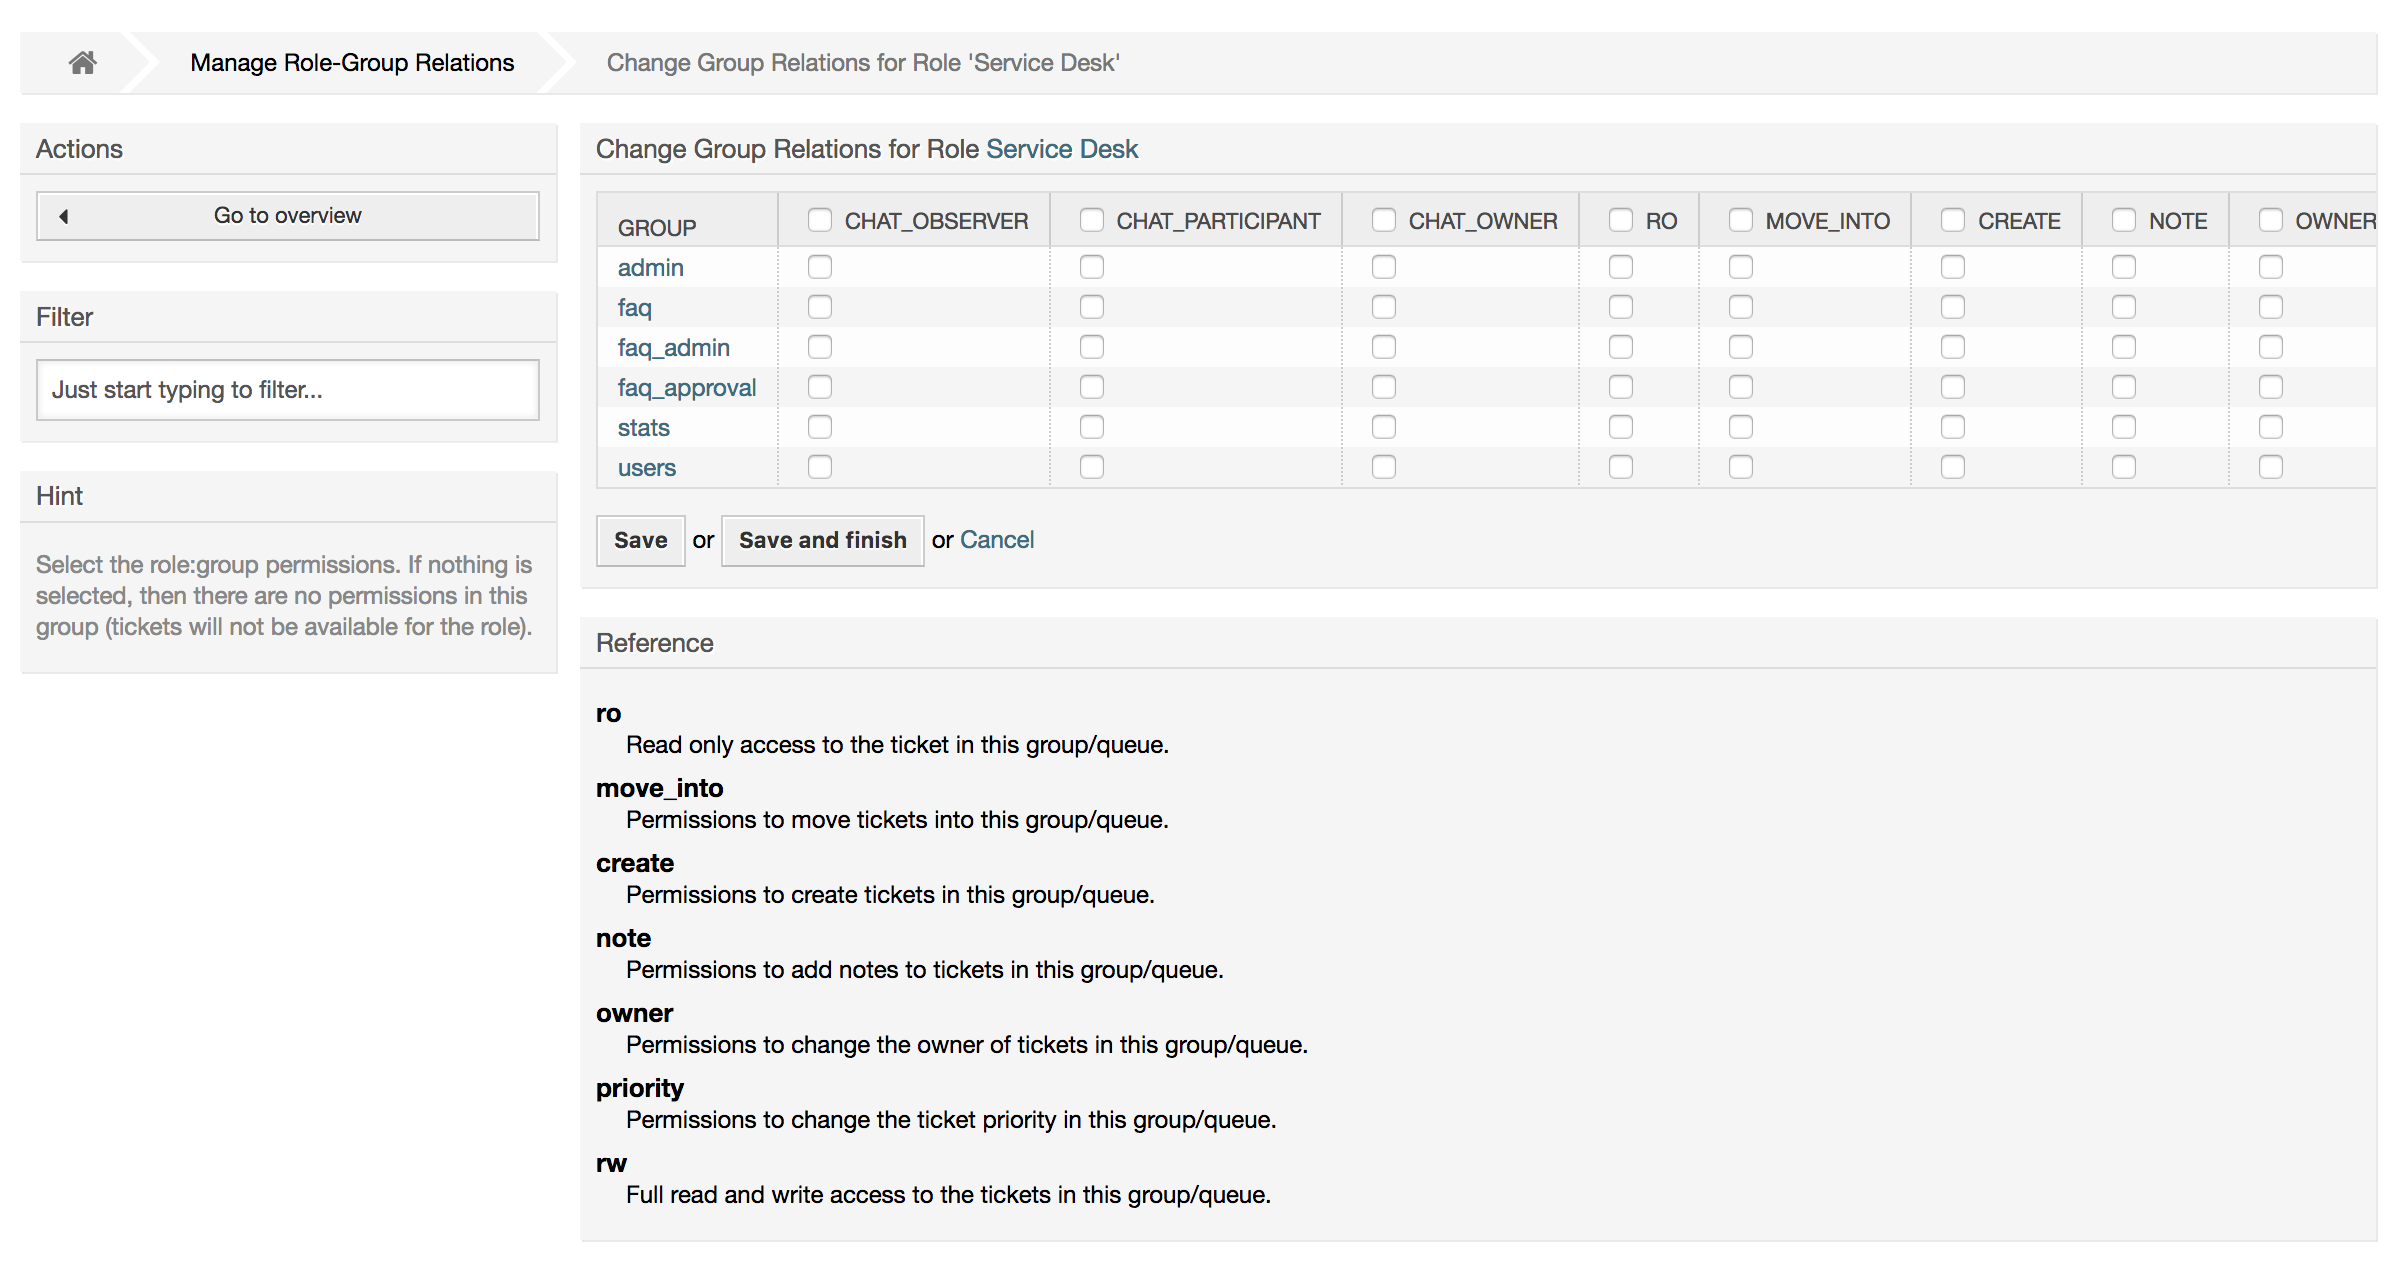
To add an agent to a group, or to change the agents who belong to a group, you can use the link Agents <-> Groups from the Admin page (see figure below).
An overview of all groups and agents in the system is displayed on this page. You can also use the available filters to find a specific entity. If you want to change the groups that an agent is a member of, just click on the agent's name (see figure below). To change the agents associated with a group, just click on the group you want to edit (see figure below).
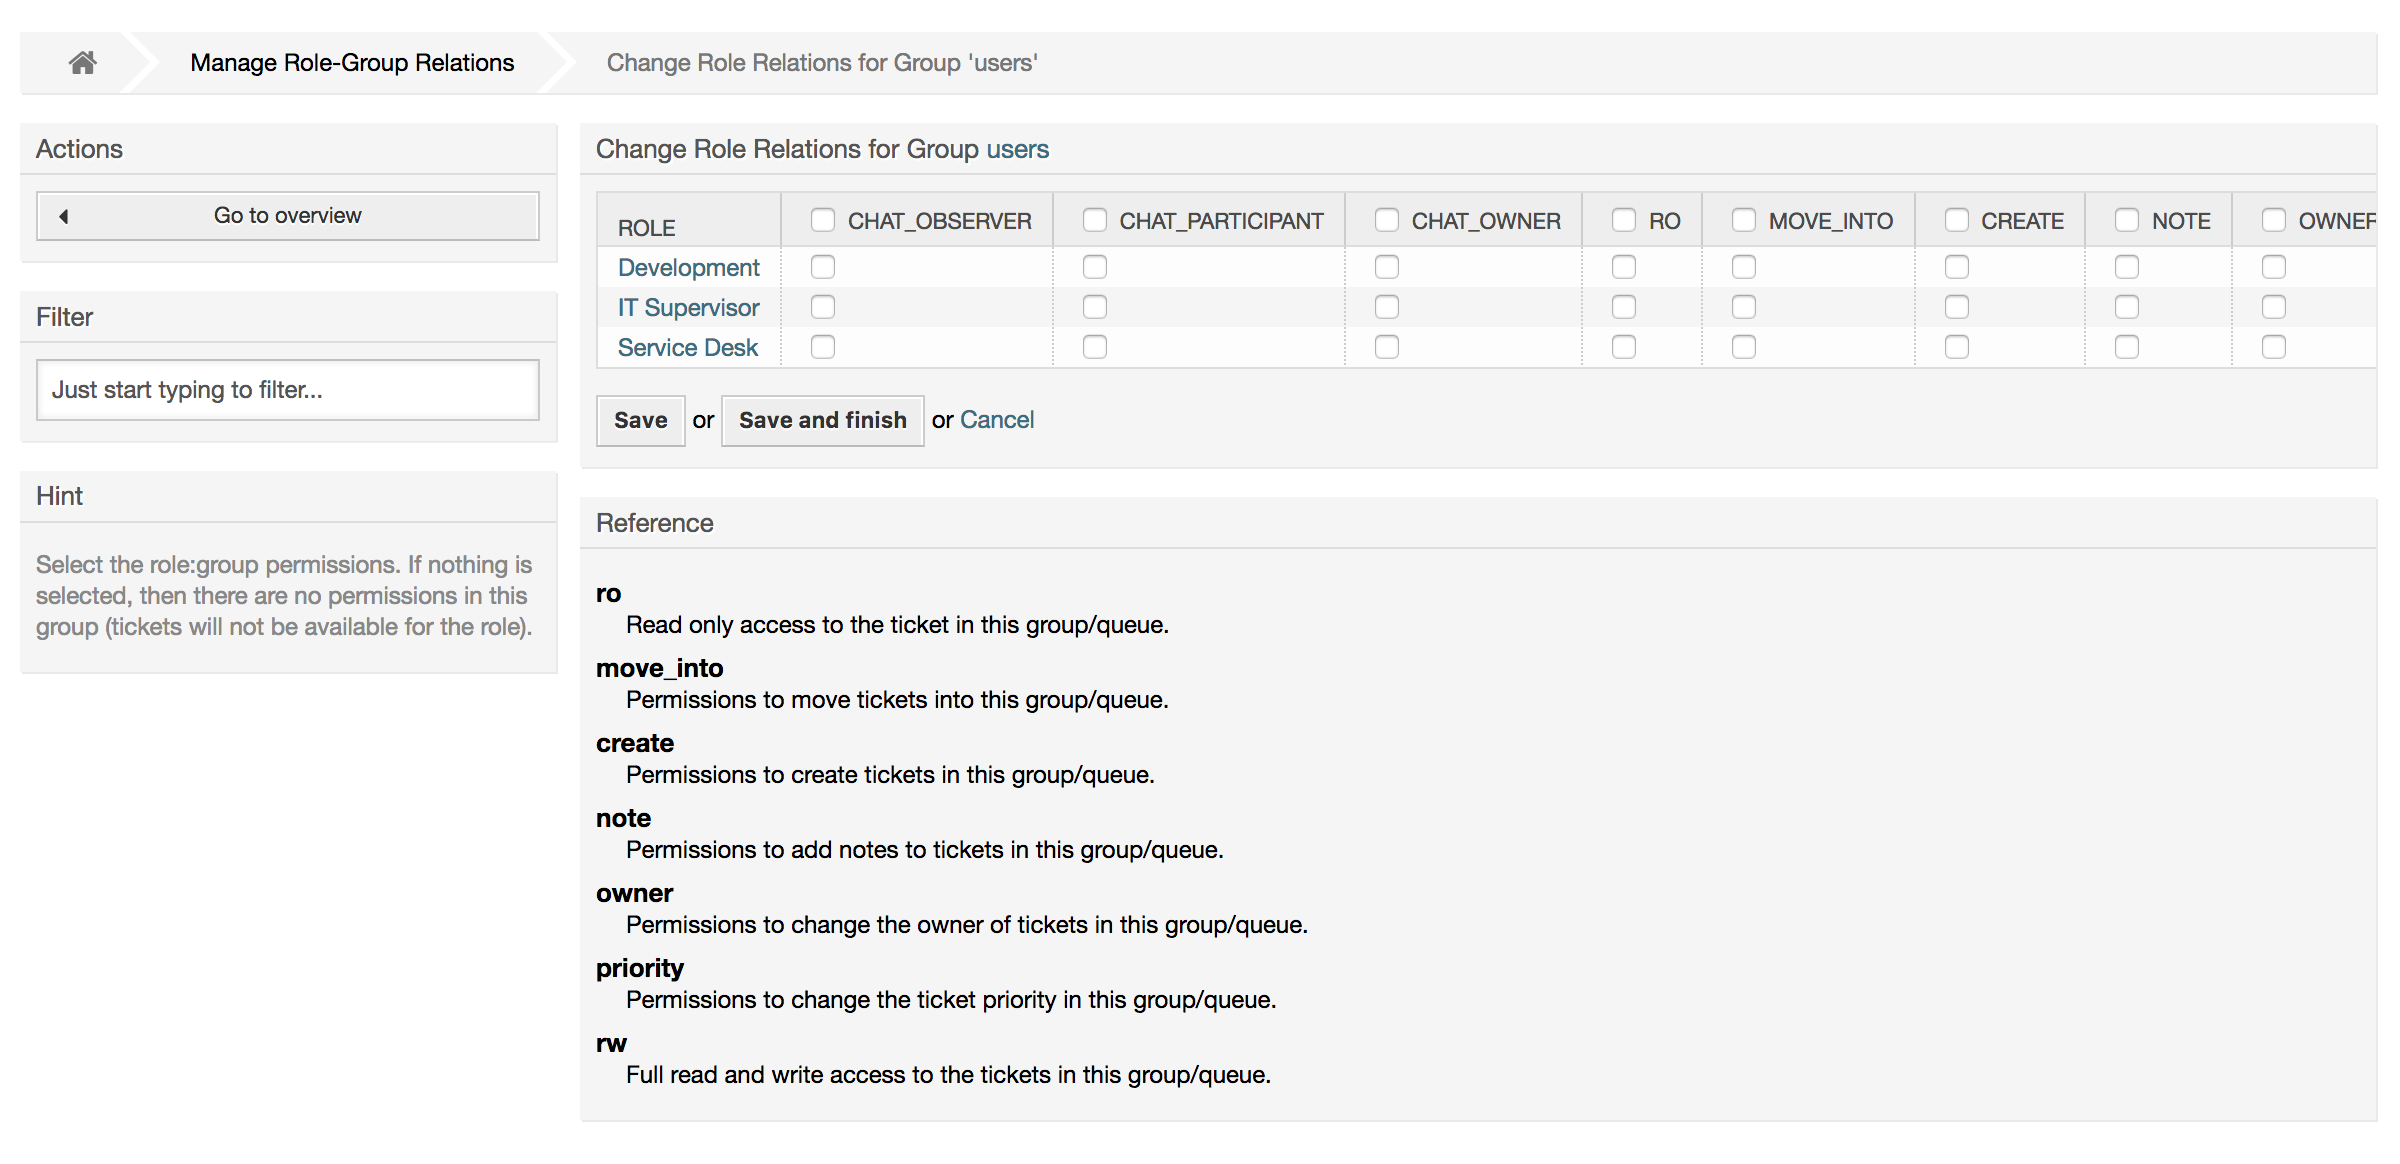
Each group has a set of rights associated with it, and each group member (agent) may have some combination of these rights for themselves. A list of the permissions / rights is shown in Table 4-2.
Table 4.2. Rights associated with OTRS groups
| Right | Description |
|---|---|
| chat_observer | Agents may take part silently in a chat (available in OTRS Business Solution™). |
| chat_participant | Agents may normally participate in a chat (available in OTRS Business Solution™). |
| chat_owner | Agents have full rights for a chat and can accept chat requests (available in OTRS Business Solution™). |
| ro | Read only access to the tickets, entries and queues of this group. |
| move into | Right to move tickets or entries between queues or areas that belong to this group. |
| create | Right to create tickets or entries in the queues or areas of this group. |
| note | Right to add notes to tickets or entries in the queues or areas of this group. |
| owner | Right to update the owner of tickets or entries in queues or areas that belong to this group. |
| priority | Right to change the priority of tickets or entries in queues or areas that belong to this group. |
| rw | Full read and write access on tickets or entries in the queues or areas that belong to this group. |
Note
By default, the QueueView only lists tickets in queues that an agent has rw access to, i.e., the tickets the agent needs to work on. If you want to change this behaviour, you can set Ticket::Frontend::AgentTicketQueue###ViewAllPossibleTickets to Yes.
Not all available permissions are shown by default. These additional permissions can be added.
Table 4.3. Additional permission groups
| Right | Description |
|---|---|
| stats | Gives access to the stats page. |
| bounce | The right to bounce an email message (with bounce button in ticketZoom). |
| compose | The right to compose an answer for a ticket. |
| customer | The right to change the customer of a ticket. |
| forward | The right to forward a messages (with the forward button). |
| pending | The right to set a ticket to pending. |
| phone | The right to add a phonecall to a ticket. |
| responsible | The right to change the responsible agent for a ticket. |
Note
These permissions can be added by changing the System::Permission
Roles are a powerful feature to manage the access rights of many agents in a very simple and quick manner. They are particularly useful for large, complex support systems with a lot of agents, groups and queues. An example below explains when they should be used.
Suppose that you have a system with 100 agents, 90 of them with access to a single queue called "support" where all support requests are handled. The "support" queue contains multiple sub queues. The other 10 agents have permission to access all queues of the system. These 10 agents dispatch tickets, watch the raw queue and move spam messages into the "junk" queue.
The company now opens a new department that sells some products. Order request and acceptance, order confirmation, bills, etc. must be processed, and some of the company's agents are supposed to do this using OTRS. The different agents have to get access to the new queues that must be created.
Because it would take a long time to change the access rights for the individual agents manually, roles that define the different access levels can be created. The agents can then be added to one or more roles, with their access rights being modified automatically. If a new agent account is created, it is also possible to add this account to one or more roles.
Note
Roles are really useful when dealing with complex organizations and when maintaining larger OTRS installations. Proper care is advised though. Mixing Agent to Group with Agent to Role mappings can make for a complex access control scheme, that is difficult to understand and maintain. If you wish to use only roles and disable the Agents <-> Groups option in the Admin area, you can do so by modifying the Frontend::Module###AdminUserGroup in the SysConfig. Be aware that this won't remove already existing Agents to Group assignments!
You can access the role management section (see figure below) by clicking the Roles link on the Admin page.
Note
As with agent and groups, roles once created can be deactivated but not deleted. To deactivate, set the Valid option to invalid or invalid-temporarily.
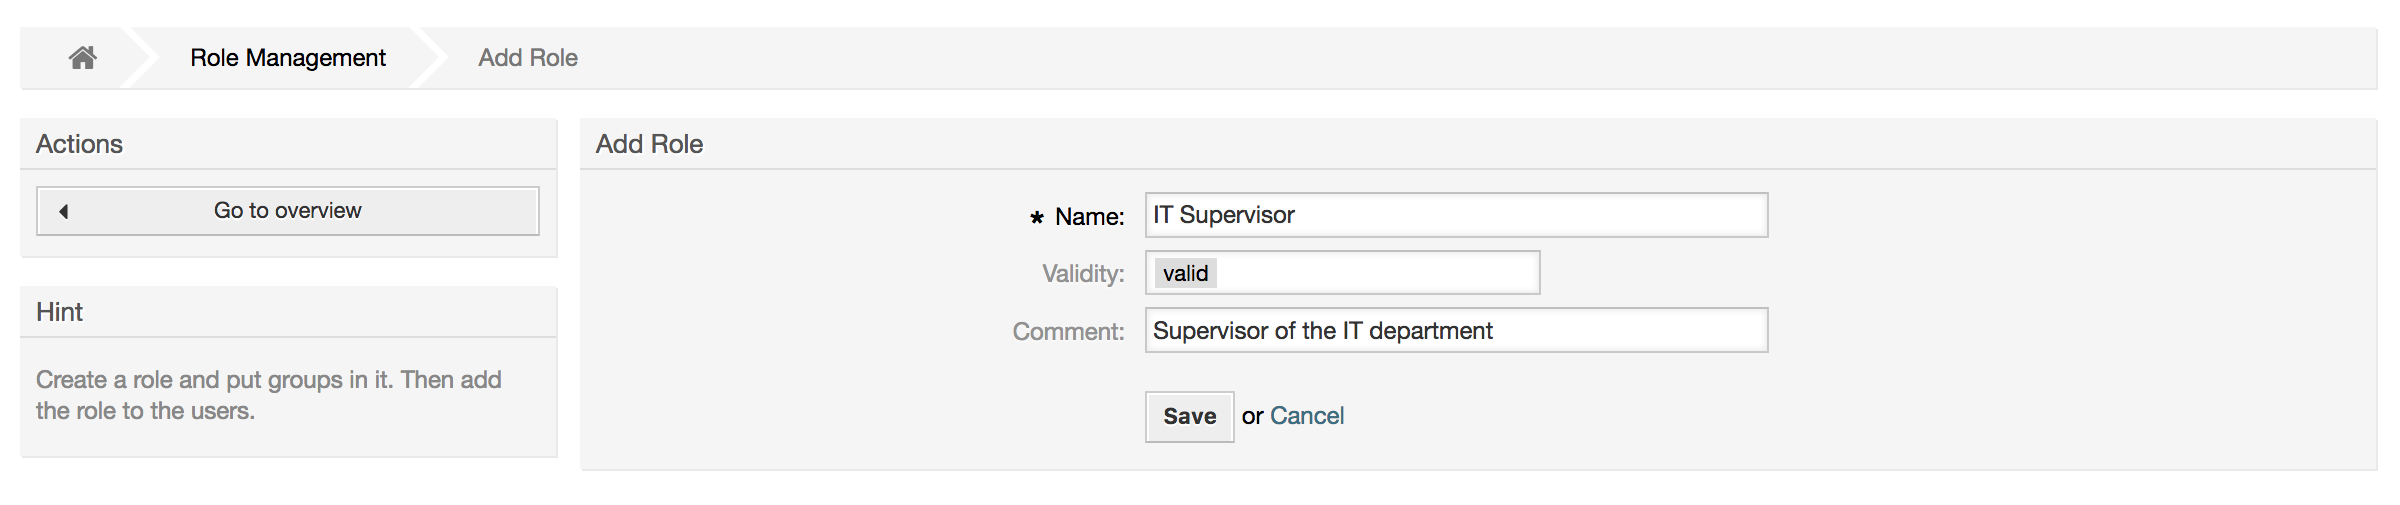
An overview of all roles in the system is displayed. To edit a role's settings, click on the role's name. In a fresh new OTRS installation, there are no roles defined by default. To register one, click on the Add role button, provide the needed data and submit it (see figure below).
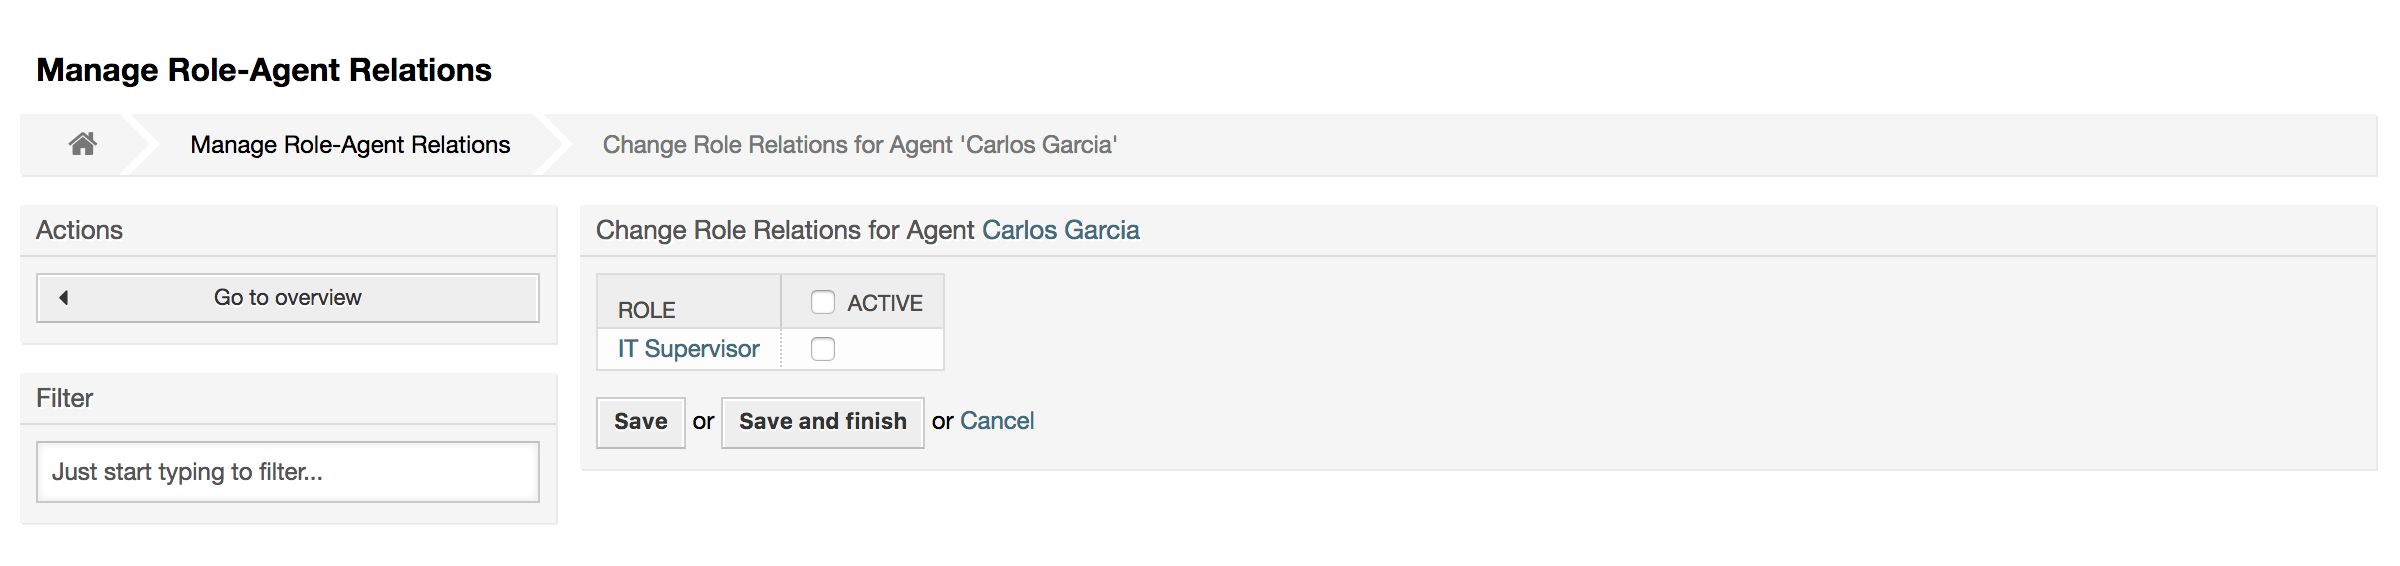
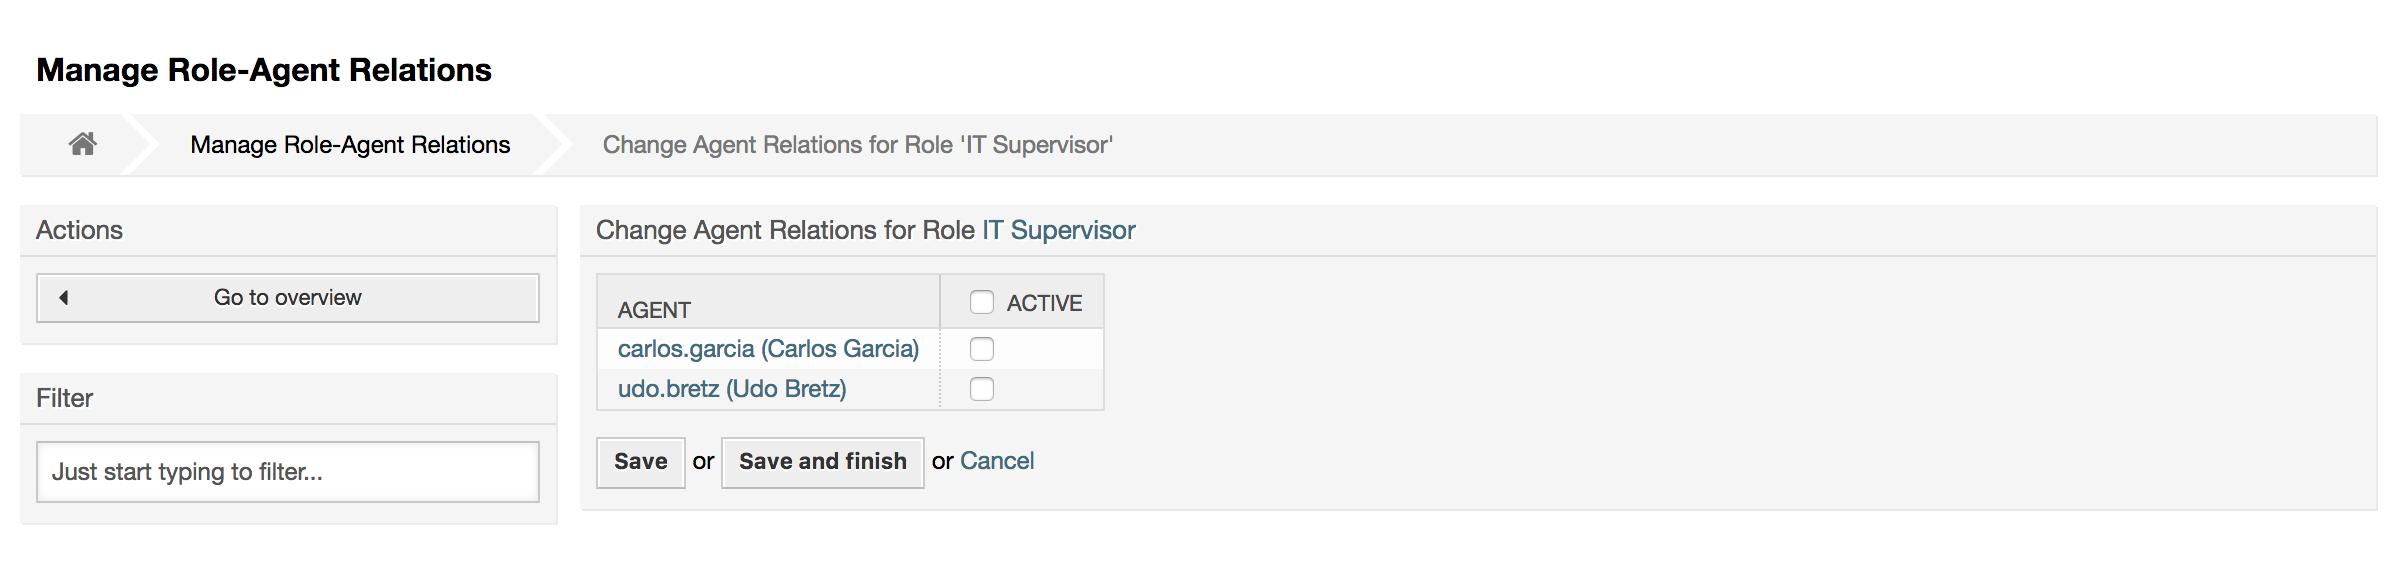
To get an overview of all roles and agents in the system, click on the link Roles <-> Agents on the Admin page. You can also use filters to find a specific element. If you want to change the roles associated with an agent, just click on the agent's name (see figure below). To change the agents associated with a role, click on the role you want to edit (see figure below).
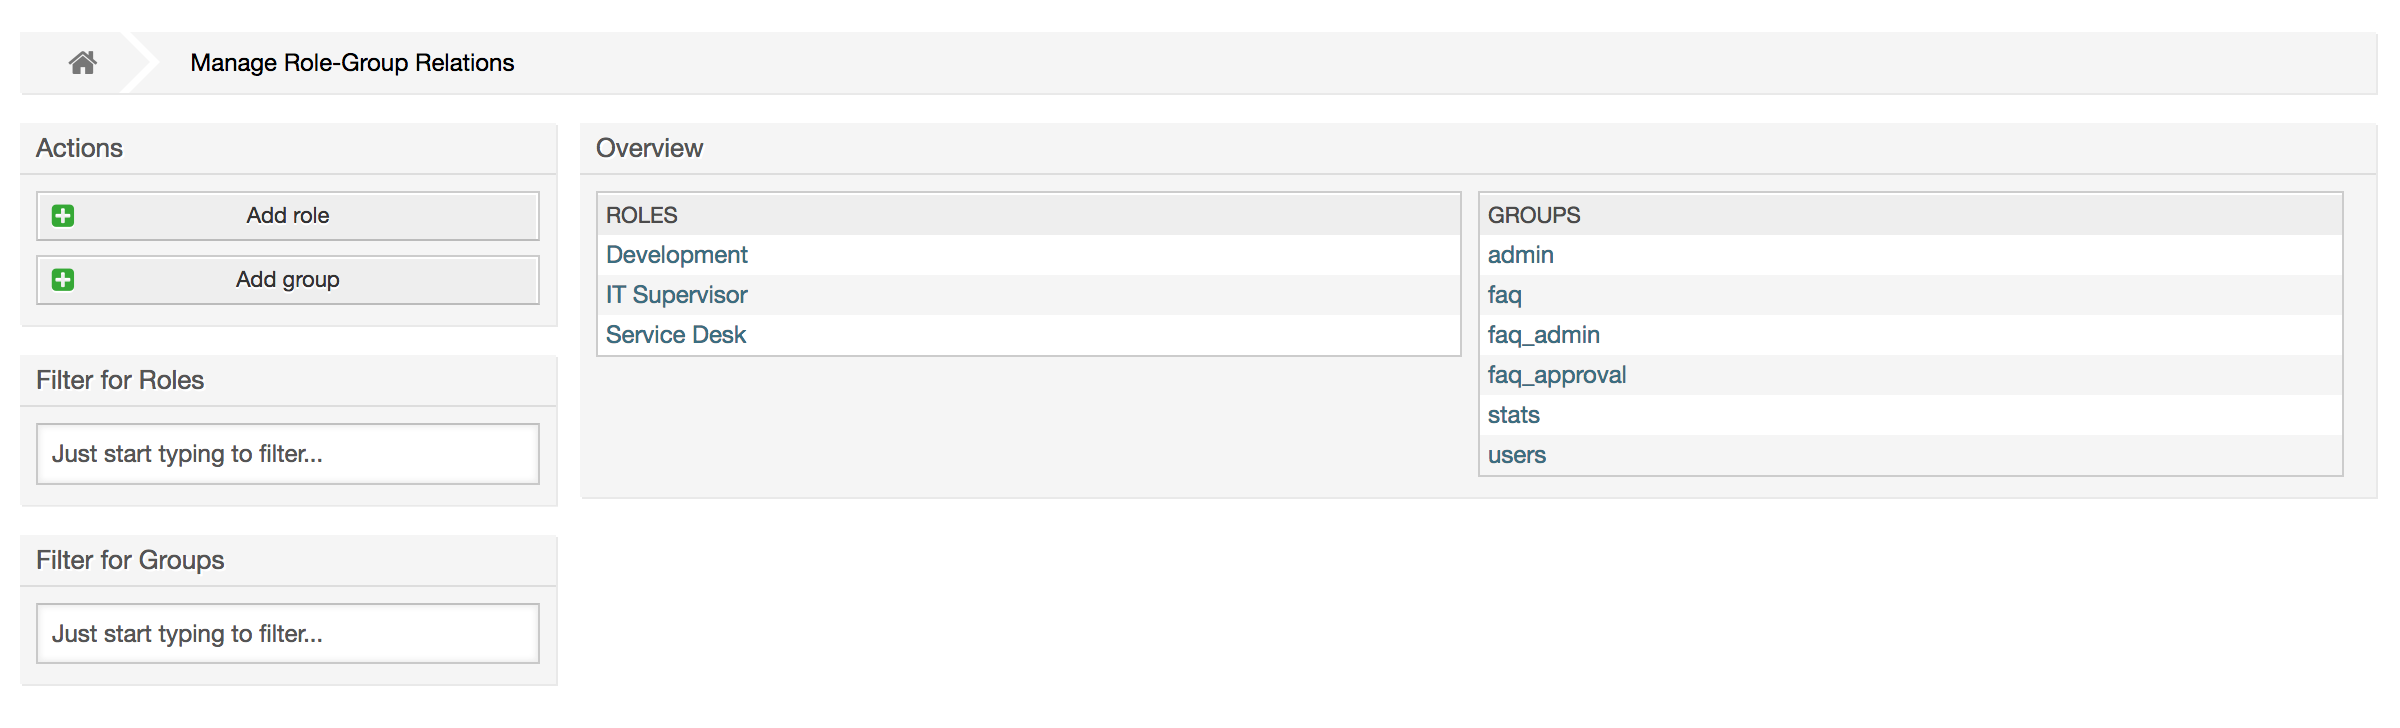
To get an overview of all roles and groups in the system, click on the link Roles <-> Groups on the Admin page. You will see a similar screen as the one shown in the Figure. You can also use filters to find a specific entity.
To define the different access rights for a role, click on the name of a role or a group (see below the Figures 4.13 and 4.14, respectively).
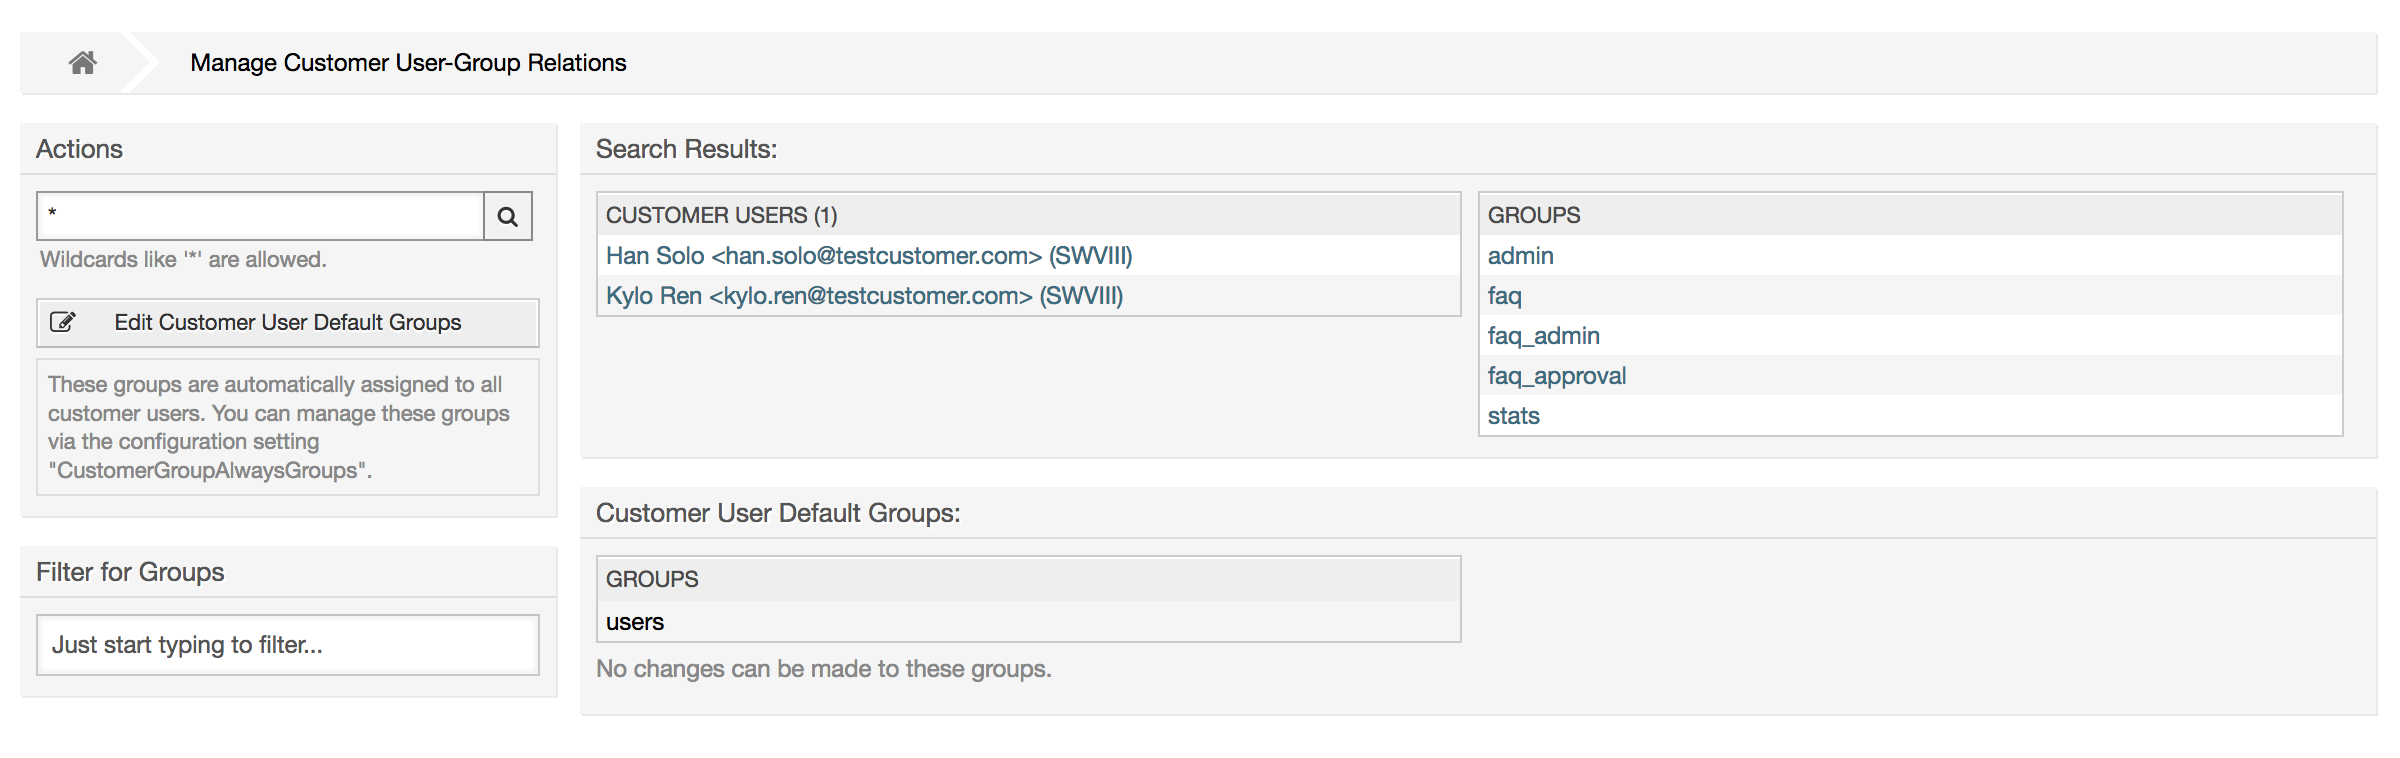
OTRS supports different types of users. Using the link Customer Users (via the navigation bar, or the Admin page), you can manage the accounts of your customer users (see figure below), who can log into the system via the Customer Users interface (customer.pl). Through this interface, your customers can not only create tickets but also review their past tickets for new updates. It is important to know that a customer user is needed for the ticket history in the system.
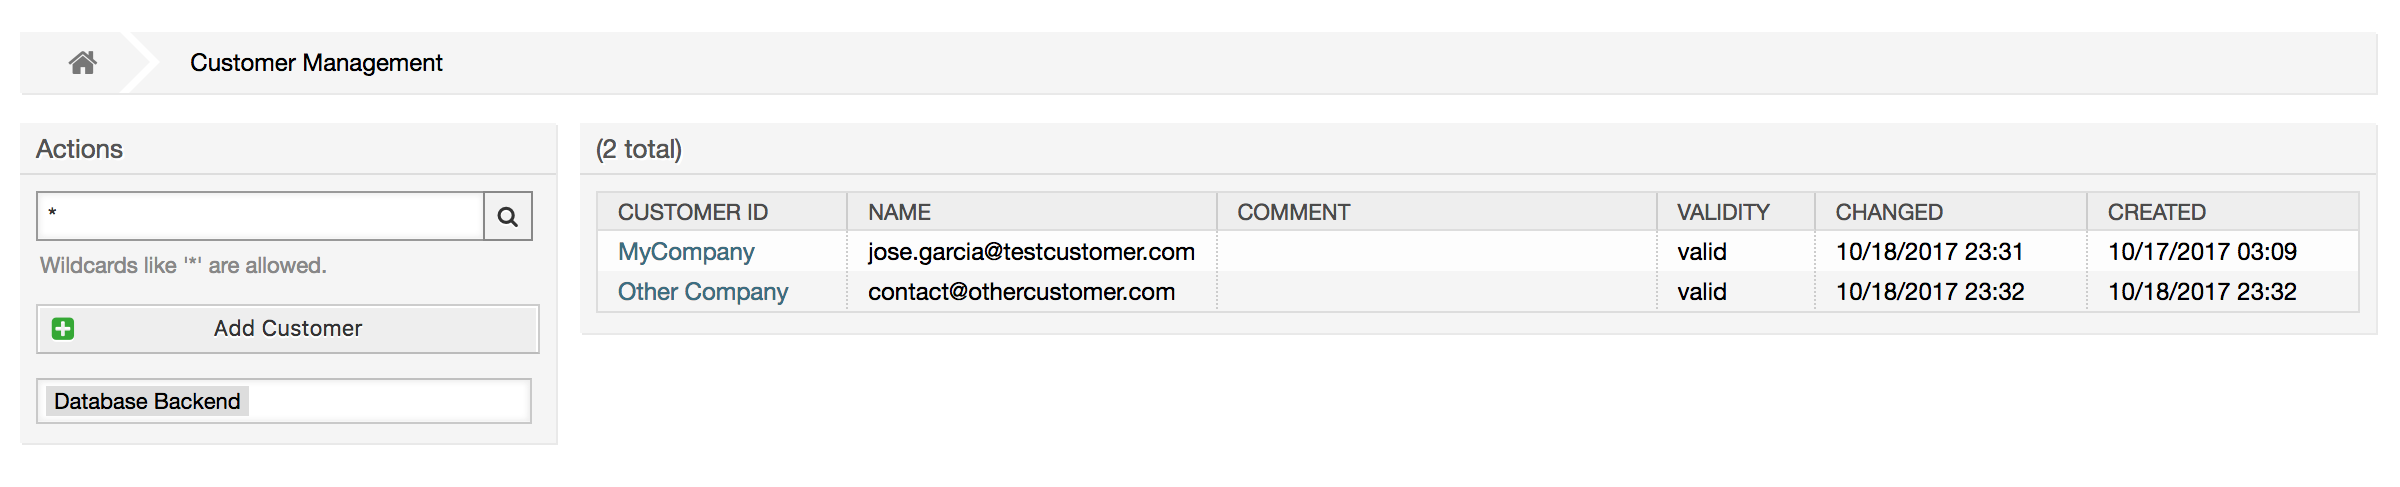
You can search for a registered customer user, or edit their settings by clicking on their name. You also have the possibility to change the customer back-end, for further information please refer to the chapter about external back-ends.
To create a new customer user account, click on the Add customer user button (see figure below). Some of the fields are mandatory, i.e., they have to contain values, so if you leave one of those empty, it will be highlighted in red.
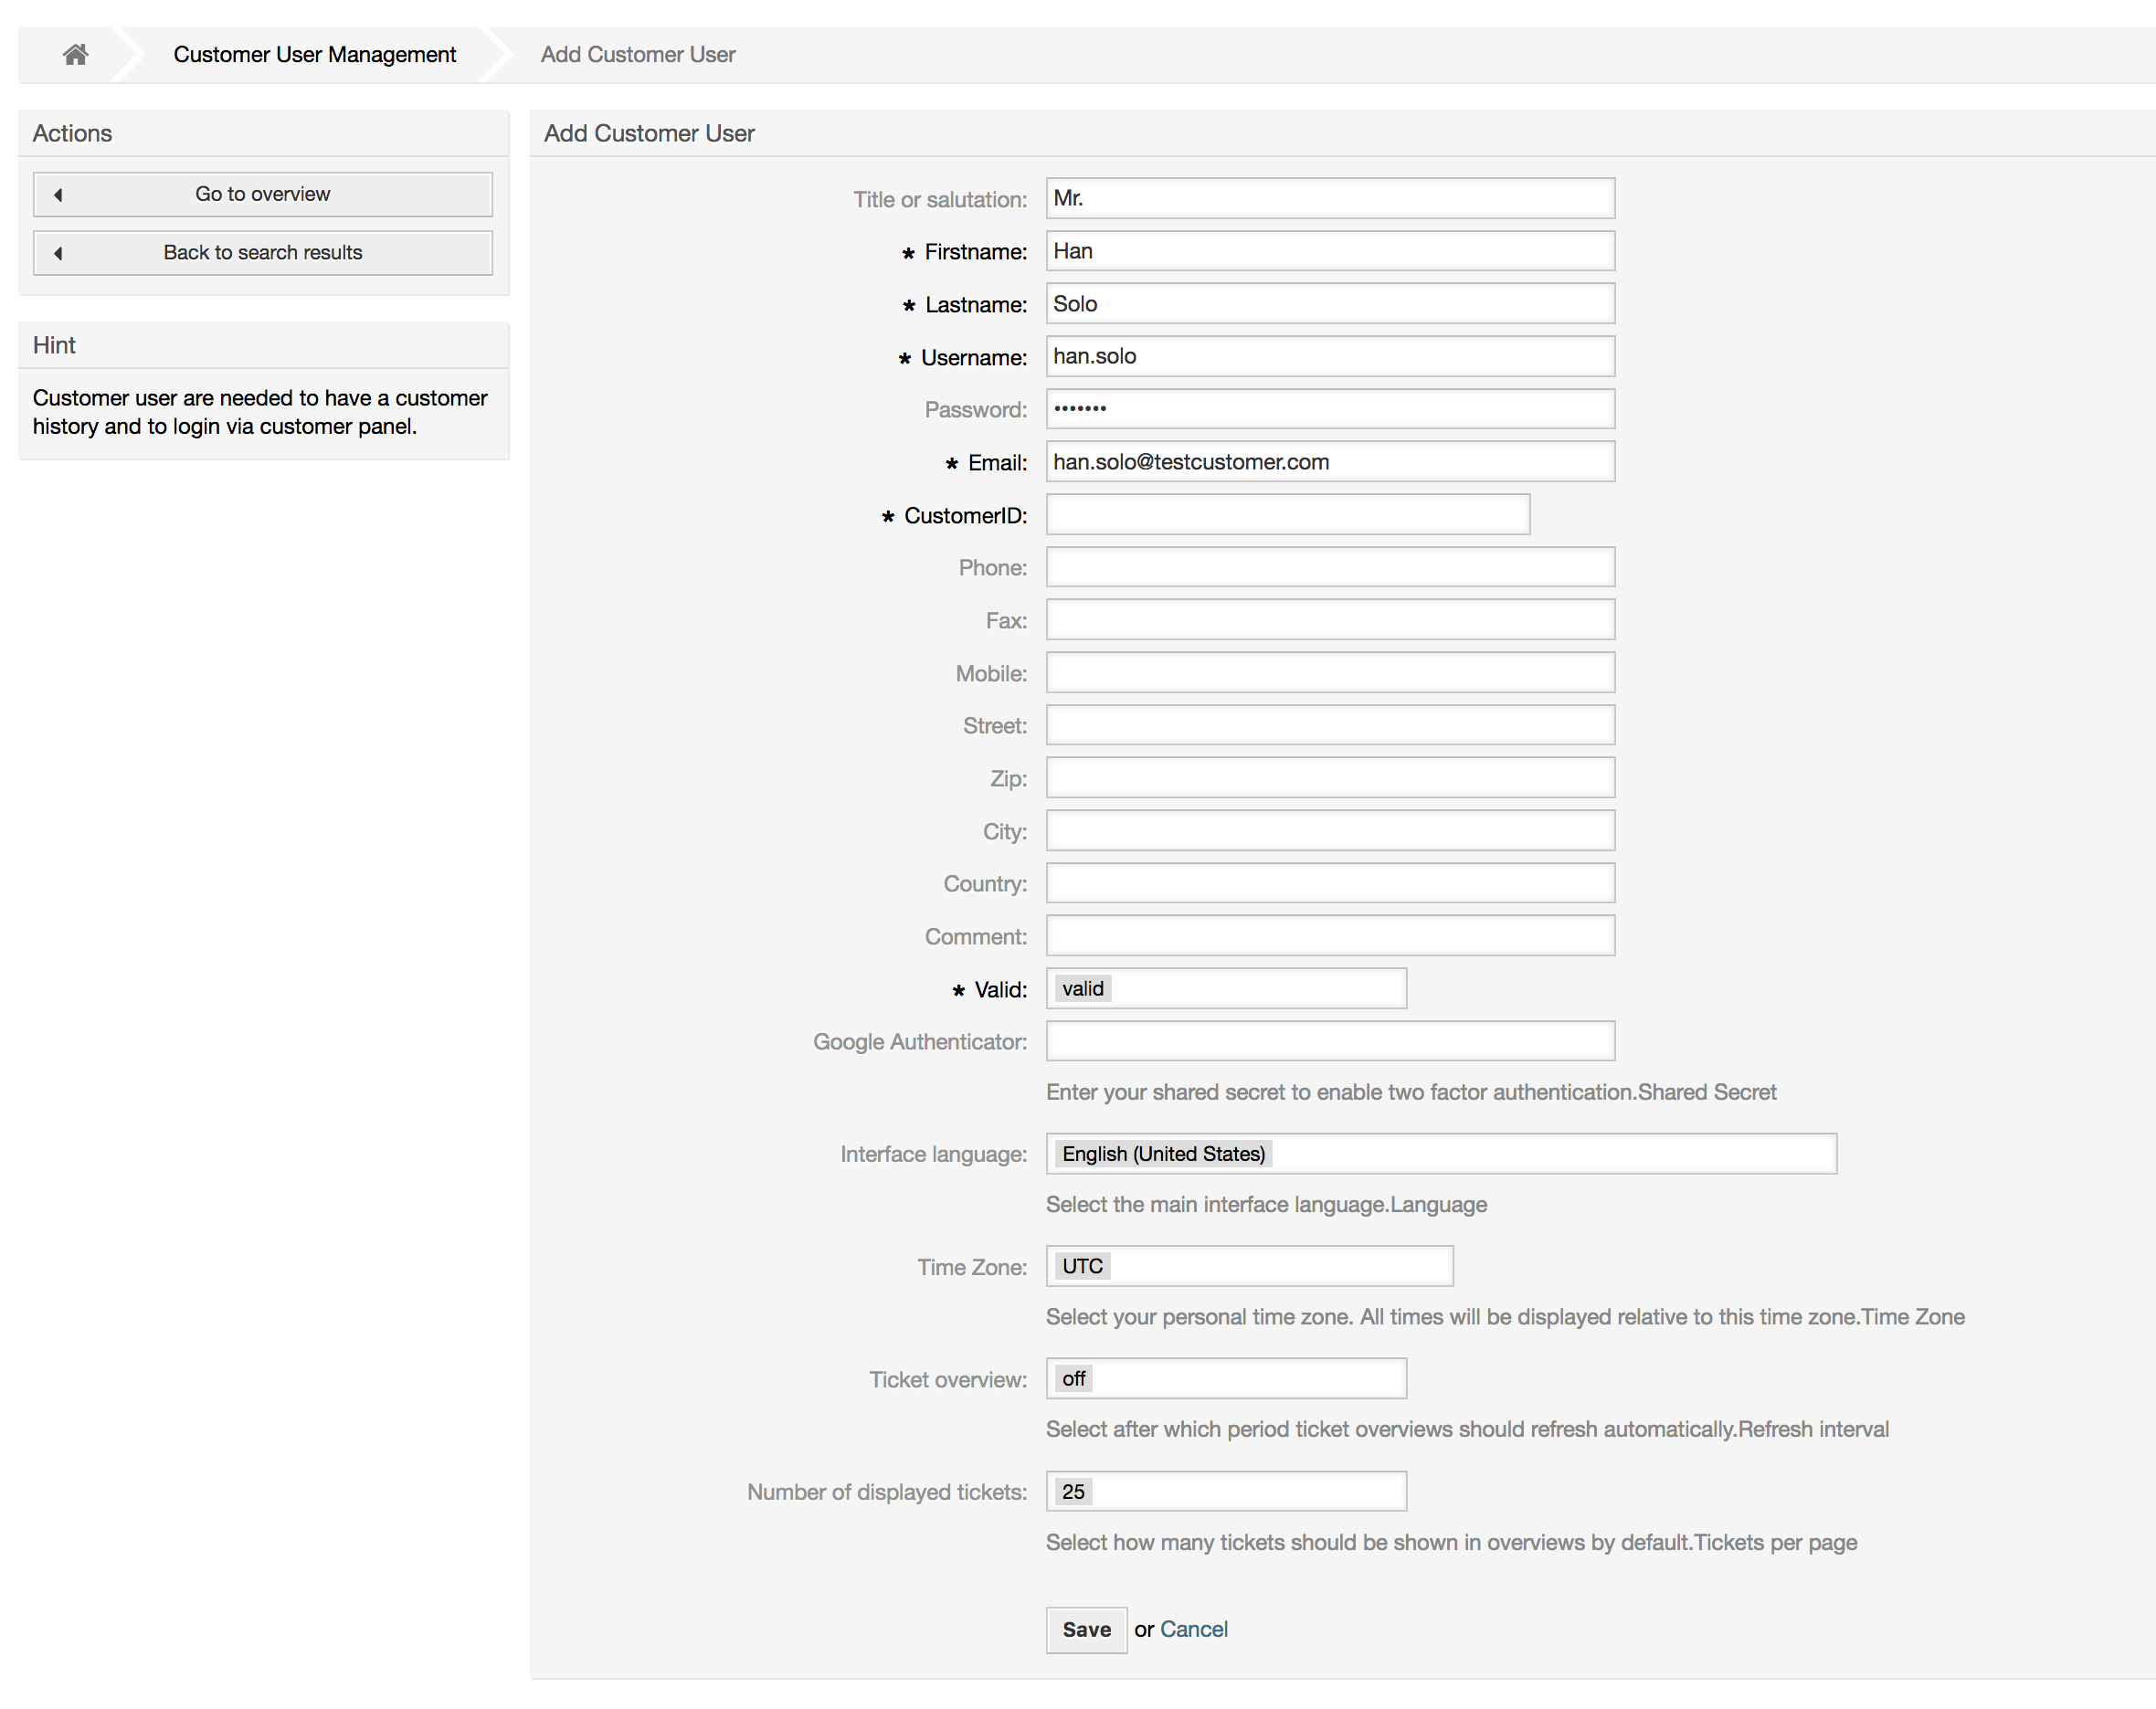
Customer Users can access the system by providing their username and password. The CustomerID is needed by the system to identify the user and associated tickets. Since the email address is a unique value, it can be used as the ID.
With the configuration parameter AdminCustomerUser::UseAutoComplete in the Admin SysConfig the autocomplete field can be activated for the customer ID selection in the customer user add or edit screen.
Note
As with agents, groups and roles, customer users can not be deleted from the system, only deactivated by setting the Valid option to invalid or invalid-temporarily.
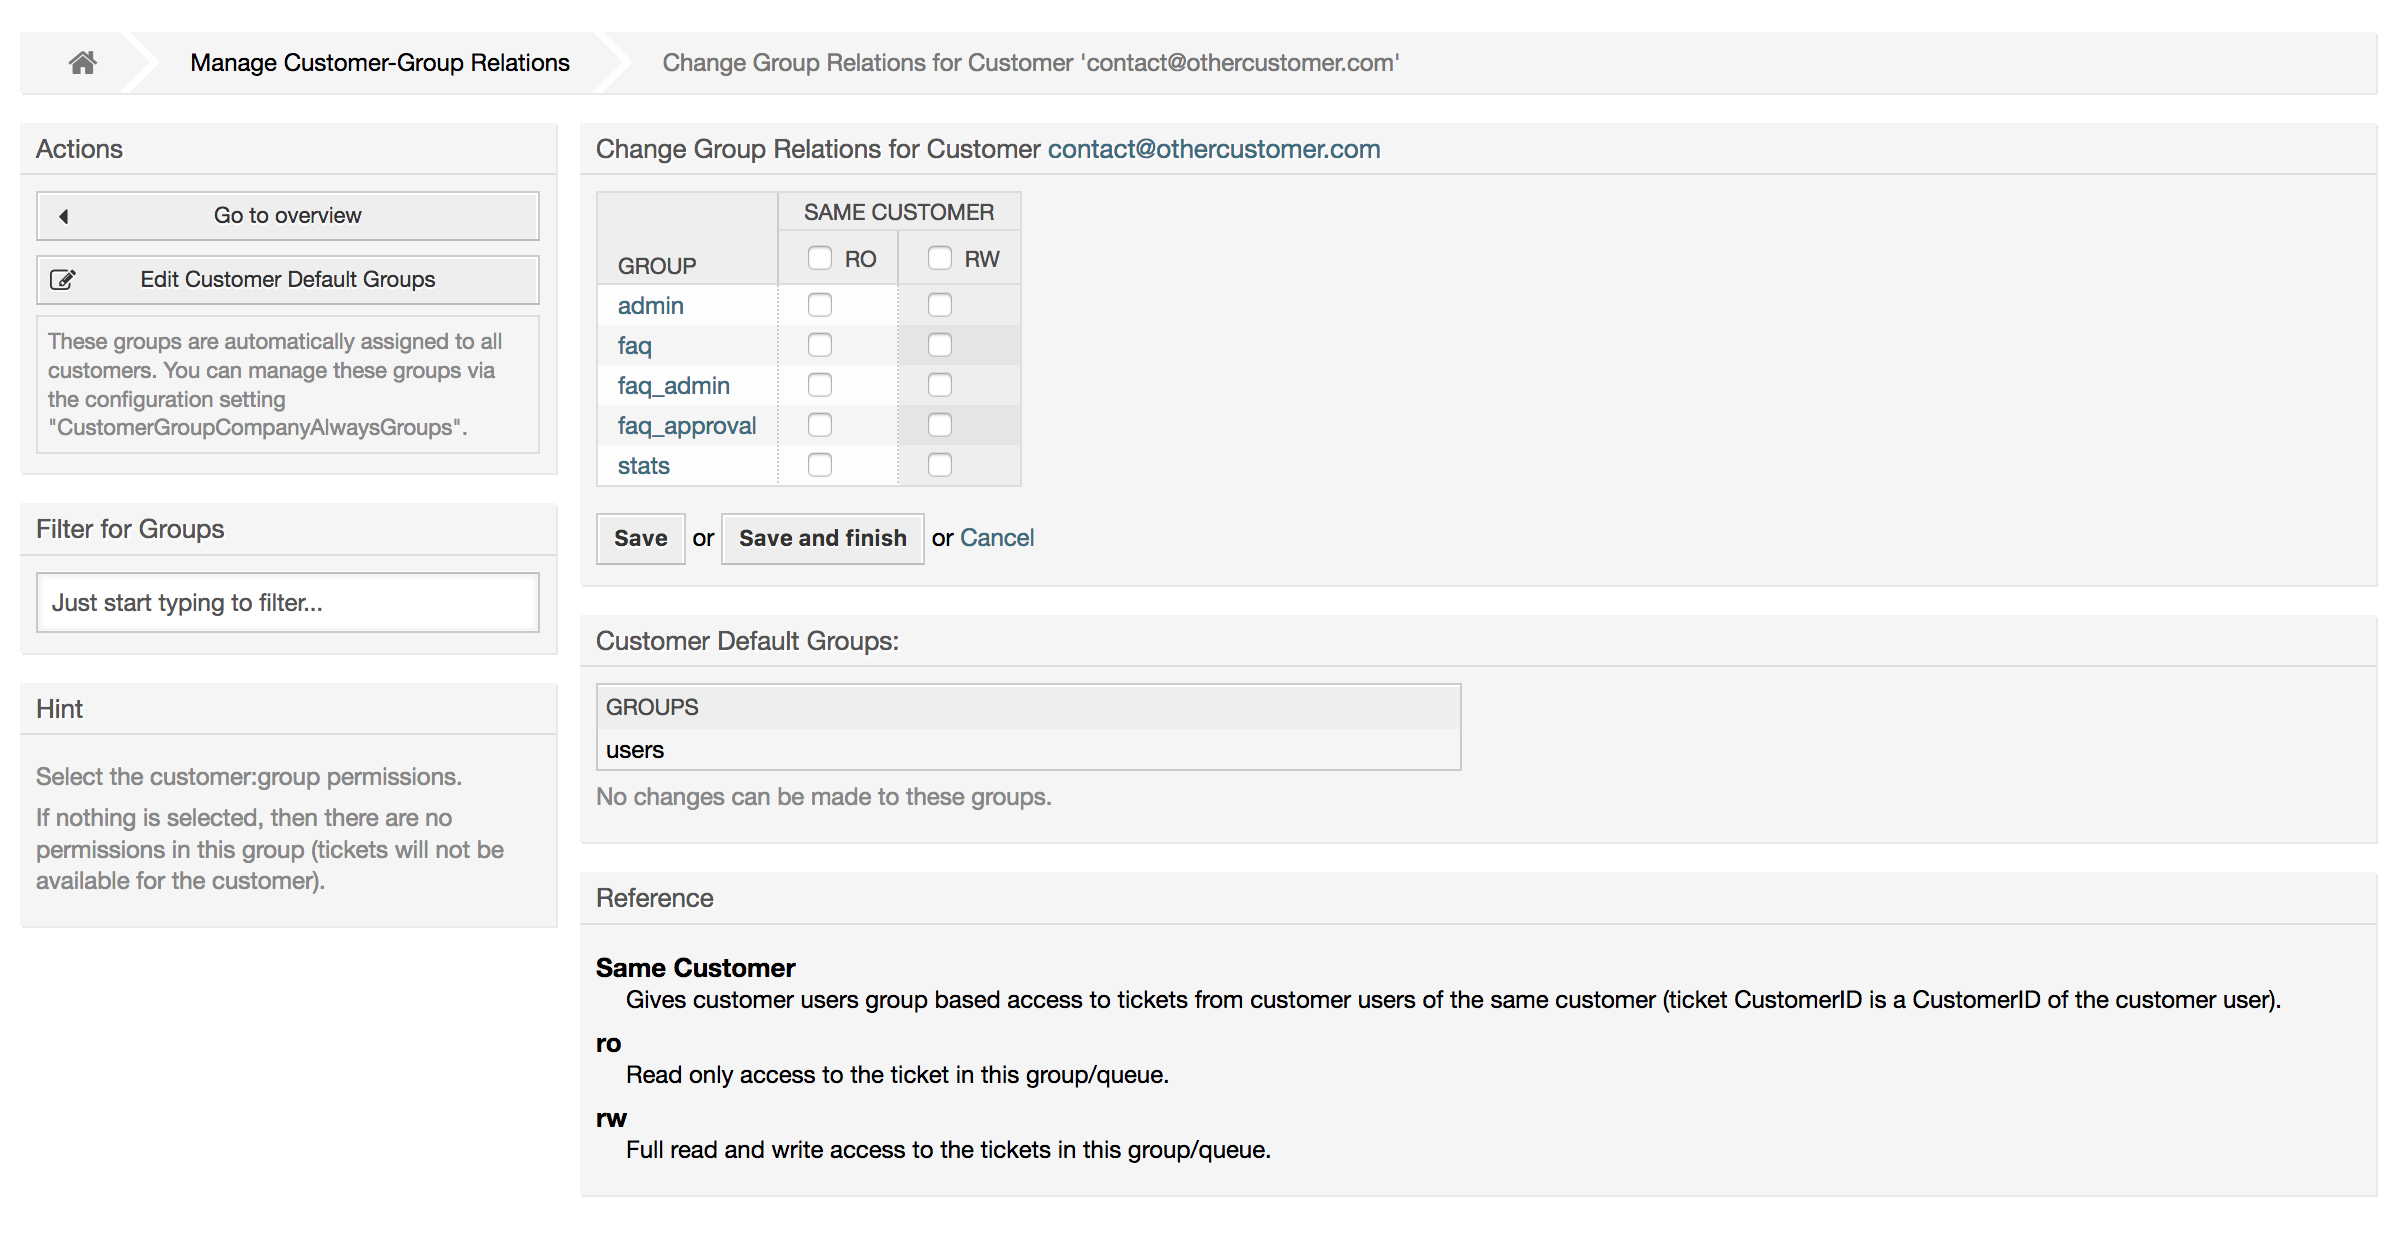
Customer users can be assigned to multiple customers (and vice-versa) using the link Customer Users ↔ Customers on the admin page. In addition to their own (primary) customer, they will be linked to any other customer for which there is a defined relation.
This gives them access to tickets of customer users from these customers.

Customer users can also be added to a group, which can be useful if you want to add customer users of the same company with access to one or a few queues. First create the group to which your customer users will belong, via the Group management module. Then add the queues and select the new group for the queues.
The next step is to activate the customer group support. This can be done with the configuration parameter CustomerGroupSupport, from the Admin SysConfig option. Using the parameter CustomerGroupAlwaysGroups, you can specify the default groups for a newly added customer user, so that every new account will be automatically added to these groups.
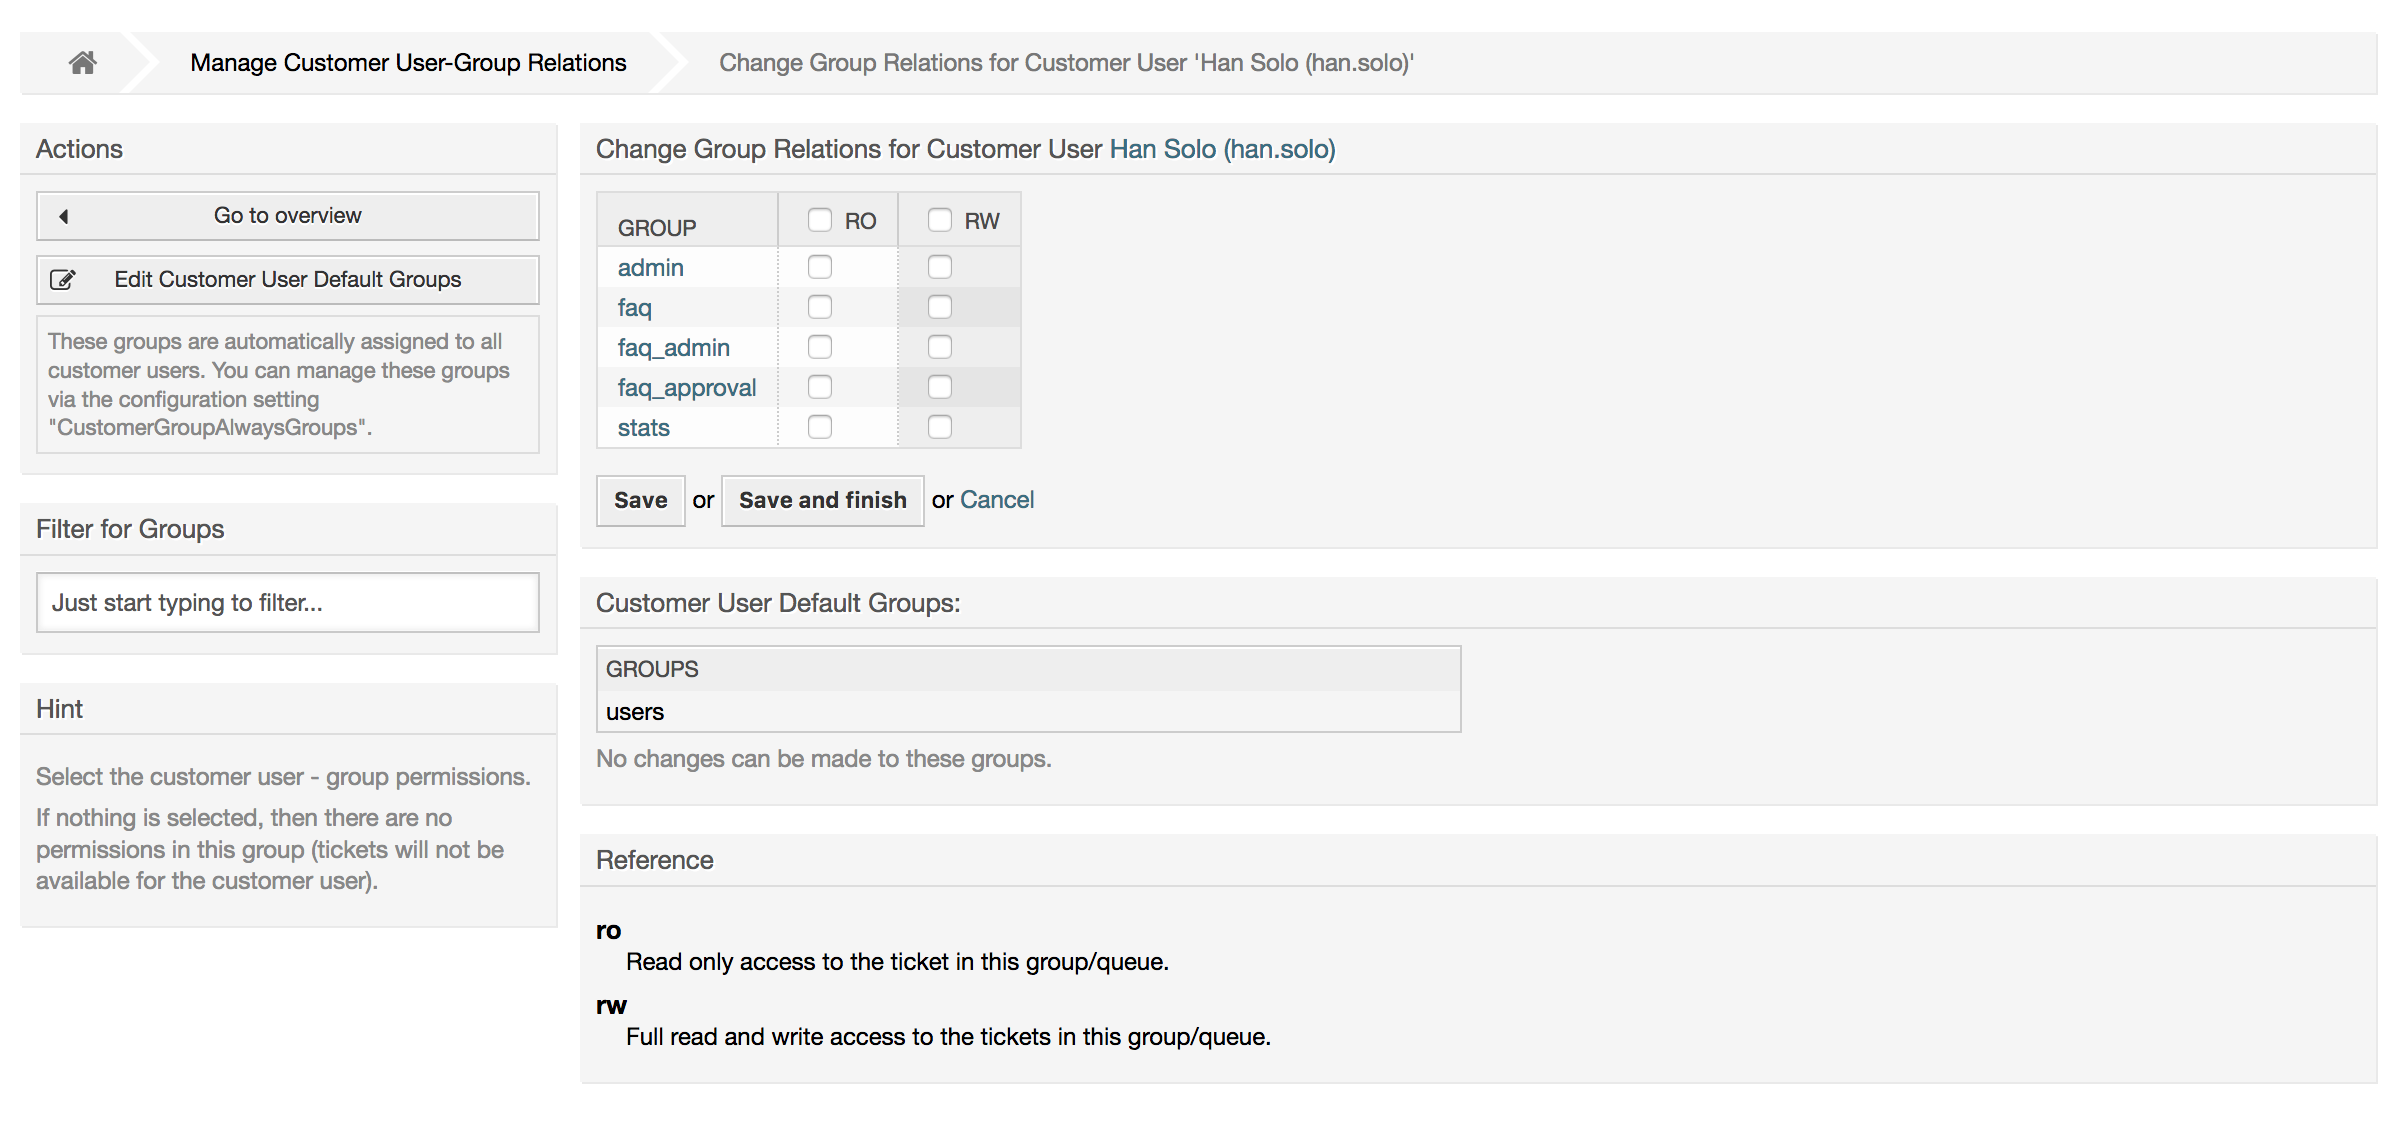
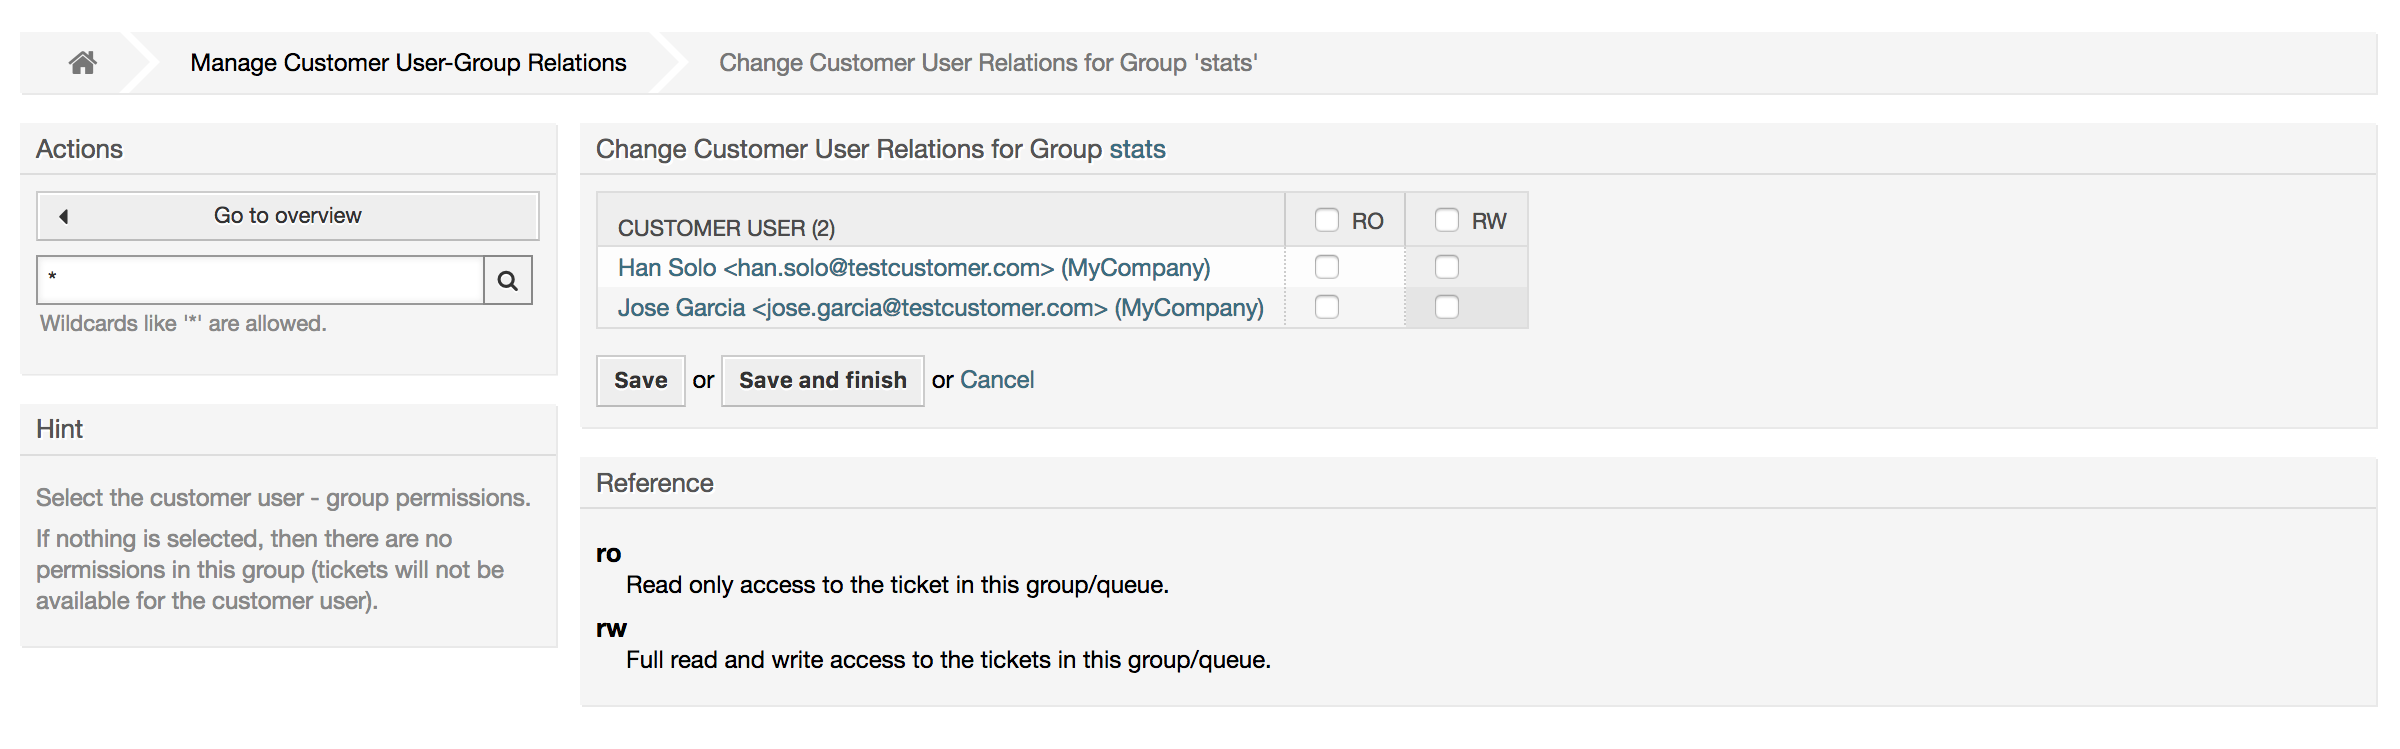
Through the link Customer Users ↔ Groups you can manage which customer shall belong to the different groups (see figure below).
To define the different groups a customer should be part of and vice versa, click on the corresponding customer username or group (see below the Figures 4.18 and 4.19, respectively).
Customers can also be added to a group, which can be useful if you don't want to add group relations to every single customer user. First create the group to which your customers will belong, via the Group management module. Then add the queues and select the new group for the queues.
The next step is to activate the customer group support. This can be done with the configuration parameter CustomerGroupSupport, from the Admin SysConfig option. Using the parameter CustomerGroupAlwaysGroups, you can specify the default groups for a newly added customers, so that every new customer will be automatically added to these groups. Available permission levels can be changed via configuration.
Assigned permissions will be shared among all customer users of this customer, so permissions don't have to be given individually to every customer user (although this is still possible if required).
Different contexts of permission assignment are available, which will determine how the permissions are inherited by customer users.
The following contexts are available:
Same Customer
Group permissions will be inherited by all customer users of this customer. This provides them with access to tickets of all customer users from the this customer if they are located in a queue that's assigned to this group.
Other Customers
Group permissions will be inherited by all customer users of this customer. This provides them with access to tickets of all customer users from other customers if they are located in a queue that's assigned to this group and if the other customer also has permissions to this group.
Access is limited to the level the customer user of a ticket has.
Through the link Customers ↔ Groups you can manage which customer shall belong to the different groups (see figure below).
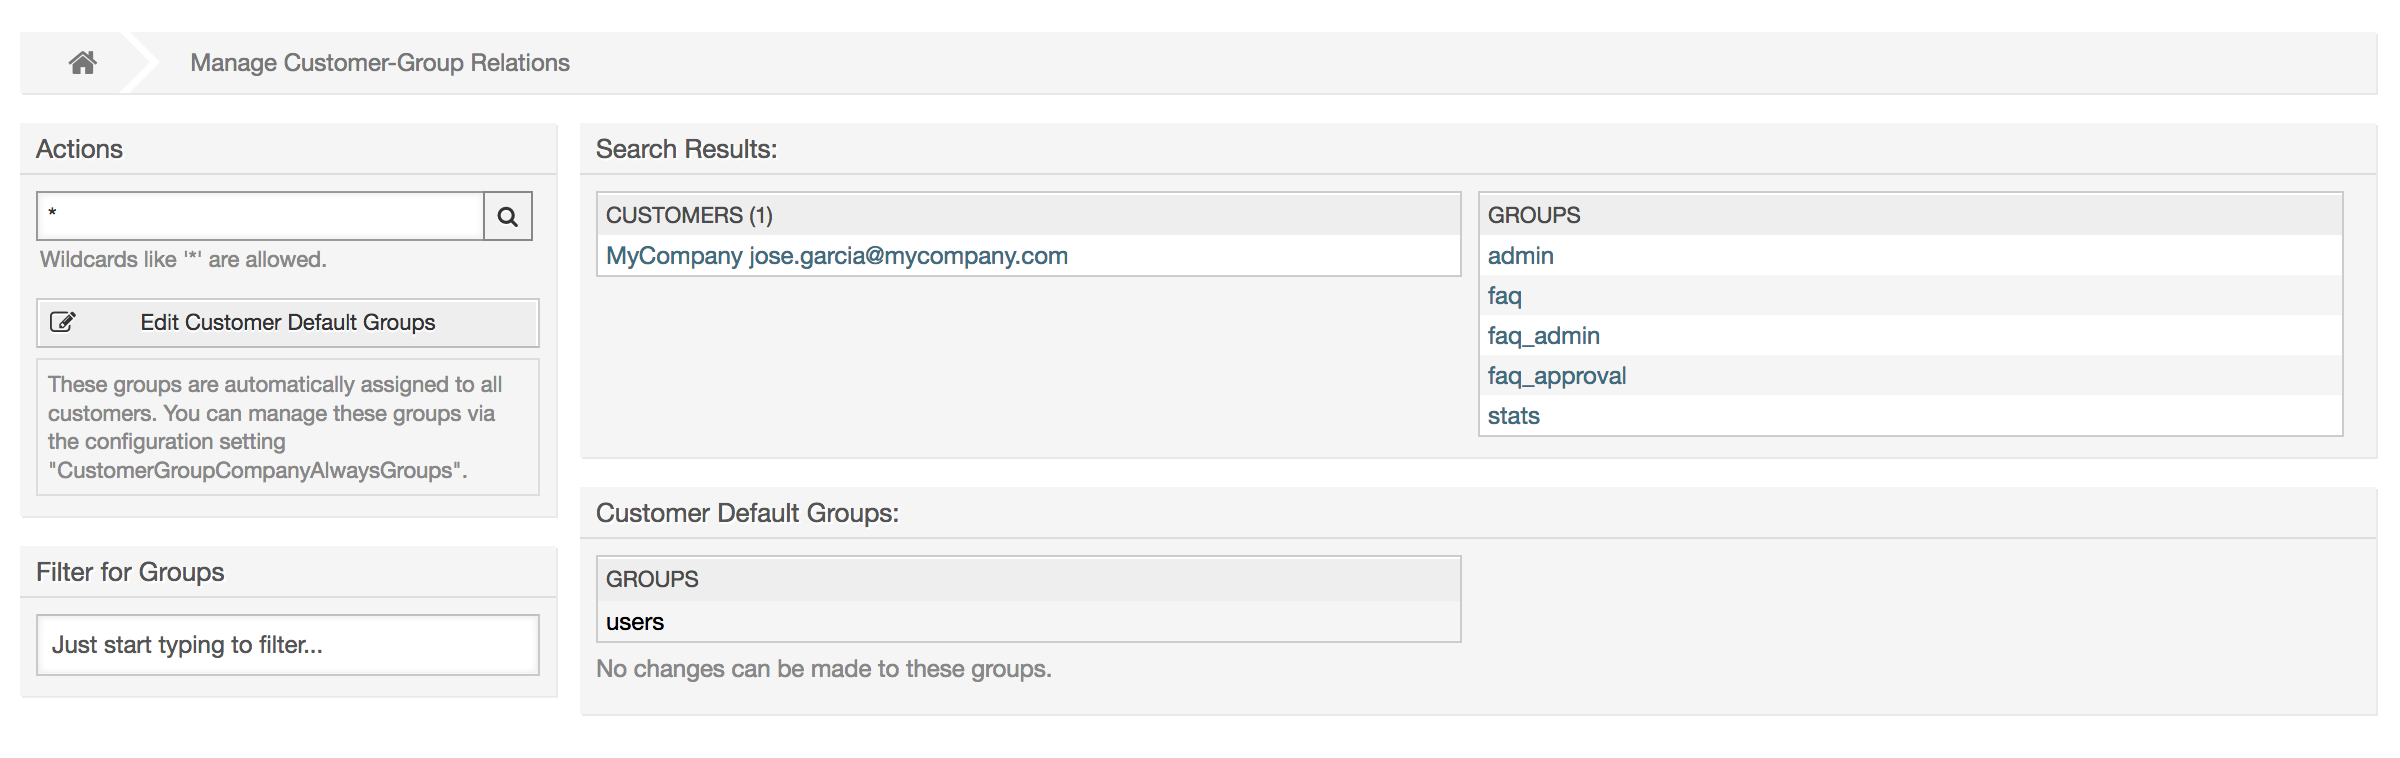
To define the different groups a customer should be part of and vice versa, click on the corresponding customer username or group (see below the Figures 4.18 and 4.19, respectively).
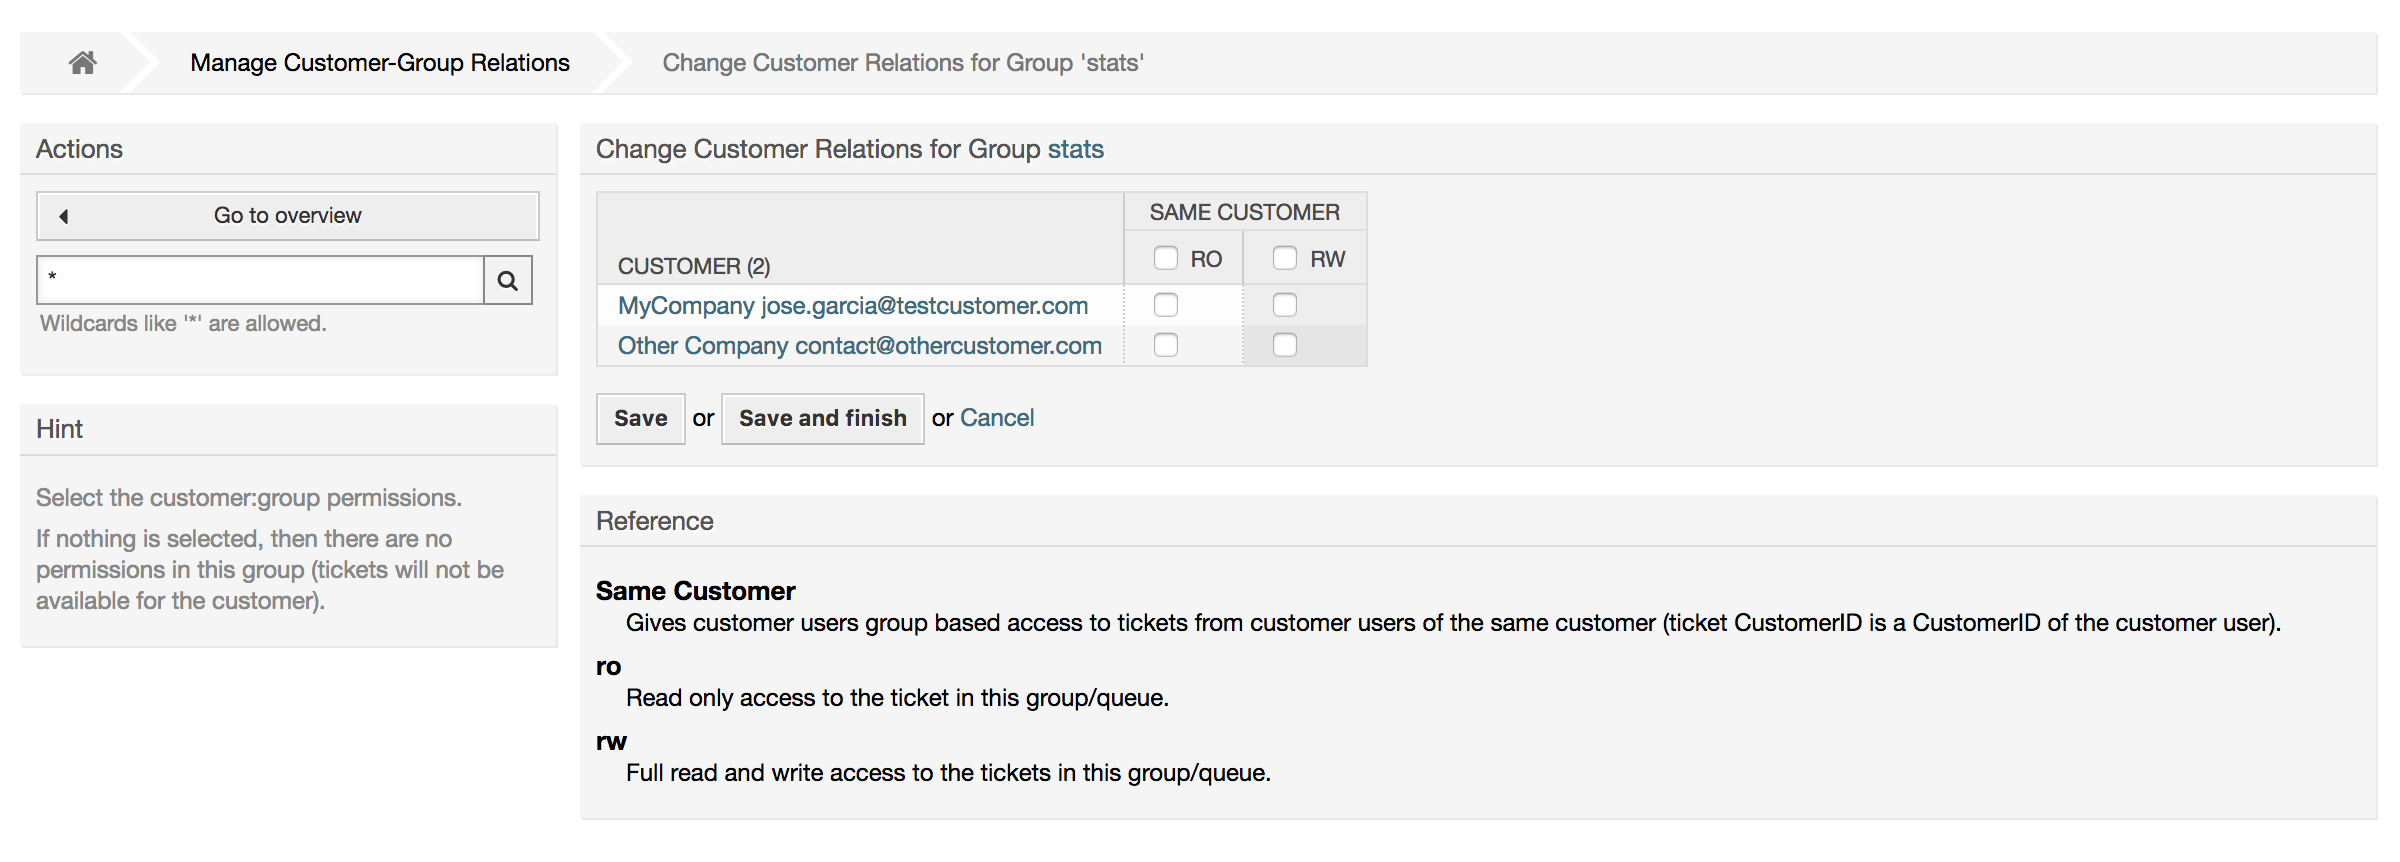
Access to tickets on the customer interface with enabled group support is mostly evaluated by a combination of group and individual (customer/customer user based) permission. Only if both criteria are met, specific access is granted.
If the resulting access is rw, a customer user can view and modify a ticket, if the access is ro only viewing is possible.
For ticket creation only the group permissions are used and a customer user can create
tickets for all queues with rw permissions (unless restricted otherwise, e.g. ACL or
CustomerPanelOwnSelection).
Group permissions are additive (meaning that only one method needs to grant permissions) and the following possibilities are taken into account:
Customer user default groups via SysConfig setting
Groups assigned to the customer user via Customer Users ↔ Customers admin frontend
Customer default groups via SysConfig setting
Groups assigned to the customer via Customers ↔ Groups admin frontend
For the methods above, all customers related to a customer user are used. This includes the 'primary' customer (selected in Customer User admin frontend), additional customers (added in Customer Users ↔ Customers admin frontend) and other customer that might exist in the backend.
Individual permission checks require one of the following conditions to be met:
Ticket is assigned to the customer user
Ticket is assigned to a customer that the customer user is related to (as explained above)
Ticket is assigned to a customer with group permissions for the ticket queue while a customer related to the customer user has Other Customers permission to the same group
An example for the last item to clarify the functionality:
Ticket is assigned to customer user 'Arvid Karlsson' with related customer 'Ericsson AB'
Ticket is located in queue 'Support Sweden'
Queue 'Support Sweden' is in group 'support-se'
Customer 'Ericsson AB' has 'Same Customer' context 'rw' permission to group 'support-se'
Logged in customer user is 'Barry Smith' which is related to customer 'Farmers Inc.'
Customer 'Farmers Inc.' has 'Same Customer' context 'ro' permission to group 'support-se'
Now, if Customer 'Farmers Inc.' is given 'Other Customers' context 'ro' permission to group 'support-se', Barry Smith will be able to view the ticket
In order for Barry to modify the ticket, 'rw' permission is required for both 'Same Customer' and 'Other Customers' context
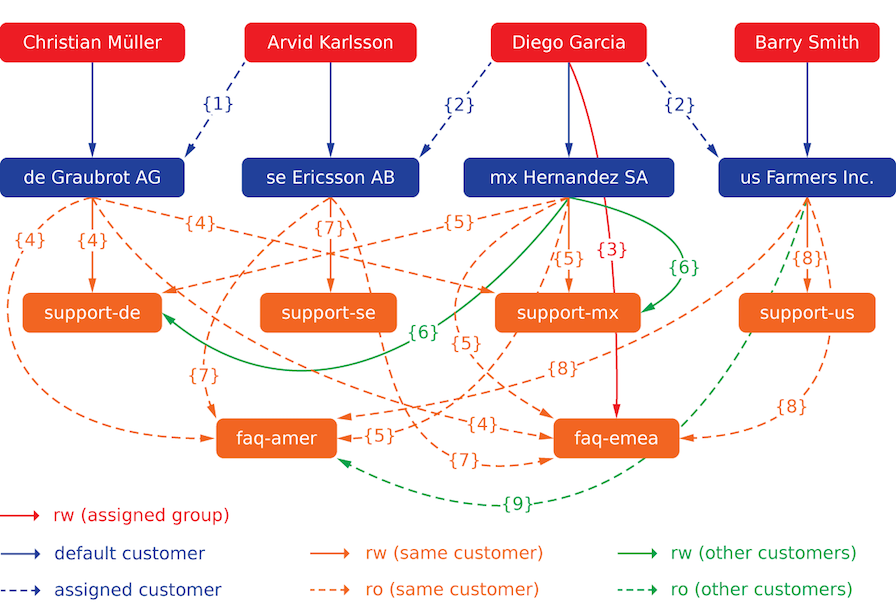
In this example we will create a multi-tier customer structure with resulting ticket permissions. To get the same results you will need a relatively clean system without many customizations.
First, create following customers through 'Admin → Customers' frontend:
CustomerID: de, Customer: Graubrot AG
CustomerID: mx, Customer: Hernandez SA
CustomerID: se, Customer: Ericsson AB
CustomerID: us, Customer: Farmers Inc.
Next, create the following customer users through Admin → Customer Users frontend and assign them to the already created customers. Use any valid email addresses for Email field.
Firstname: Arvid, Lastname: Karlsson, Username: ak, CustomerID: Ericsson AB
Firstname: Barry, Lastname: Smith, Username: bs, CustomerID: Farmers Inc.
Firstname: Christian, Lastname: Müller, Username: cm, CustomerID: Graubrot AG
Firstname: Diego, Lastname: Garcia, Username: dg, CustomerID: Hernandez SA
Then, go to 'Admin → Groups' frontend and add the following as new groups:
faq-amer
faq-emea
support-de
support-mx
support-se
support-us
Then, go to Admin → Queues and add corresponding queues which will use previously created groups. For the System address you can use any available.
Name: FAQ Germany, Group: faq-emea
Name: FAQ Mexico, Group: faq-amer
Name: FAQ Sweden, Group: faq-emea
Name: FAQ USA, Group: faq-amer
Name: Support Germany, Group: support-de
Name: Support Mexico, Group: support-mx
Name: Support Sweden, Group: support-se
Name: Support USA, Group: support-us
Go to Admin → Customer Users ↔ Customers frontend and assign customer users to other customers.
Arvid Karlsson
de Graubrot AG → active {1}
Diego Garcia
se Ericsson AB, us Farmers Inc. → active {2}
Additionally, go to Admin → Customer Users ↔ Groups frontend and assign a single customer user direct access to a group.
Diego Garcia
faq-emea → rw {3}
Now, go to Admin → Customers ↔ Groups frontend and assign customers to groups according to the matrix below. Be sure to select proper permission level for each group and company.
de Graubrot AG
Same Customer {4}
faq-amer → ro
faq-emea → ro
support-de → rw
support-mx → ro
mx Hernandex SA
Same Customer {5}
faq-amer → ro
faq-emea → ro
support-de → ro
support-mx → rw
Other Customers {6}
support-de → rw (this is intentional to demonstrate limitation to base permissions)
support-mx → rw
se Ericsson AB
Same Customer {7}
faq-amer → ro
faq-emea → ro
support-se → rw
us Farmers Inc.
Same Customer {8}
faq-amer → ro
faq-emea → ro
support-us → rw
Other Customers {9}
faq-amer → ro
For reference, please consult image below where all relationships are drawn as lines:
Finally, let's create some tickets. Go to New phone ticket frontend and create tickets, one each per customer user and queue (32 in total). By the way, this is possible in the agent frontend as the customer group restrictions are only active on the customer frontend.
For checking resulting access to the tickets, you can easily switch between the customer
users by activating SwitchToCustomer option in SysConfig. Then just
go to Admin → Customer Users and click on corresponding
Switch to customer link next to the user's name.
You will be immediately logged in as that customer user and you can visit Tickets → Company Tickets screen for checking the ticket access. It should conform to the matrix below. Click on a ticket to check if corresponding permission level is honored: for ro permission level you should not see the Reply button.
This is the expected result for each customer user. The marker '{0}' refers to the location above where the corresponding setting was taken (this shows why the access is granted).
Resulting access for customer user Arvid Karlsson
Queue FAQ Germany: ro (via {7}) + Christian's Tickets ro (via {1})
Queue FAQ Mexico: ro (via {7}) + Christian's Tickets ro (via {1})
Queue FAQ Sweden: ro (via {7}) + Christian's Tickets ro (via {1})
Queue FAQ USA: ro (via {7}) + Christian's Tickets ro (via {1})
Queue Support Germany: rw (via {1→6}) + Christian's Tickets rw (via {1})
Queue Support Mexico: -
Queue Support Sweden: rw (via {7}) + Christian's Tickets rw (via {1})
Queue Support USA: -
Resulting access for customer user Barry Smith
Queue FAQ Germany: ro (via {8})
Queue FAQ Mexico: ro (via {8}) + Arvid's, Christian's, Diego's Tickets ro (via {9})
Queue FAQ Sweden: ro (via {8})
Queue FAQ USA: ro (via {8}) + Arvid's, Christian's, Diego's Tickets ro (via {9})
Queue Support Germany: -
Queue Support Mexico: -
Queue Support Sweden: -
Queue Support USA: rw (via {8})
Resulting access for customer user Christian Müller
Queue FAQ Germany: ro (via {4})
Queue FAQ Mexico: ro (via {4})
Queue FAQ Sweden: ro (via {4})
Queue FAQ USA: ro (via {4})
Queue Support Germany: rw (via {4})
Queue Support Mexico: ro (via {4})
Queue Support Sweden: -
Queue Support USA: -
Resulting access for customer user Diego Garcia
Queue FAQ Germany: rw (via {3}) + Arvid's, Barry's Tickets rw (via {2})
Queue FAQ Mexico: ro (via {5}) + Arvid's, Barry's Tickets ro (via {2}) + Christian's Tickets ro (via {2→9})
Queue FAQ Sweden: rw (via {3}) + Arvid's, Barry's Tickets rw (via {2})
Queue FAQ USA: ro (via {5}) + Arvid's, Barry's Tickets ro (via {2}) + Christian's Tickets ro (via {2→9})
Queue Support Germany: ro (via {5}) + Arvid's, Barry's Tickets ro (via {2}) + Christian's Tickets ro (via {6})
Queue Support Mexico: rw (via {5}) + Arvid's, Barry's Tickets rw (via {2}) + Christian's Tickets rw (via {6})
Queue Support Sweden: rw (via {2→4}) + Arvid's, Barry's Tickets rw (via {2})
Queue Support USA: rw (via {2→5}) + Arvid's, Barry's Tickets rw (via {2})
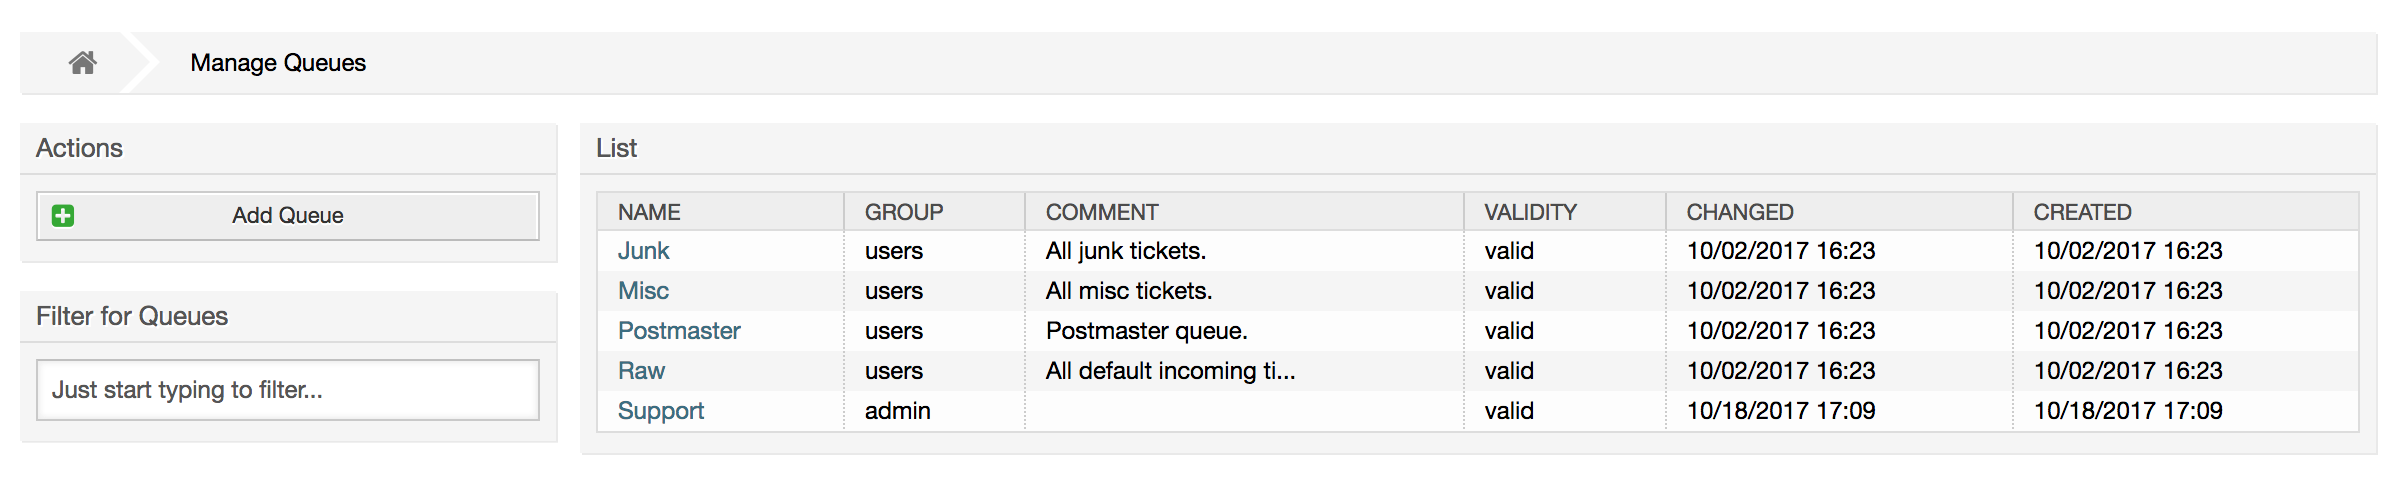
Clicking on the link "Queues" of the Admin page, you can manage the queues of your system (see figure below). In a new OTRS installation there are 4 default queues: Raw, Junk, Misc and Postmaster. All incoming messages will be stored in the "Raw" queue if no filter rules are defined. The "Junk" queue can be used to store spam messages.
Here you can add queues (see figure below) and modify them. You can specify the group that should use the queue. You can also set the queue as a sub-queue of an existing queue.
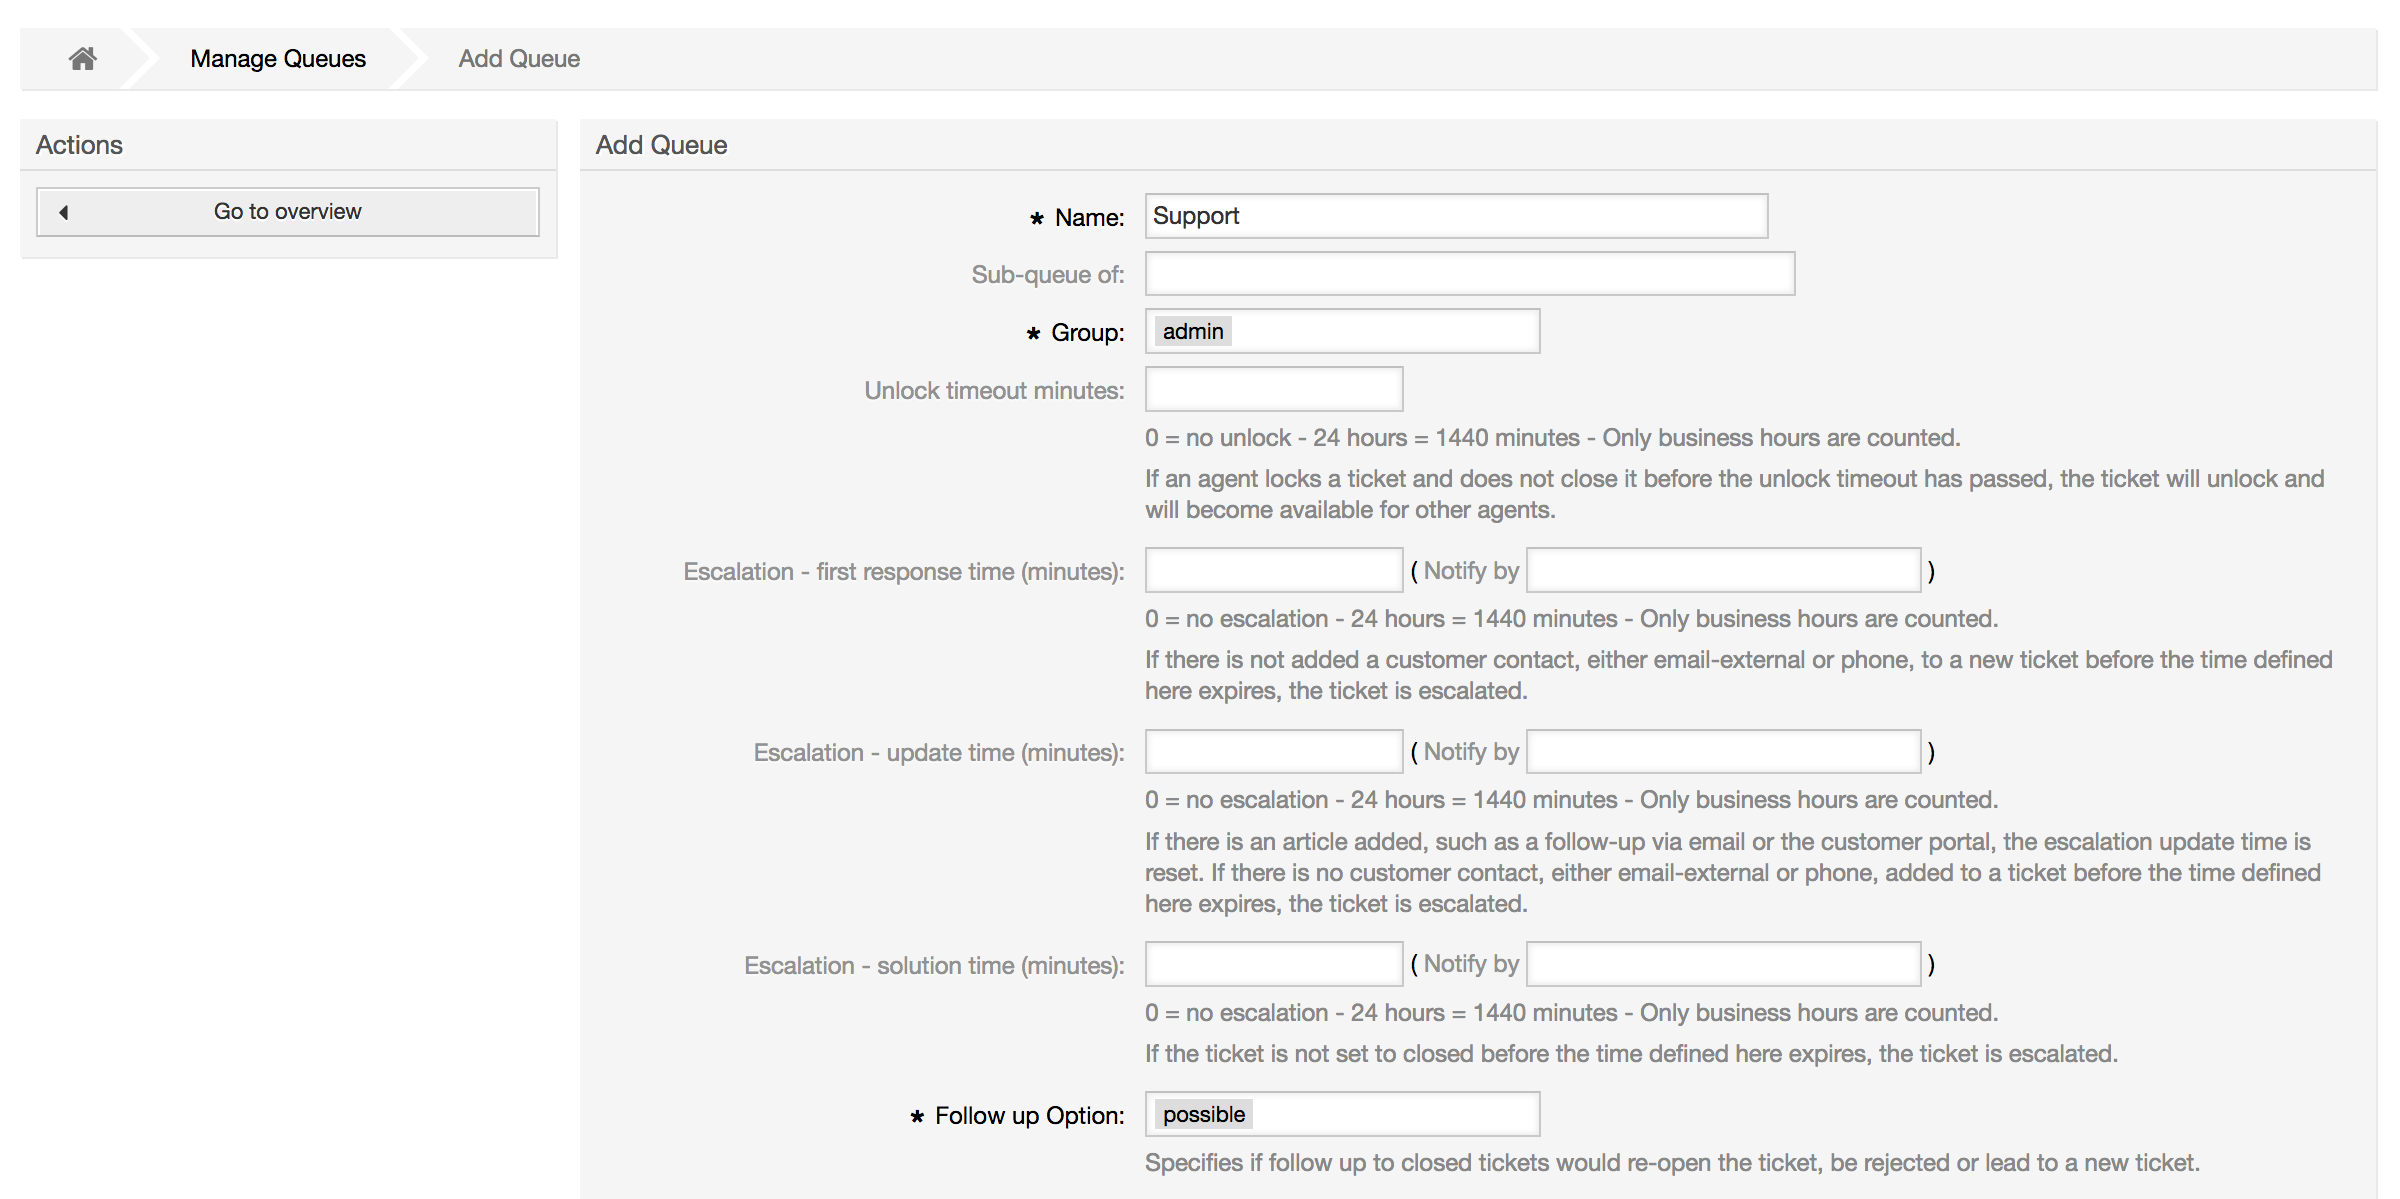
You can define an unlock timeout for a queue - if an agent locks a ticket and does not close it before the unlock timeout has passed, the ticket will be automatically unlocked and made available for other agents to work on.
There are three escalation time settings that can be associated at queue level:
Escalation - First Response Time
After creation of the ticket, if the time defined here expires without any communication with the customer, either by email or phone, the ticket is escalated.
Escalation - Update Time
If there is a customer followup either via e-mail or the customer portal, that is recorded in the ticket, the escalation update time is reset. If there is no customer contact before the time defined here expires, the ticket is escalated.
Escalation - Solution Time
If the ticket is not closed before the time defined here expires, the ticket is escalated.
With 'Ticket lock after a follow-up', you can define if a ticket should be set to 'locked' to the old owner if a ticket that has been closed and later is re-opened. This ensures that a follow up for a ticket is processed by the agent that has previously handled that ticket.
The parameter for the system address specifies the email address that will be used for the outgoing tickets of this queue. There is also the possibility to associate a queue with a salutation and a signature, for the email answers. For more detailed information, please refer to the sections email addresses, salutations and signatures.
Note
As with agents, groups and customers, queues cannot be deleted, only deactivated, by setting the Valid option to invalid or invalid-temporarily.
A salutation is a text module for a template. Salutations can be linked to one or more queues, as described in the section about queues. A salutation is used only if a ticket from a queue the salutation is linked to, is answered. To manage the different salutations of your system, use the "Salutations" link of the admin area (see figure below).
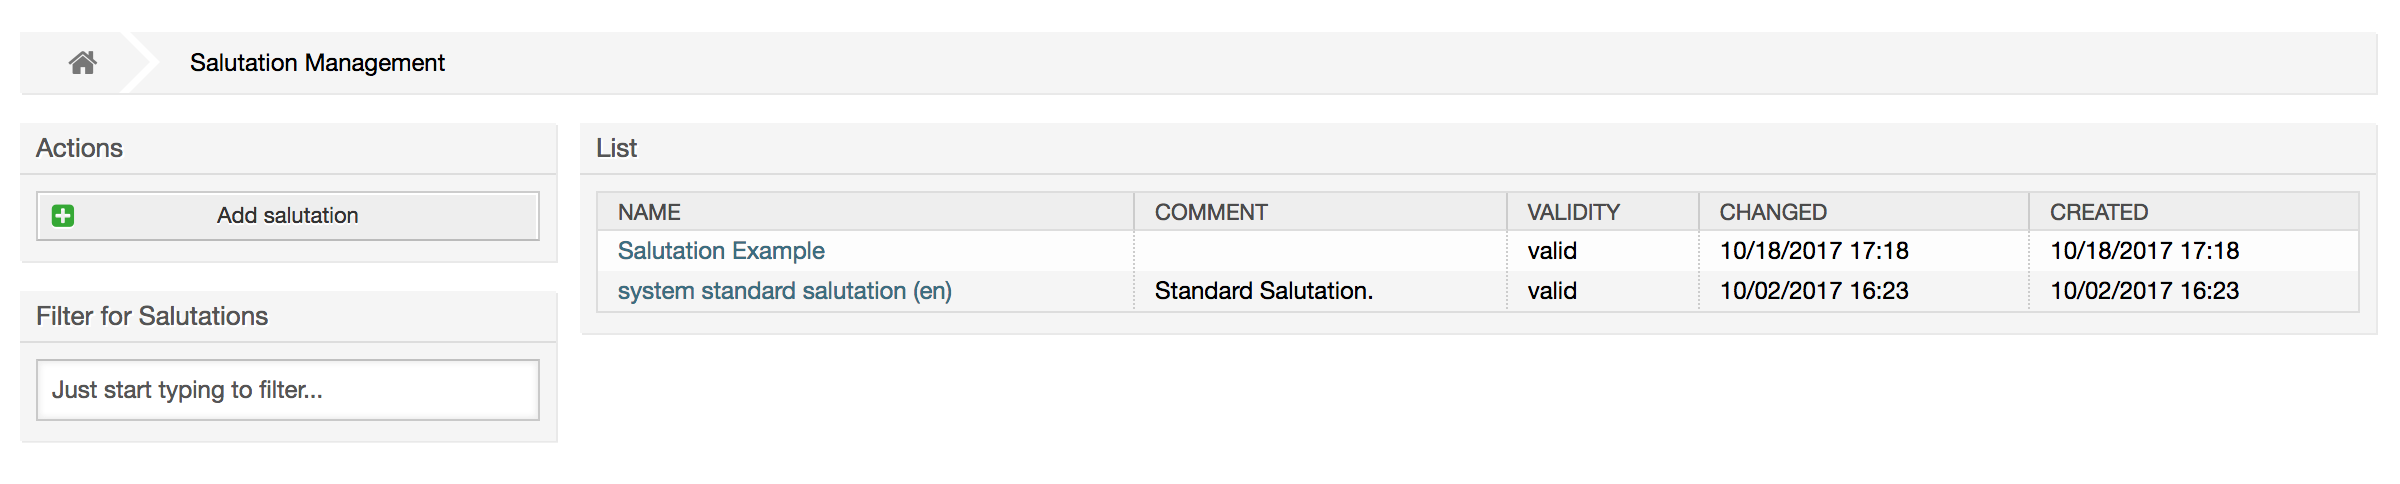
After a default installation there is already one salutation available, "system standard salutation (en)".
To create a new salutation, press the button Add salutation, provide the required data and submit it (see figure below).
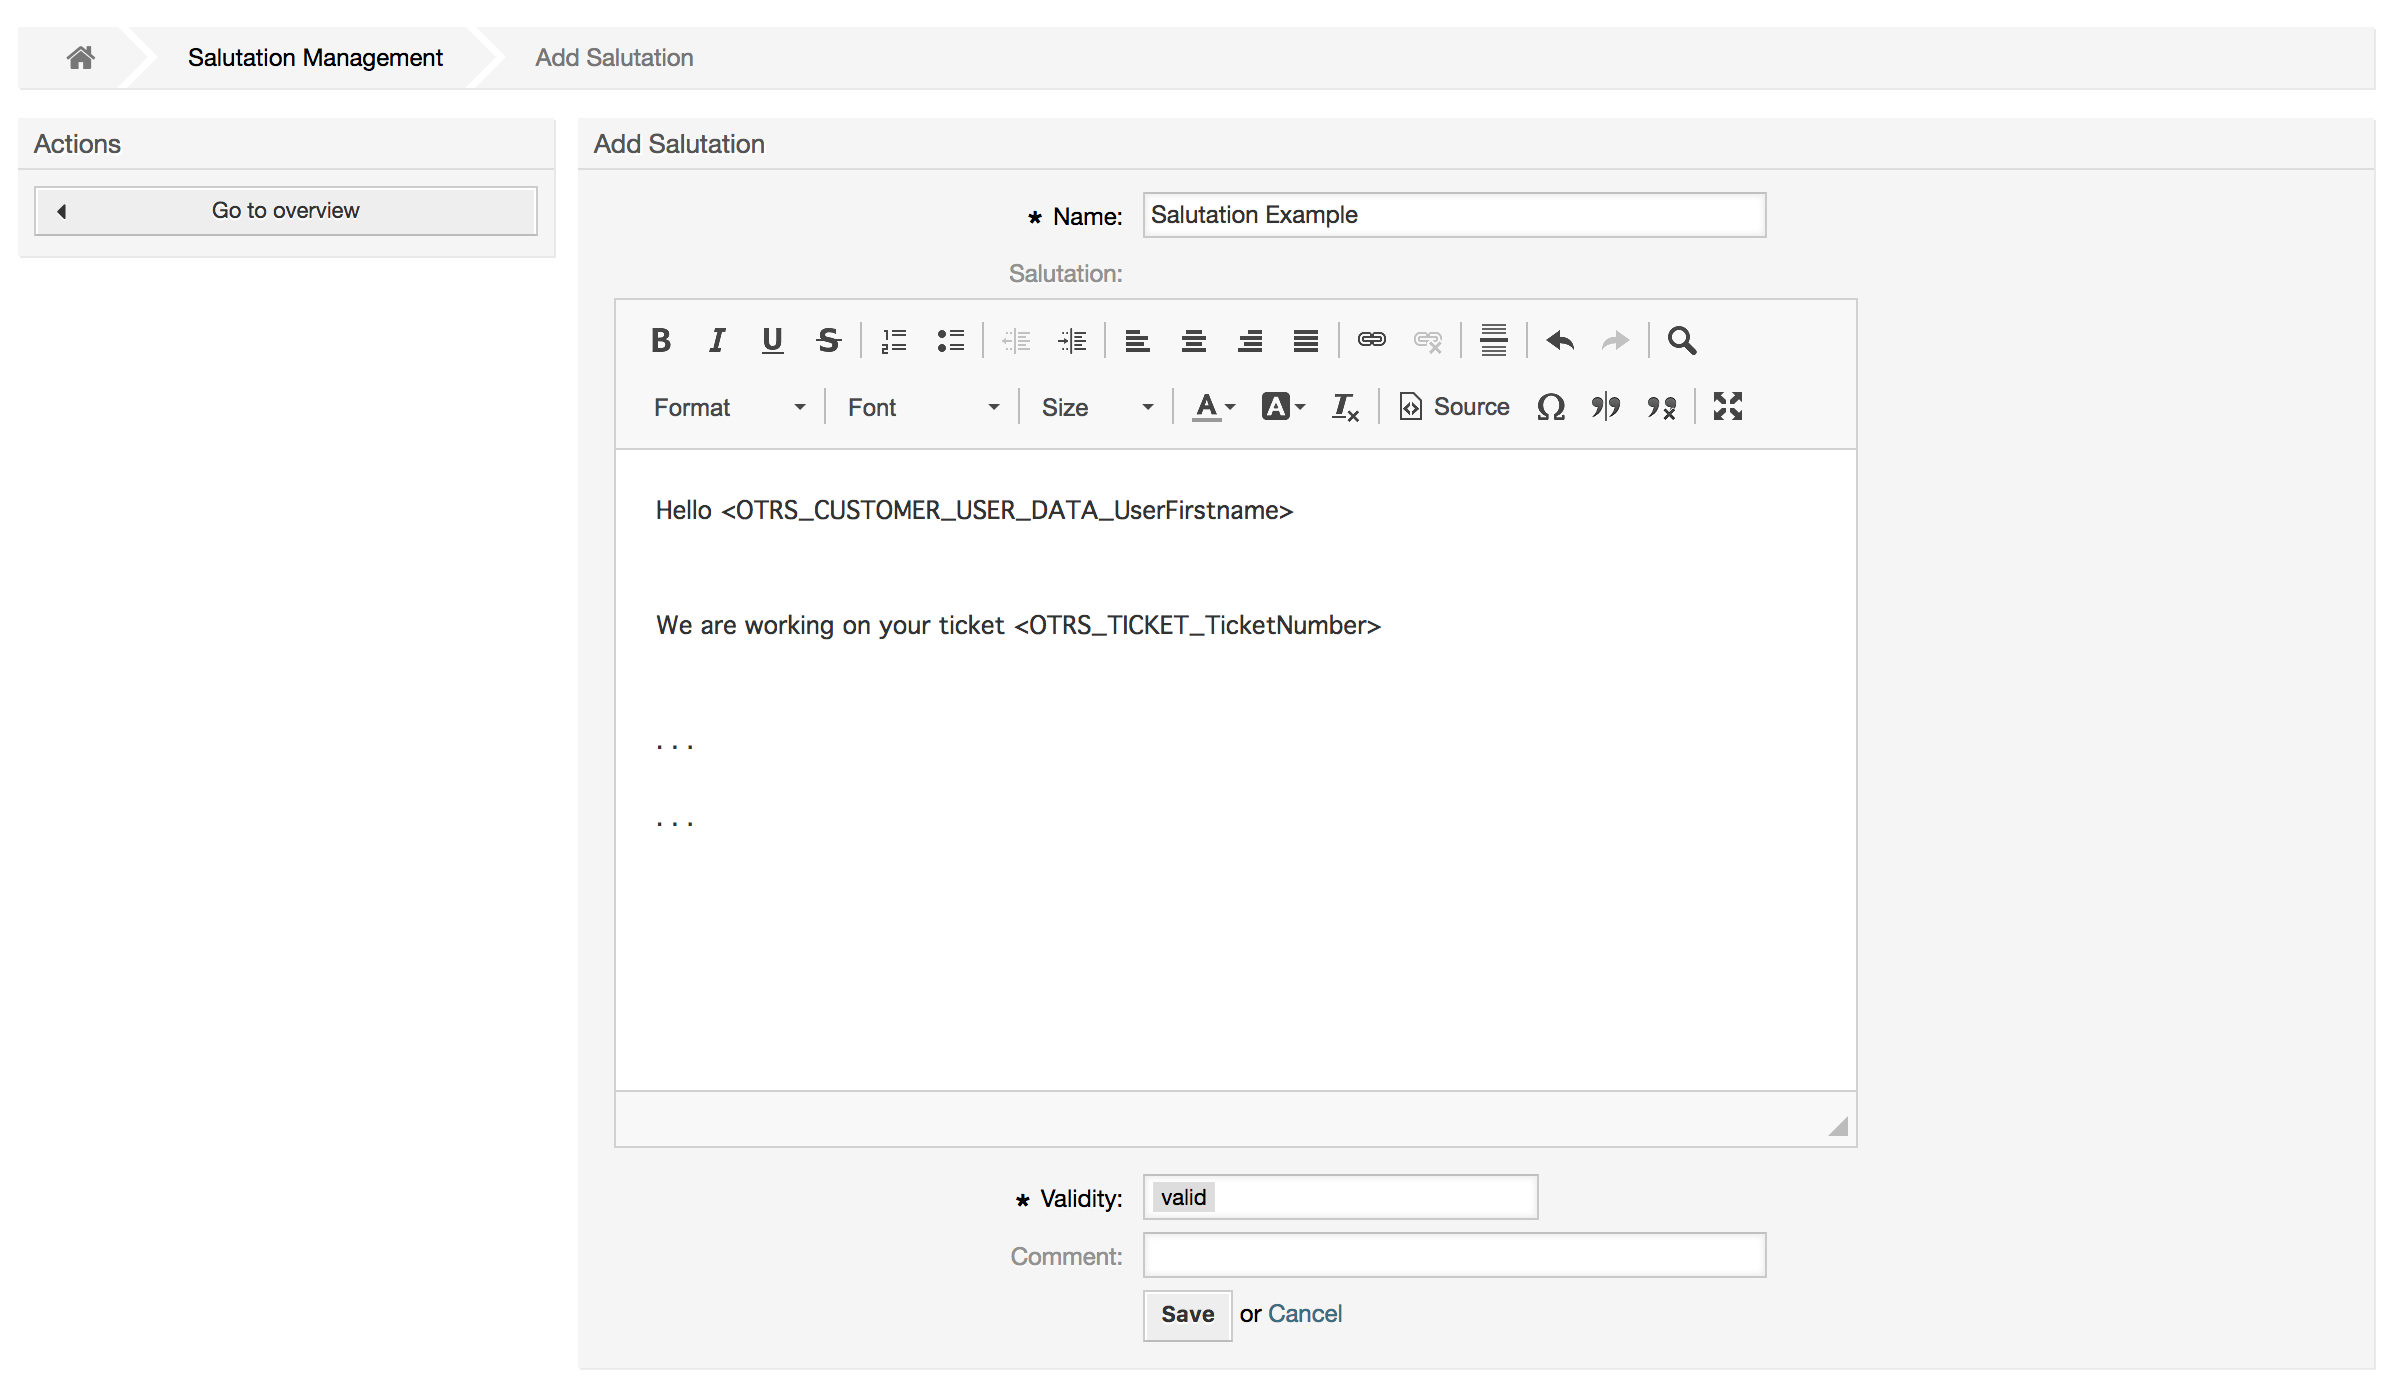
It is possible to use variables in salutations. When you respond to a ticket, the variable names will be replaced by their values.
The different variables you can use in templates are listed in the lower part of the salutation screen. If you use, for example, the variable <OTRS_LAST_NAME> the last name of the ticket's sender will be included in your reply.
Note
As with other OTRS entities, salutations cannot be deleted, only deactivated by setting the Valid option to invalid or invalid-temporarily.
Another text module for a template is the signature. Signatures can be linked to a queue, as described in the section about the queues. Please note that a signature will only be appended to a template text, if it has previously been linked to a queue. You can manage the signatures in your system by accessing the "Signatures" link of the Admin page, (see figure below).
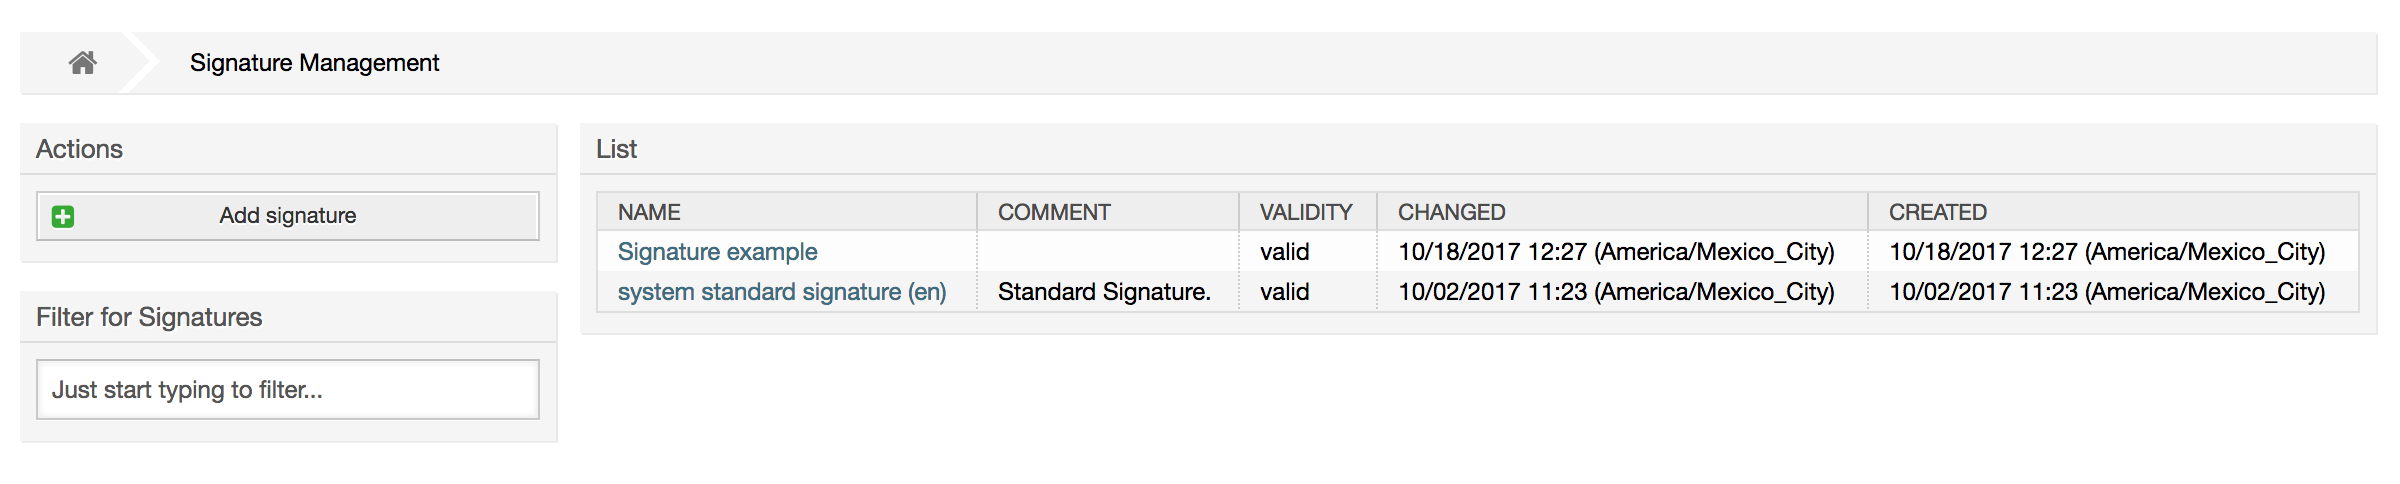
After a fresh installation of OTRS, there is one predefined signature stored in your system, "system standard signature (en)".
To create a new signature, press the button Add signature, provide the needed data and submit it (see figure below).
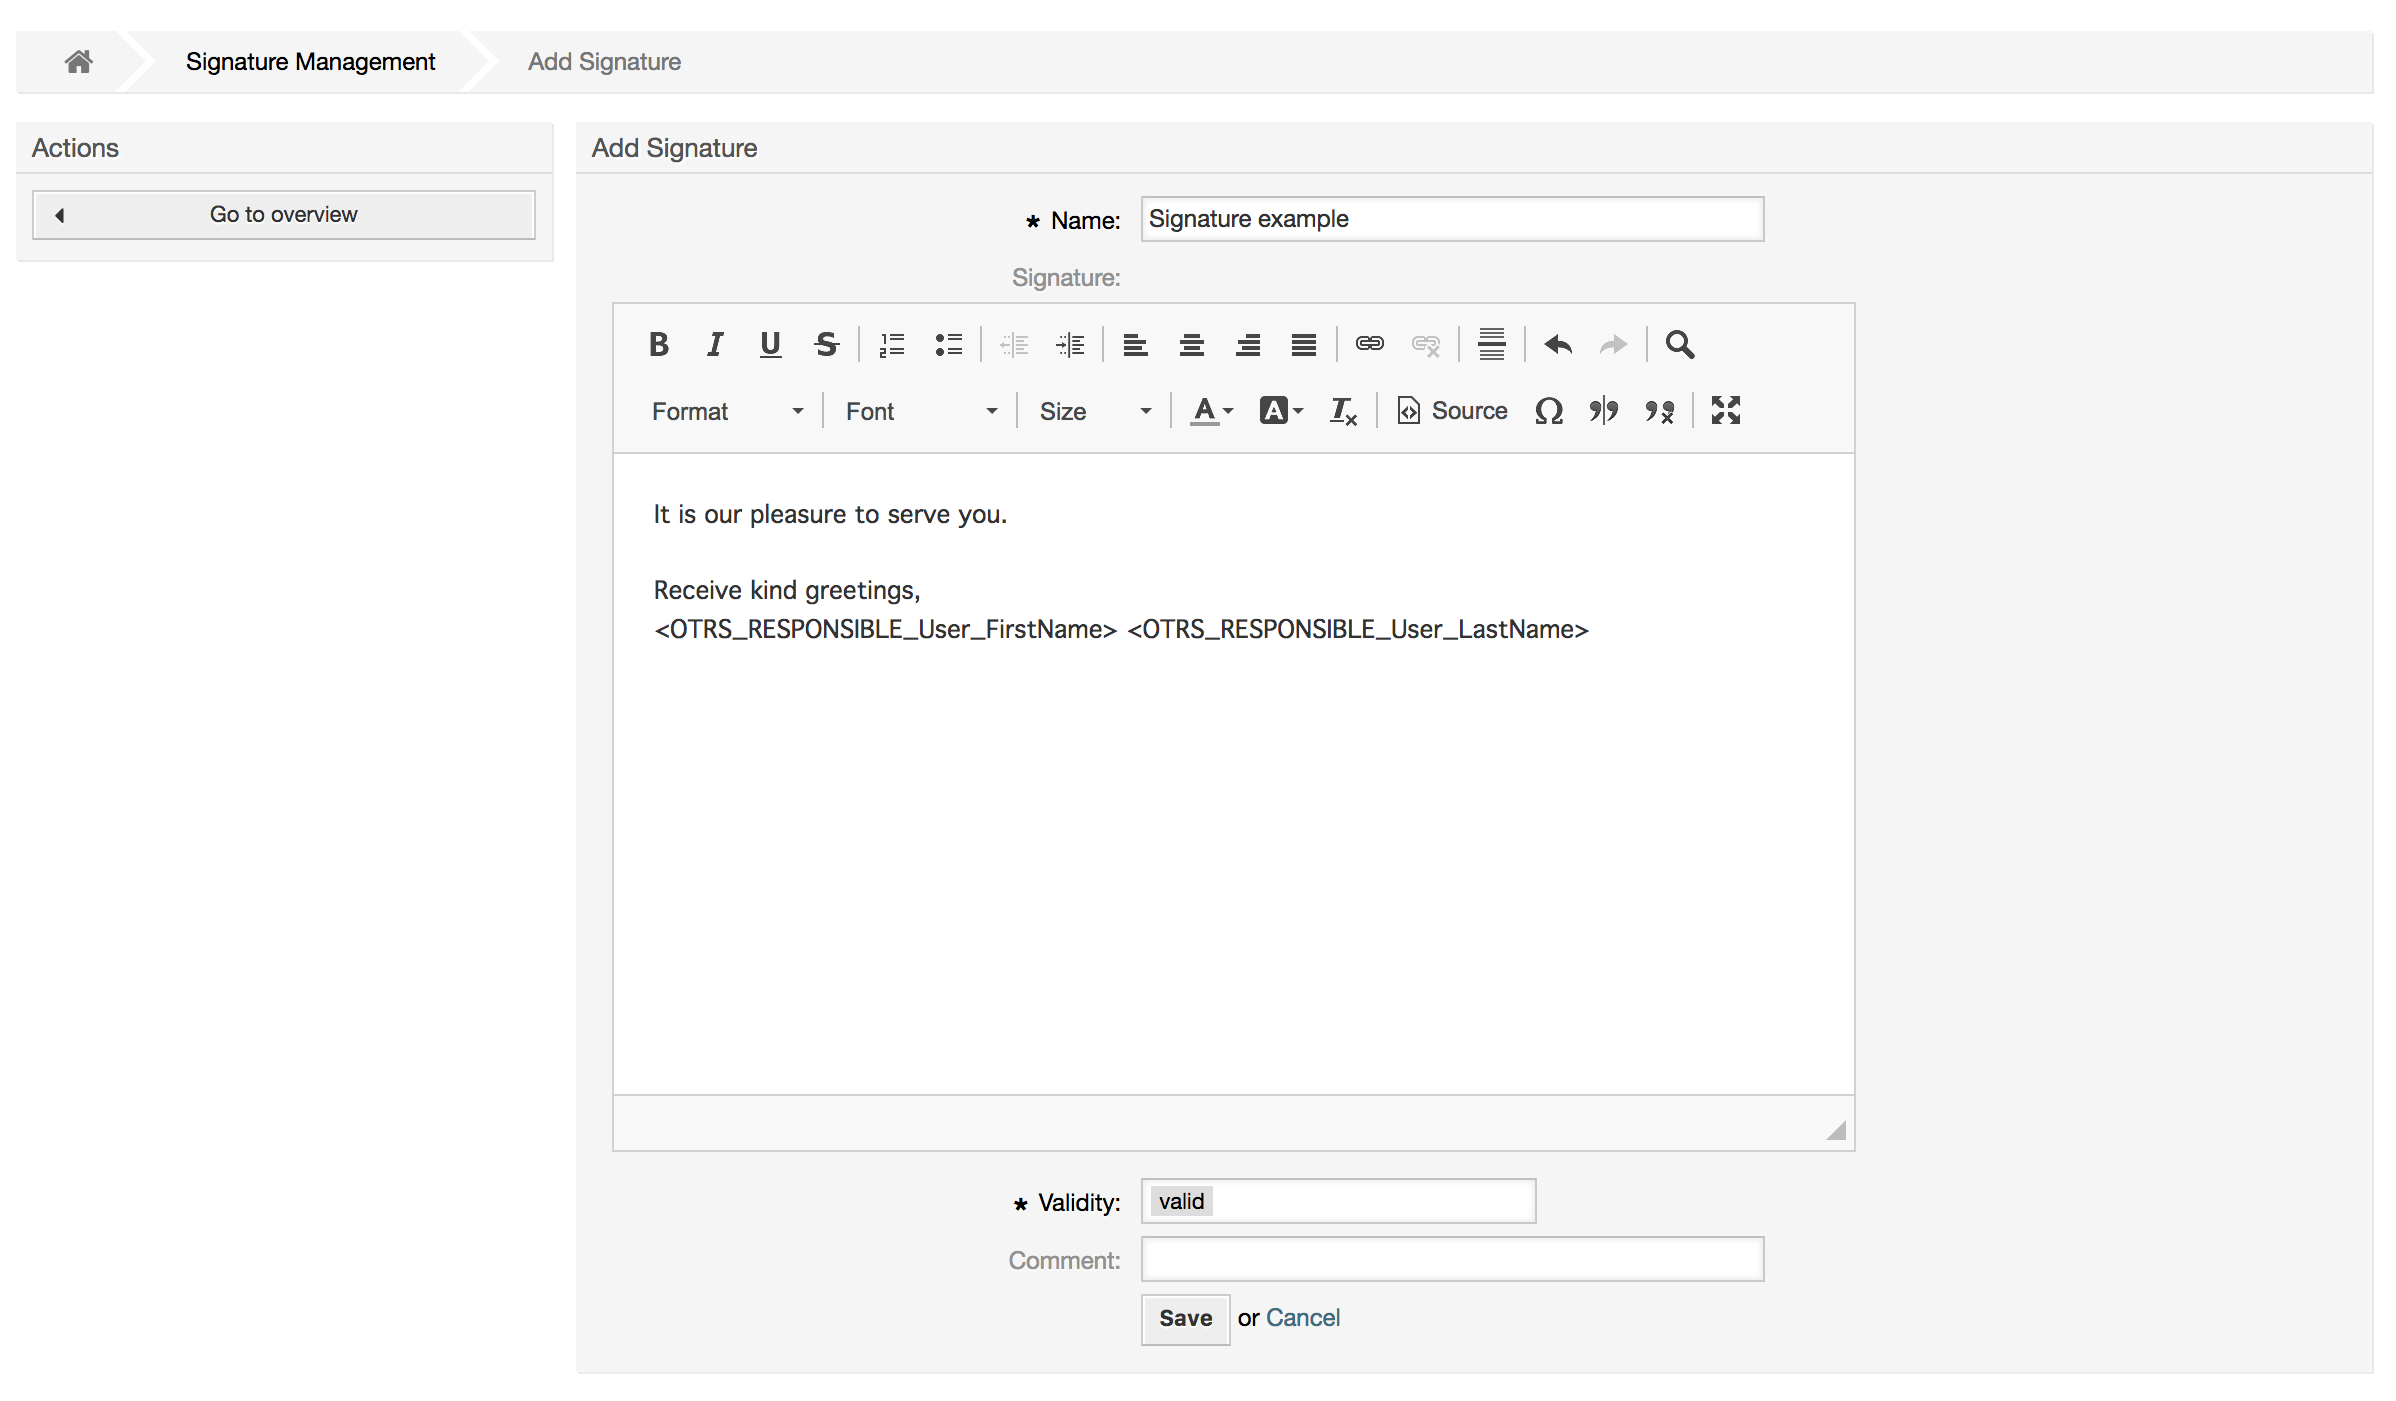
Like salutations, signatures can also contain dynamic content, such as the first and last name of the agent who answers the ticket. Here too, variables can be used to replace the content of the signature text for every ticket. See the lower part of the signatures screen for the variables which can be used. If you include the variable <OTRS_LAST_NAME> in a signature for example, the last name of the agent who answers the ticket will replace the variable.
Note
As with salutations, signatures too cannot be deleted, only deactivated by setting the Valid option to invalid or invalid-temporarily.
You can also optionally add one or more attachments to a template. If the template is selected, the attachments will be attached to the message composition window. If necessary, the agent can remove the attachment from an individual template before sending it to the customer.
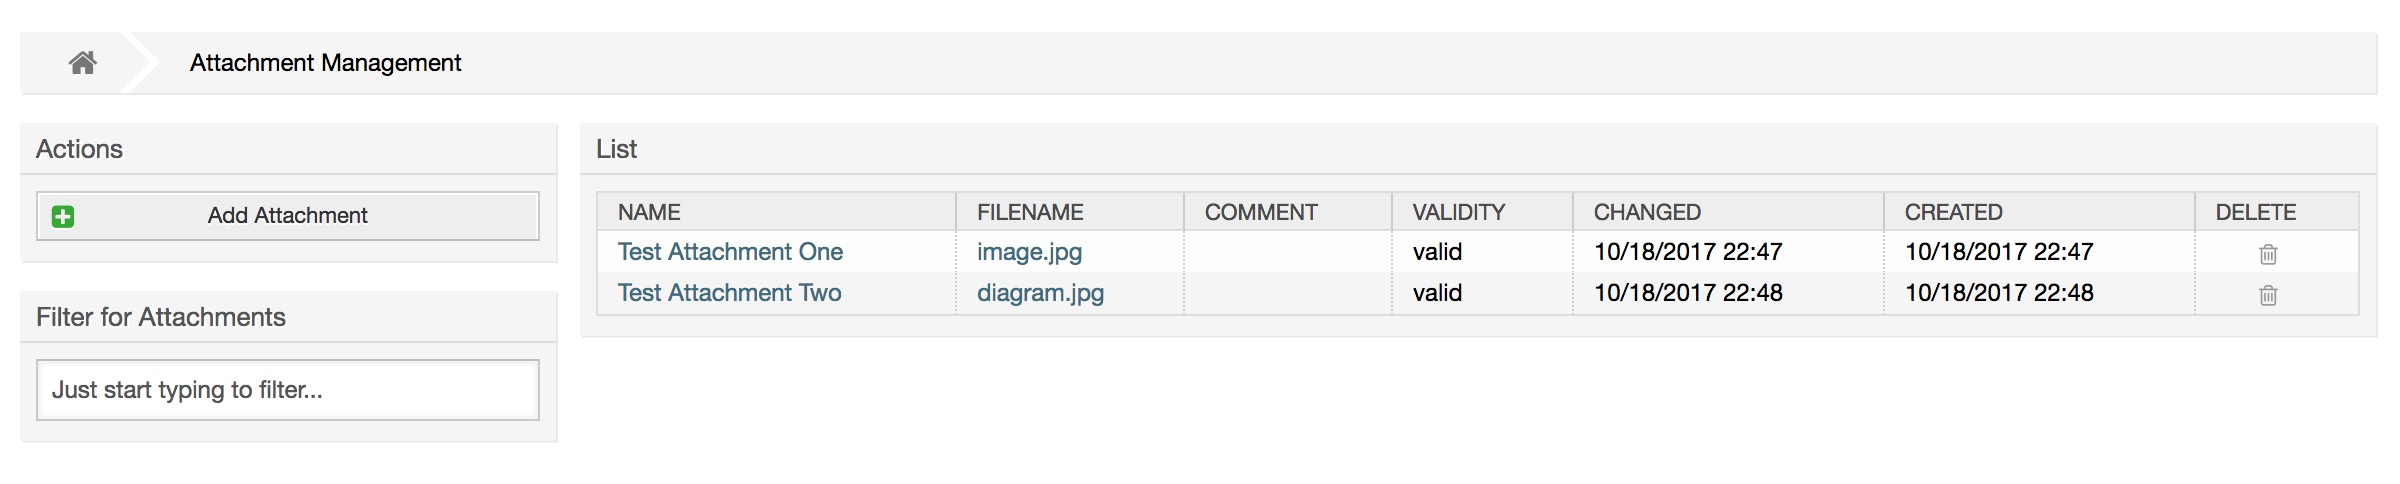
Through the "Attachment" link of the Admin page, you can load the attachments into the database of the system (see figure below).
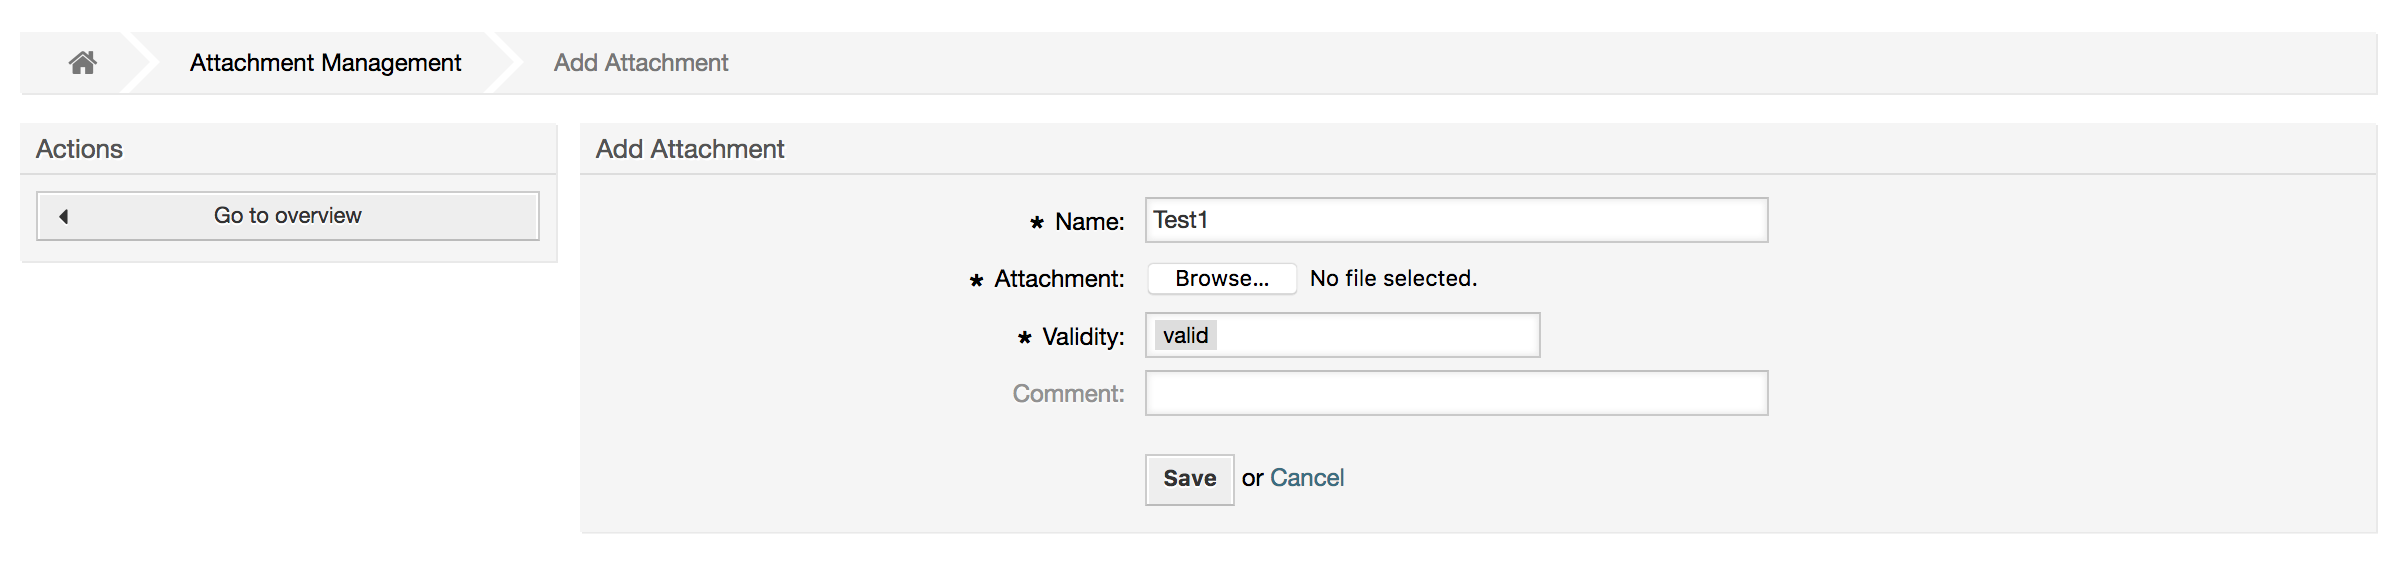
To create a new attachment, press the button Add attachment, provide the required data and submit it (see figure below).
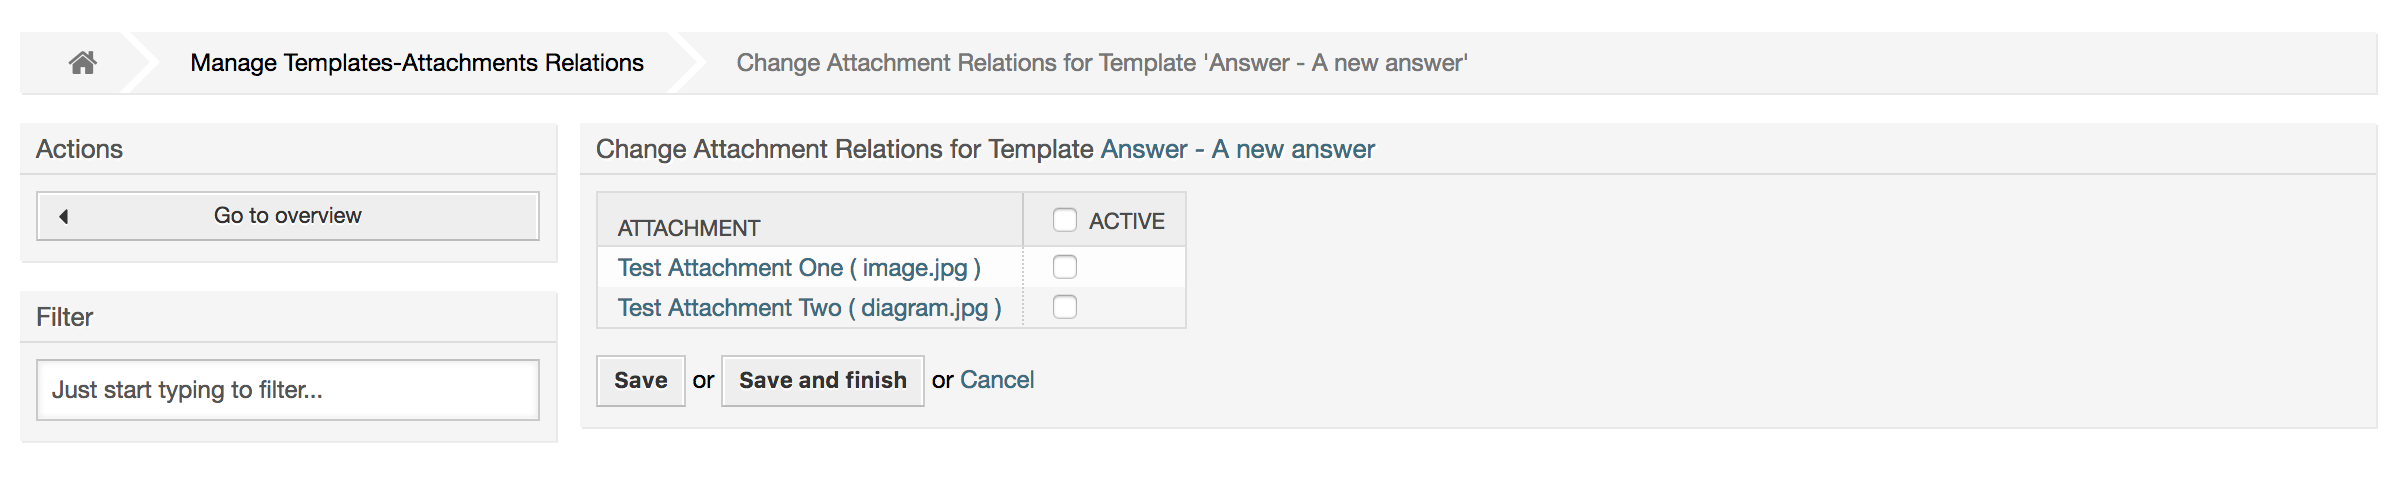
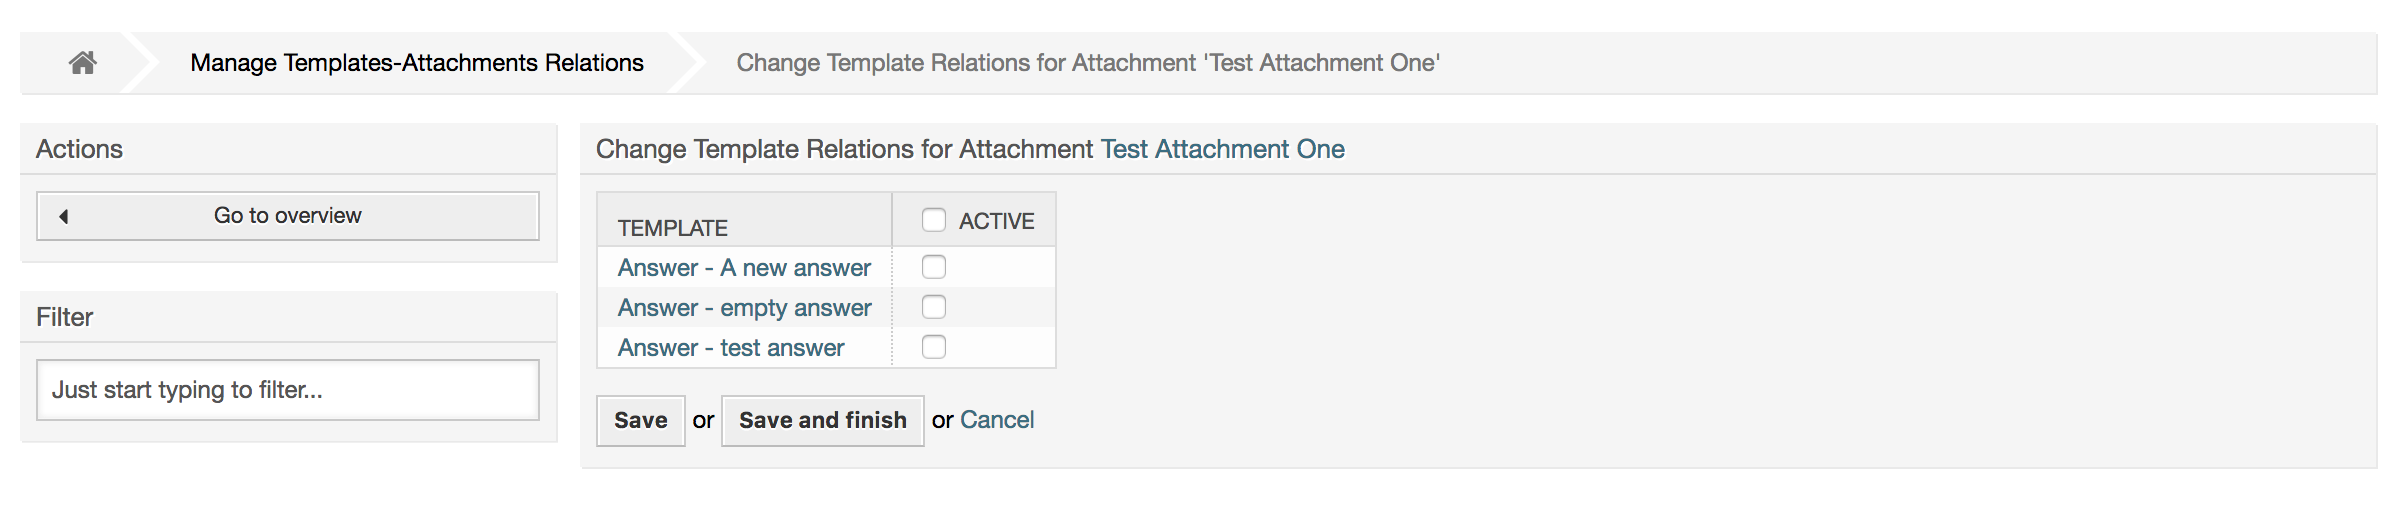
If an attachment is stored it can be linked to one or more templates. Click on the Attachment <-> Templates
link of the Admin page (see figure below).
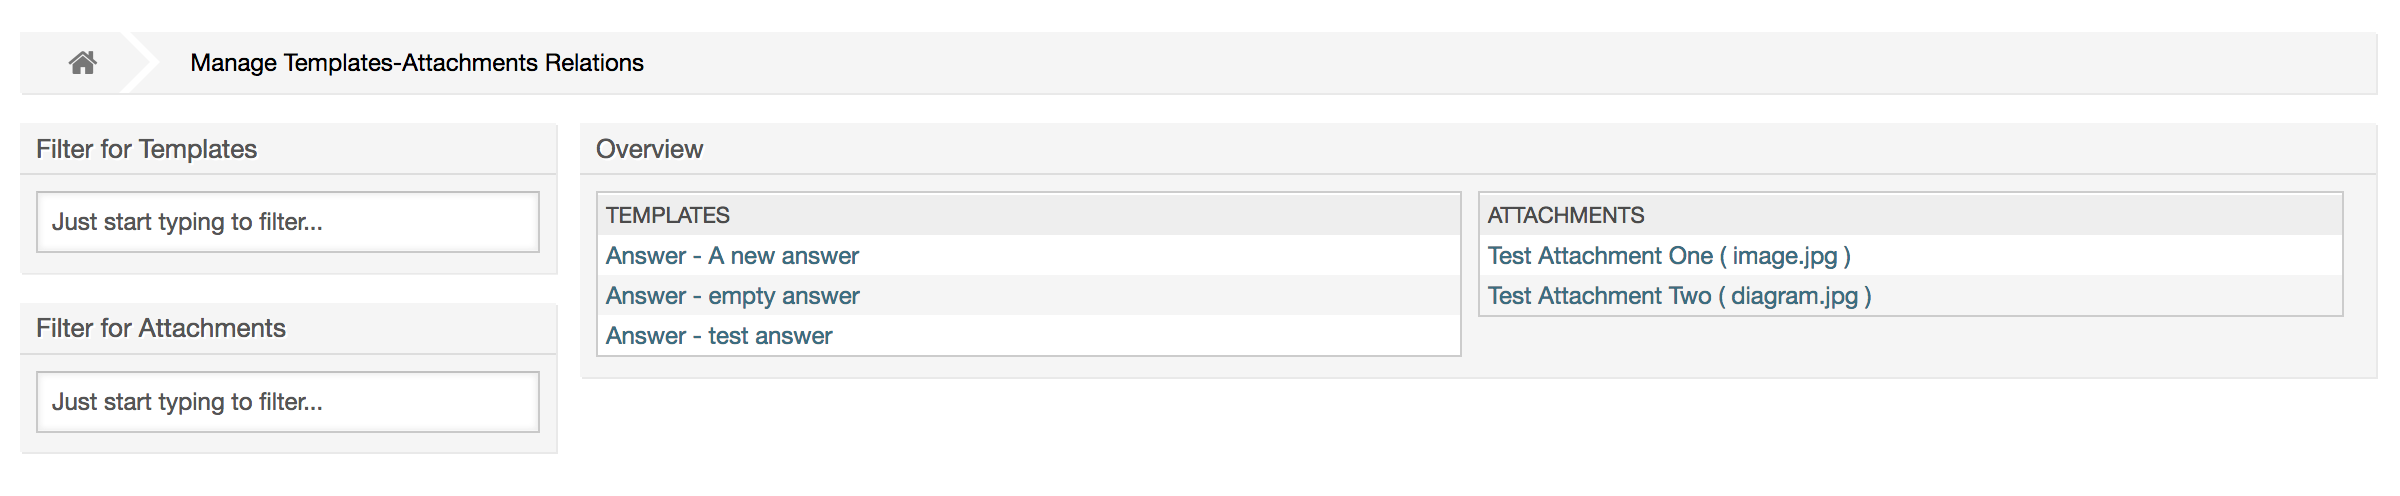
To associate different attachments with a specific template and vice versa, click on the corresponding template name or attachment (see below the Figures 4.29 and 4.30, respectively).
To speed up ticket processing and to standardize the look of answers, you can define templates in OTRS. A template can be linked to one or more queues and vice versa.
There are different kind of templates that are used in different parts of OTRS and they have its own purpose, the following is the list of possible template types:
Answer: To be used as a ticket response or reply
Create: To be used in New Phone or Email ticket
Forward: To be used to forward an article to someone else
PhoneCall: To be used in the Phone Call Inbound and Outbound screens
Answer templates can be accessed in two ways, from the ticket zoom screen in the article menu, or on a quicker way: from any ticket overview large screen such as Status View or Ticket View. For a fresh OTRS installation, the "empty answer" template (Answer) is set as the default for every queue.
As soon as Forward templates are added and assigned to queues, the "Forward" button in ticket zoom (that normally leads to a empty text forward screen) will change into a selection control, the selection is filled with the added Forward templates, by choosing one of the templates, the forward screen will be shown prefilled with the template text and attachments (similar to the reply selection box with the Answer templates).
Creating templates of type Create and PhoneCall will make visible the "Text Template" selection box in their respective screens, choosing a template for the list will populate the "Text" and "Attachment" fields (if available in the template). Notice that any previous change in the Text or attachments will be overwritten by selecting a template.
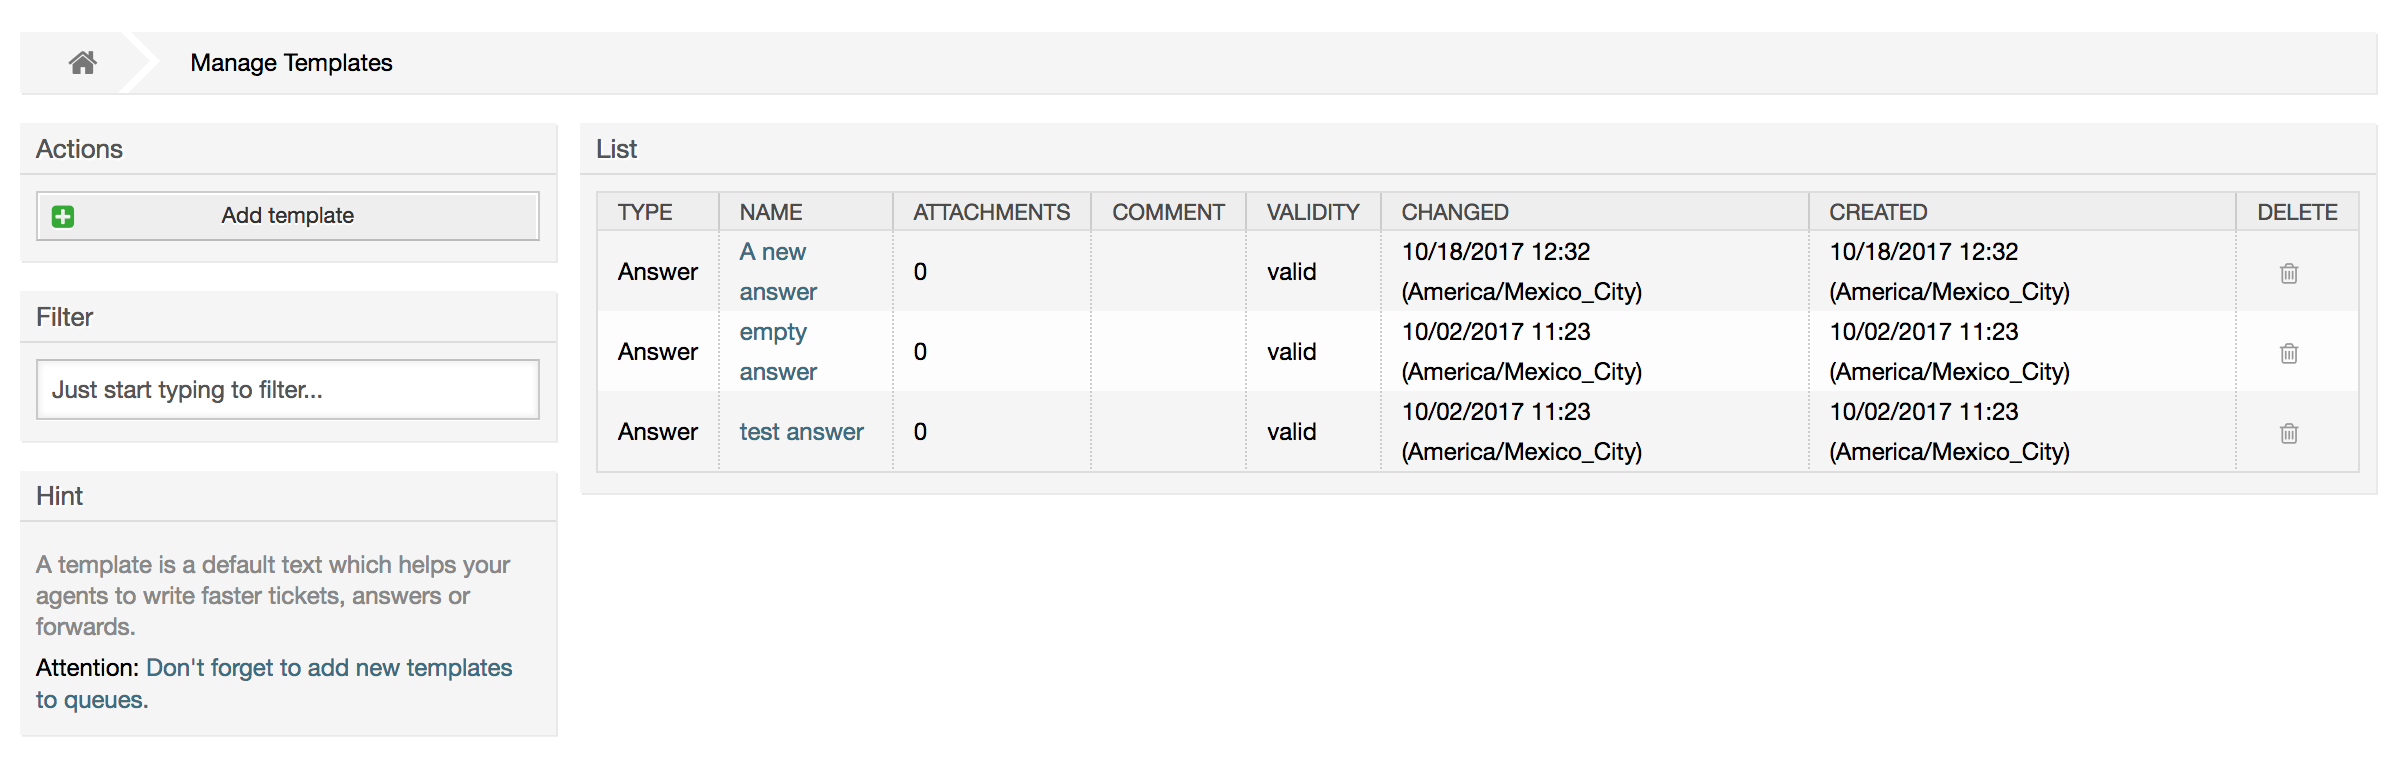
Clicking the "Templates" link on the Admin page brings you to the Template management screen (see figure below).
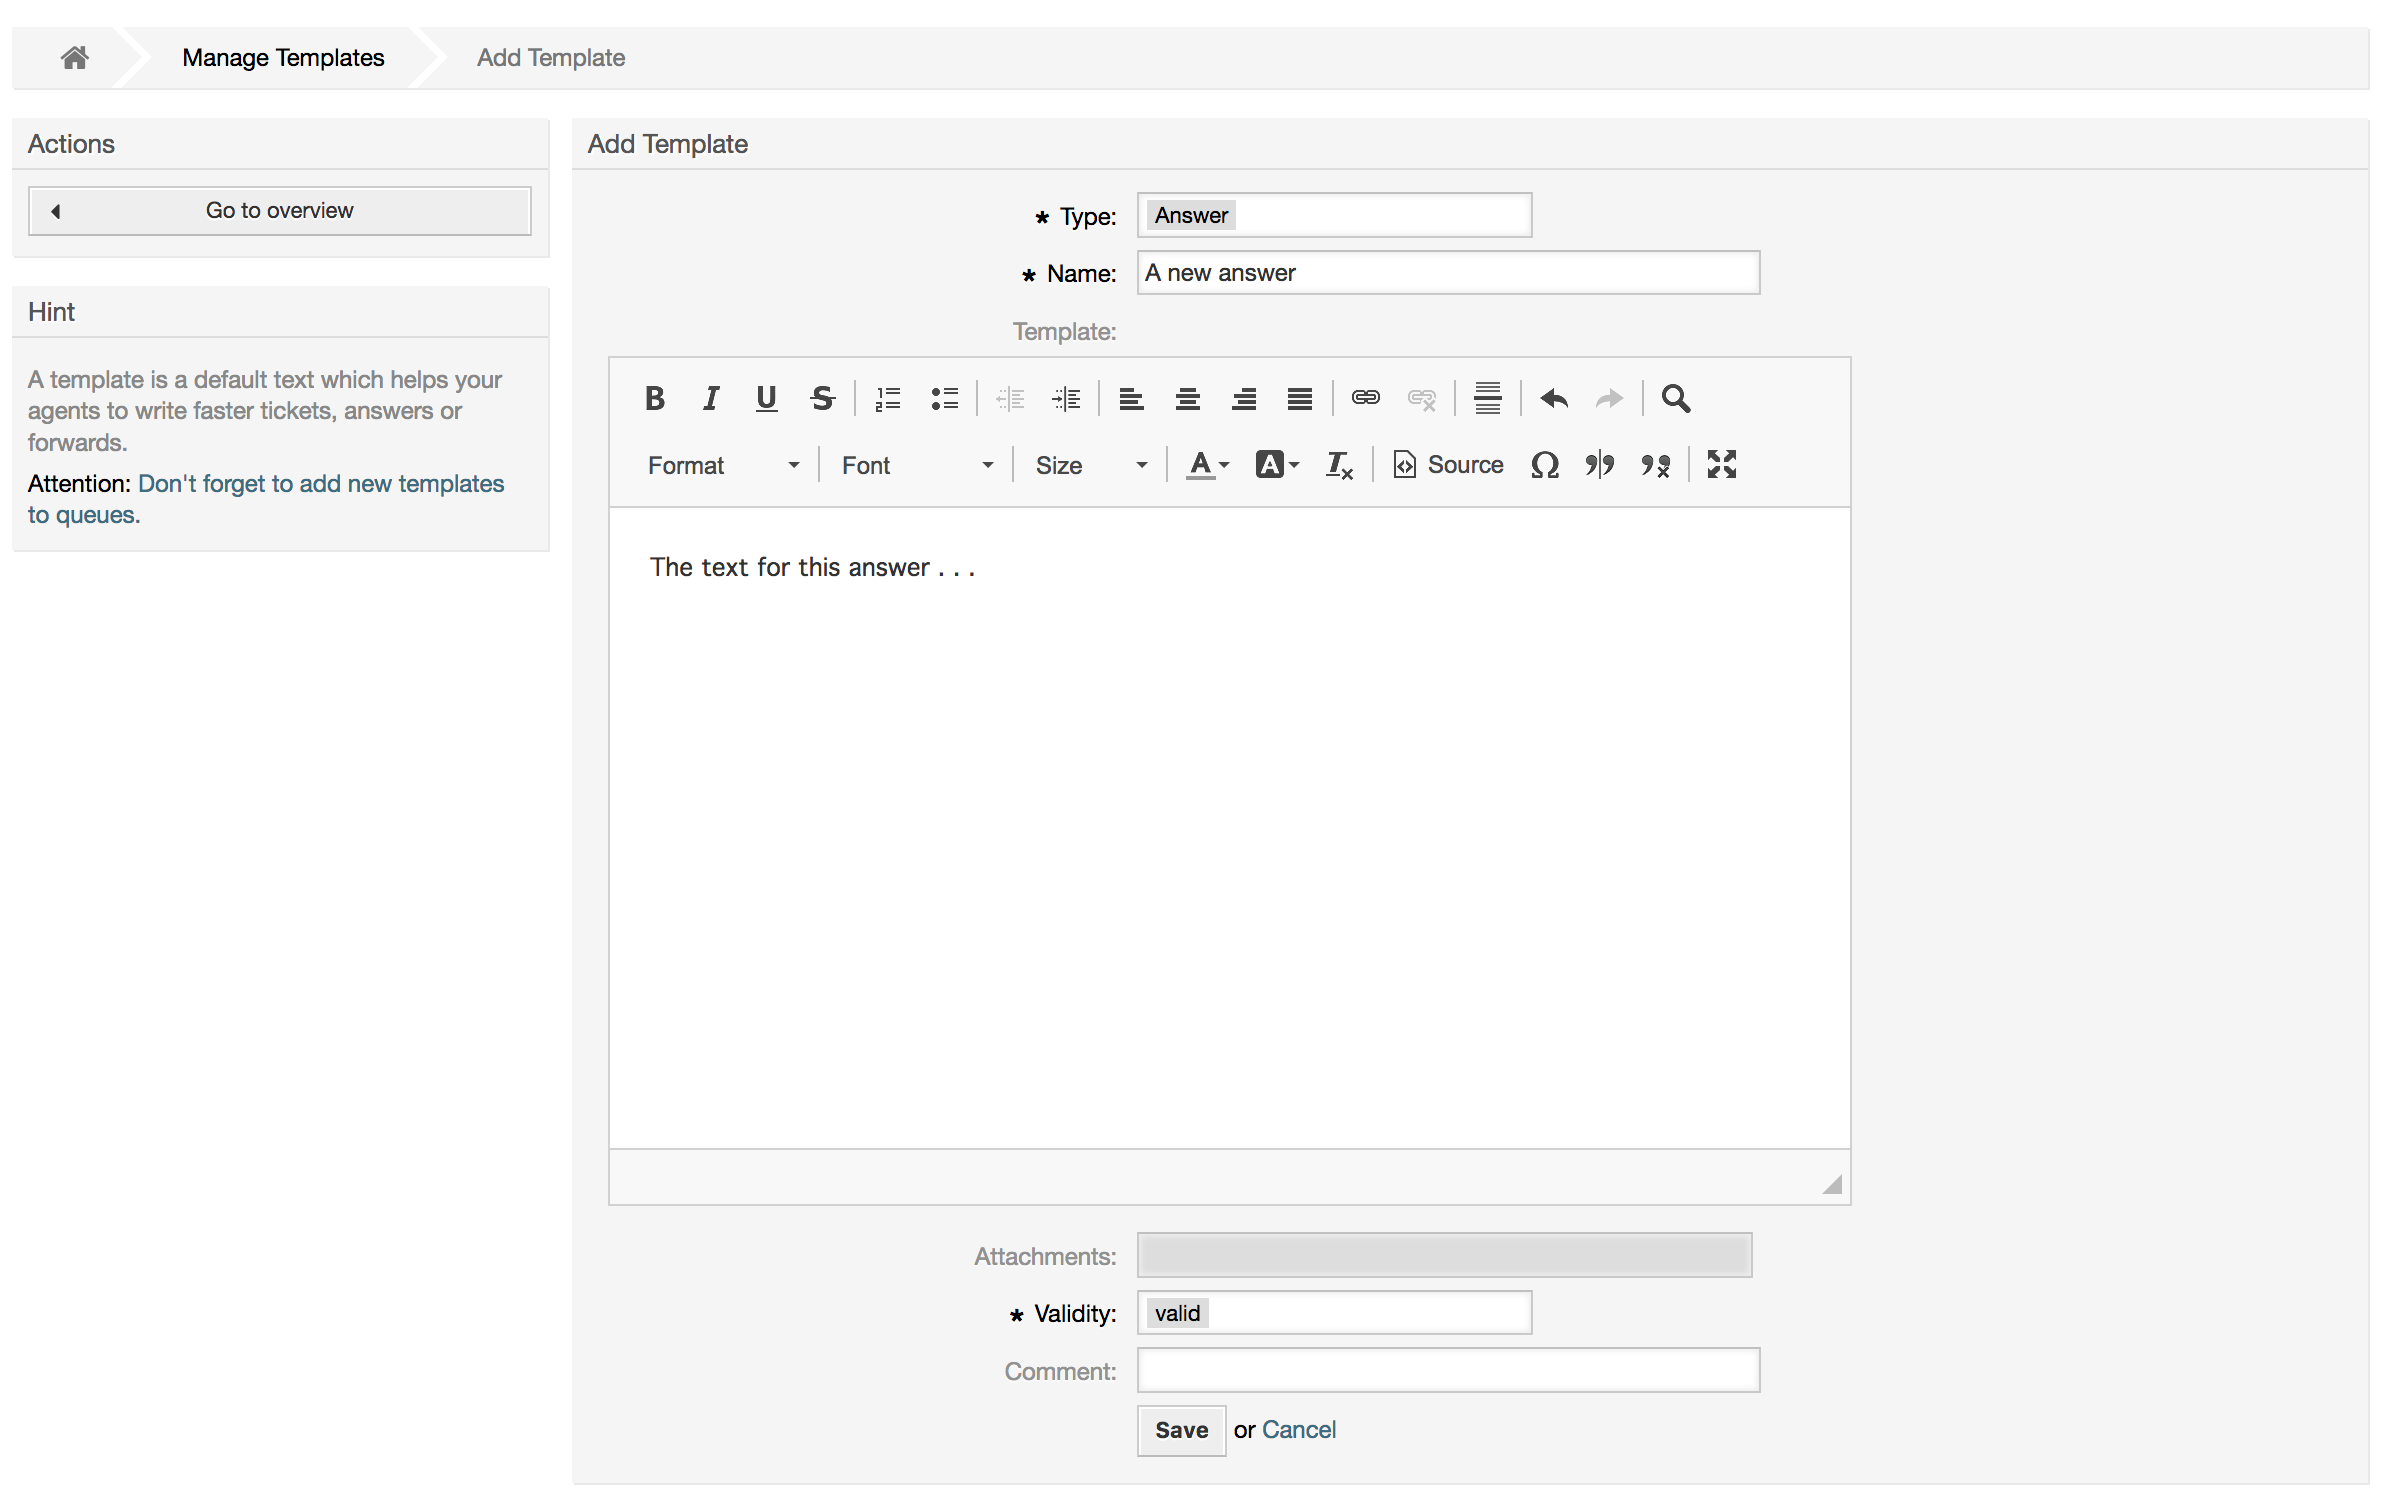
To create a new template, click on the Add template button, provide the required data (make
sure to select the appropriate template type) and submit it (see figure below).
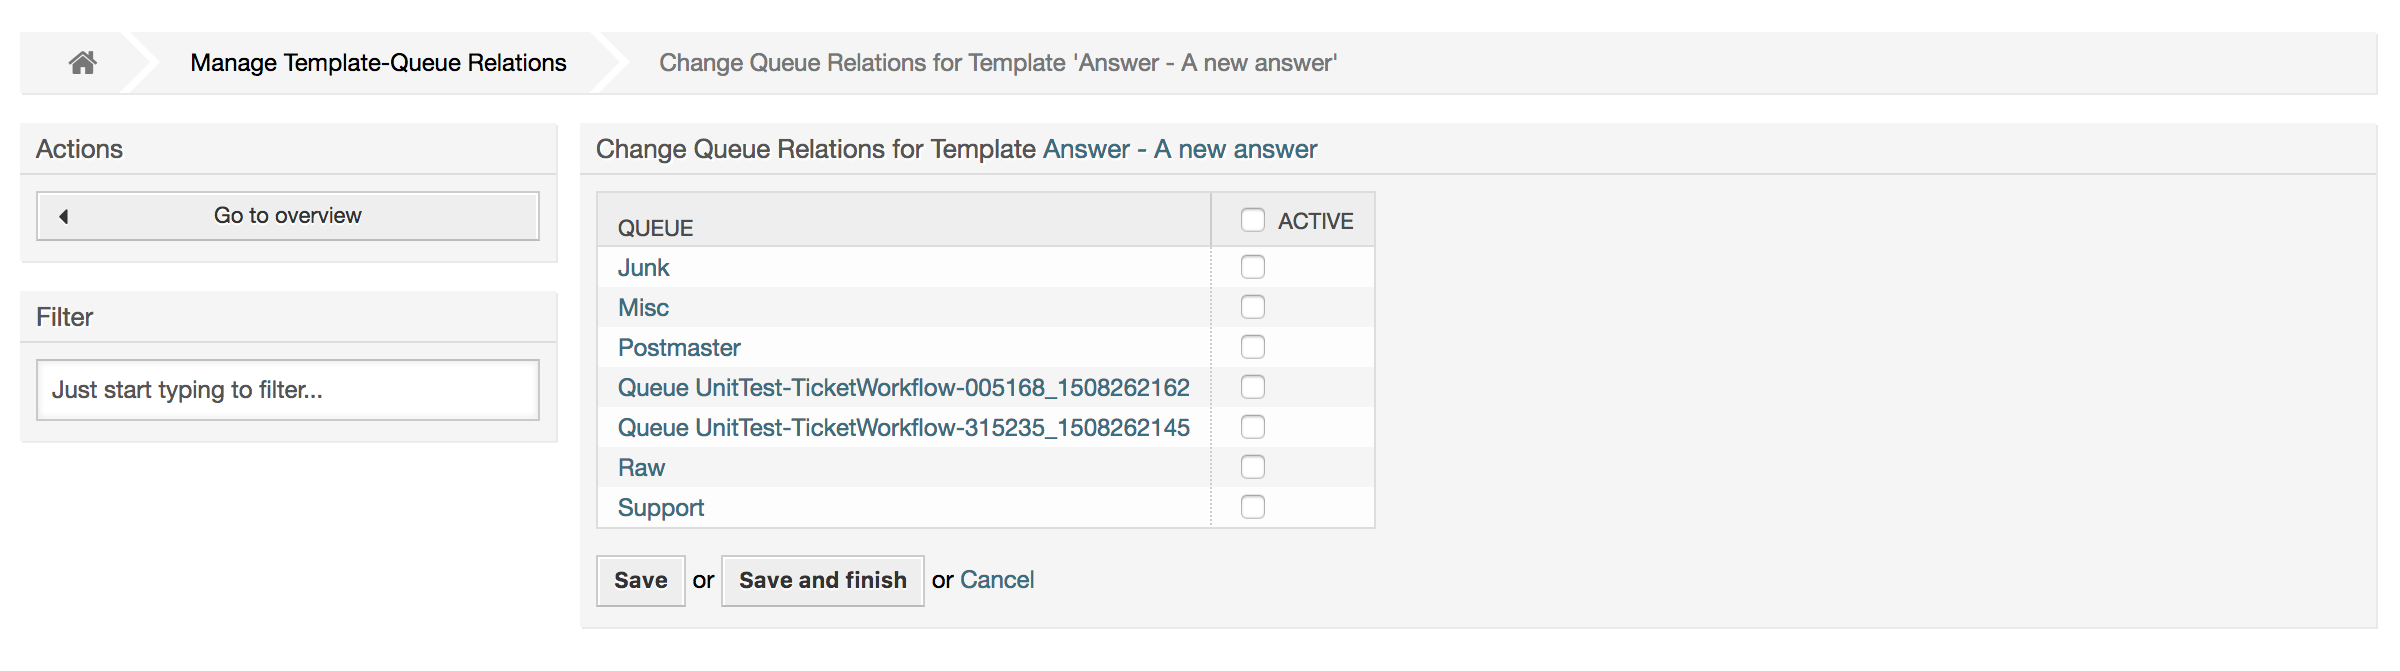
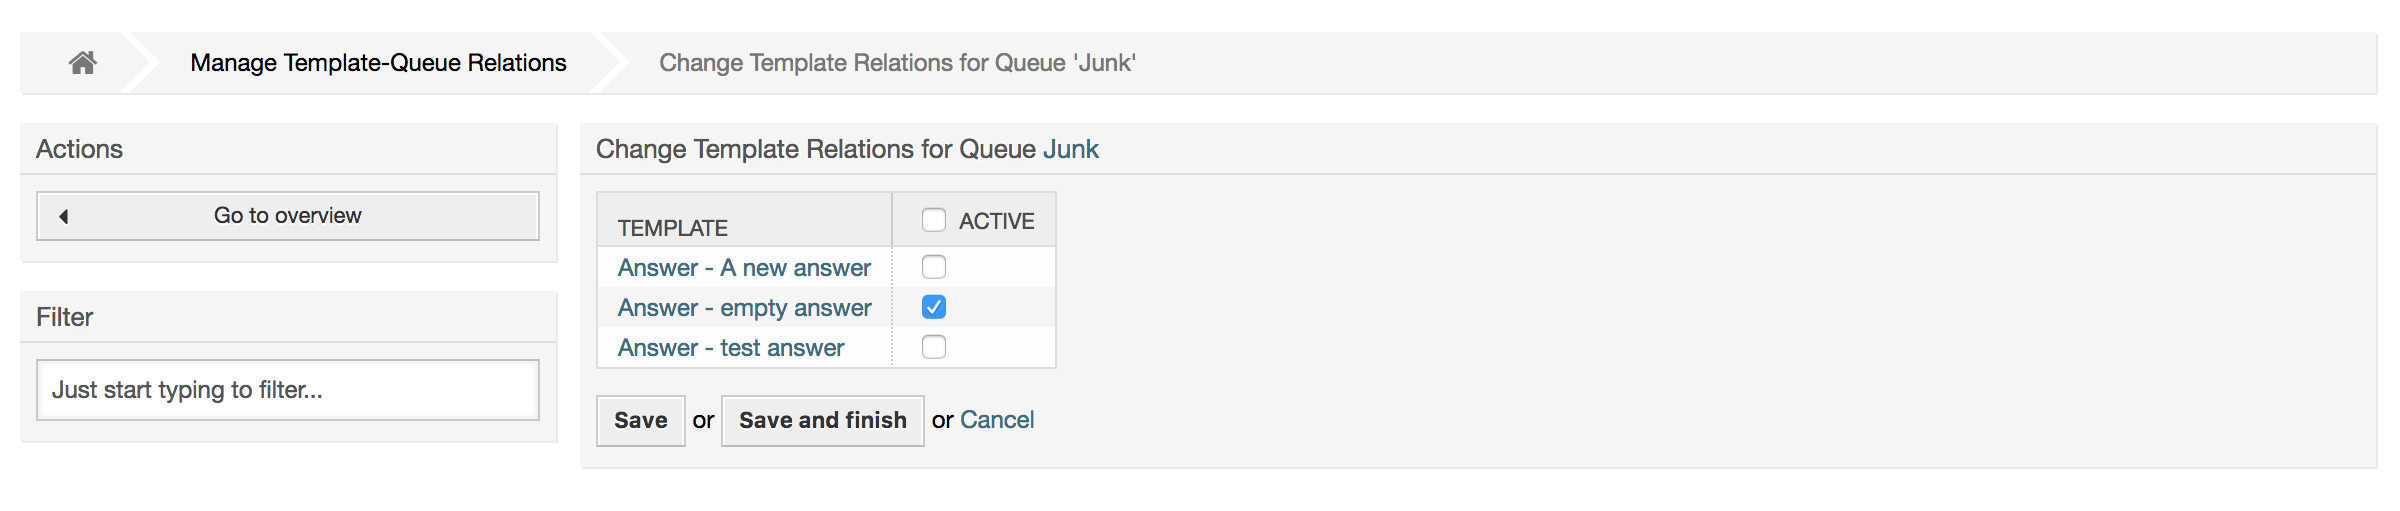
To add/remove templates to one or more queues, click on the "Templates <-> Queues" link on the Admin page (see figure below). You can also use filters to get information regarding a specific entity.
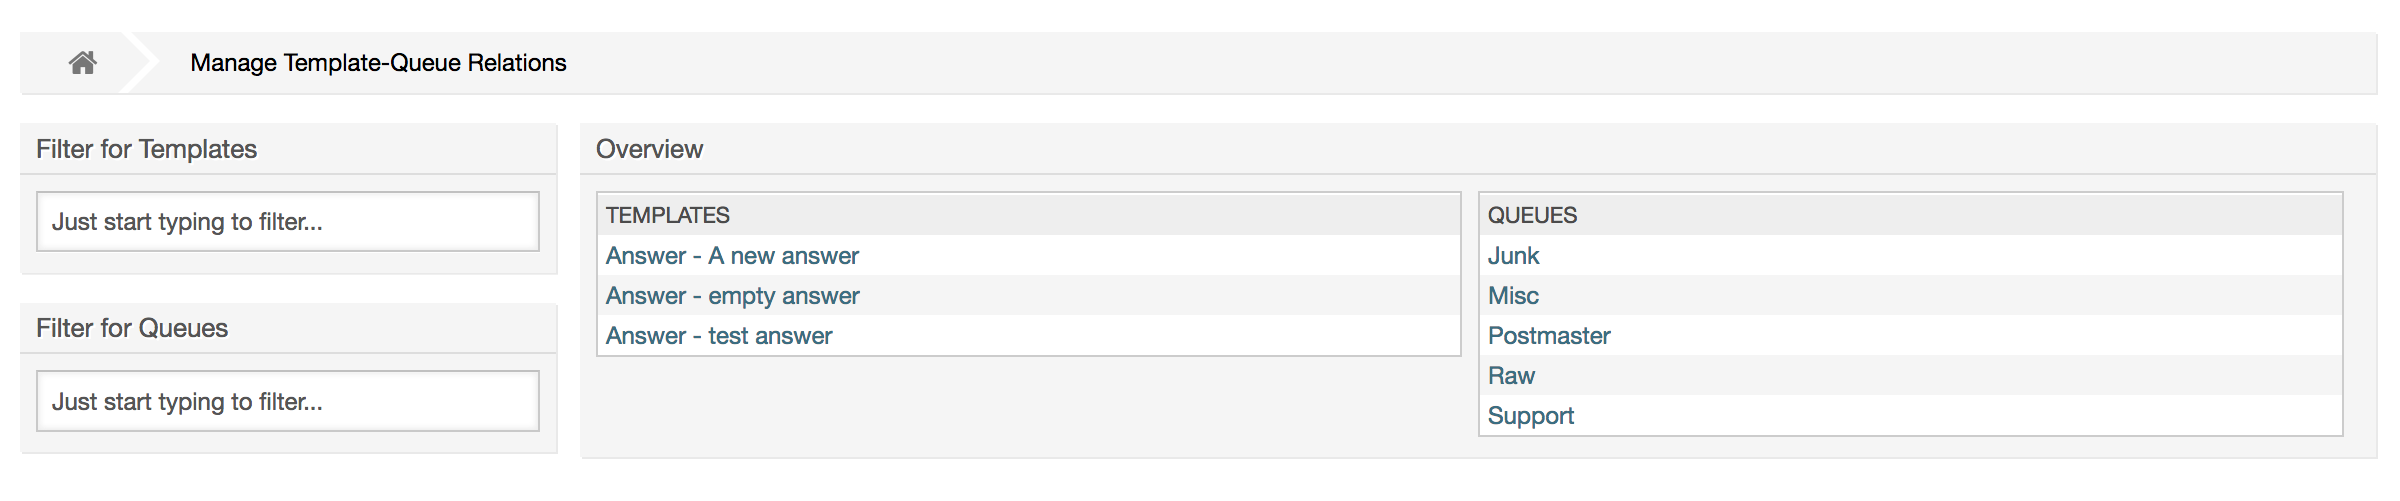
To define the different templates that will be available for a queue and vice versa, click on the corresponding template or queue (see below the Figures 5.32 and 5.33, respectively).
When choosing a template, additional information could be added to the template text, this depends on the template type:
PhoneCall and Create templates does not add any content to the template text, however New Email Ticket screen adds the queue assigned signature to the resulting email body (this screen has a separated box to visualize the signature).
Answer templates text when selected also included the salutation associated with the queue, then the text of the template, then the quoted ticket text, and finally the signature associated with the queue.
Forward templates are similar to Answer templates, but they does not include the salutation part.
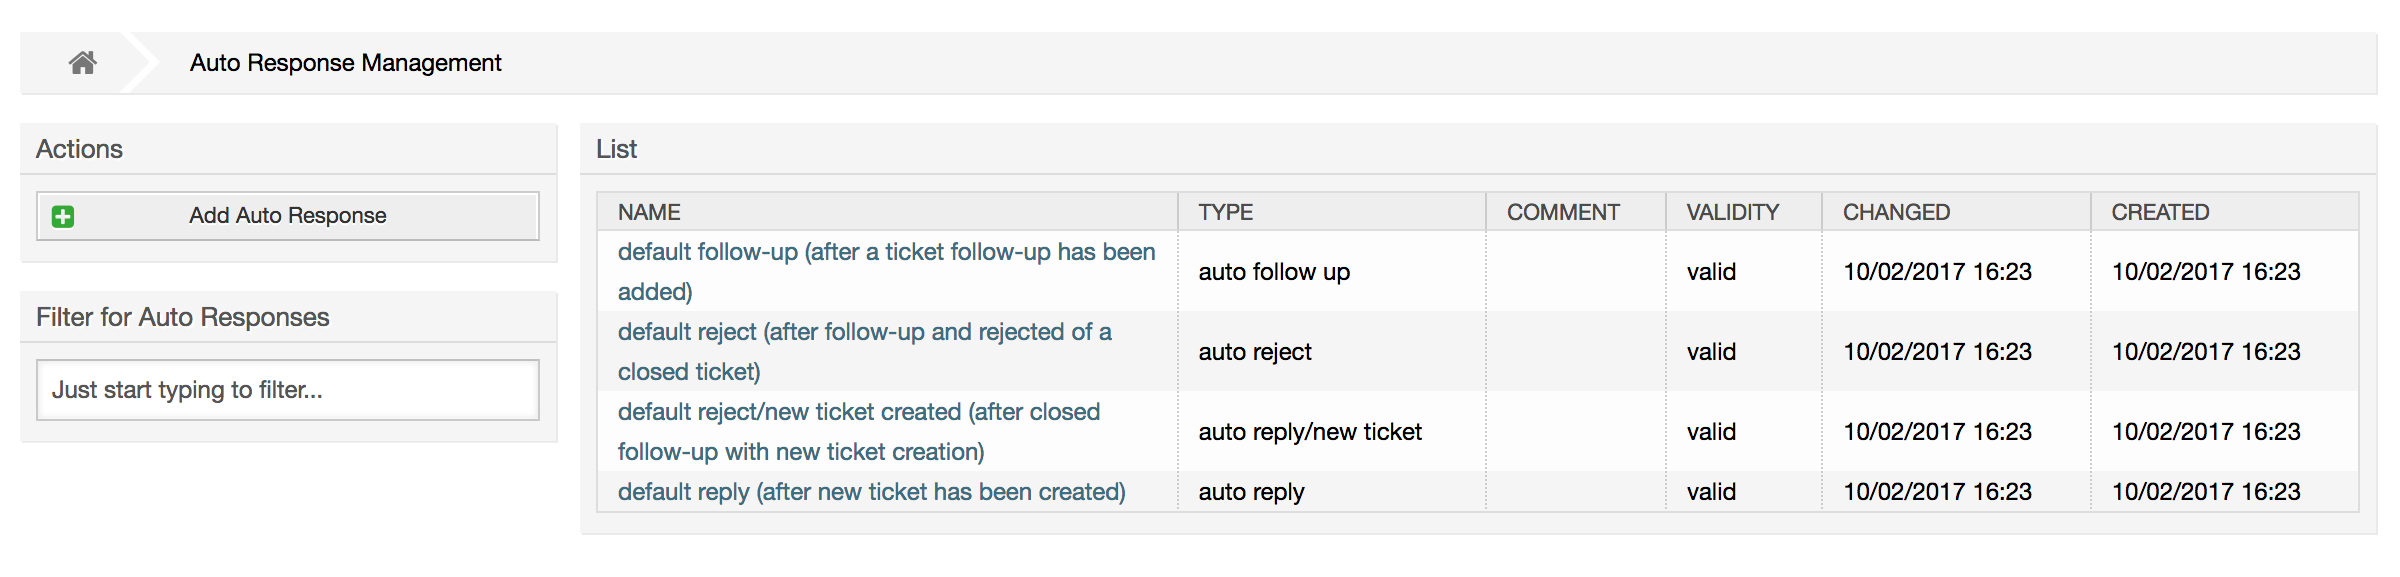
OTRS allows you to send automatic responses to customers based on the occurrence of certain events, such as the creation of a ticket in a specific queue, the receipt of a follow-up message in regards to a ticket, the closure or rejection of a ticket, etc. To manage such responses, click the link "Auto responses" on the Admin page (see figure below).
To create an automatic response, click on the button Add auto response, provide the needed data and submit it (see figure below).
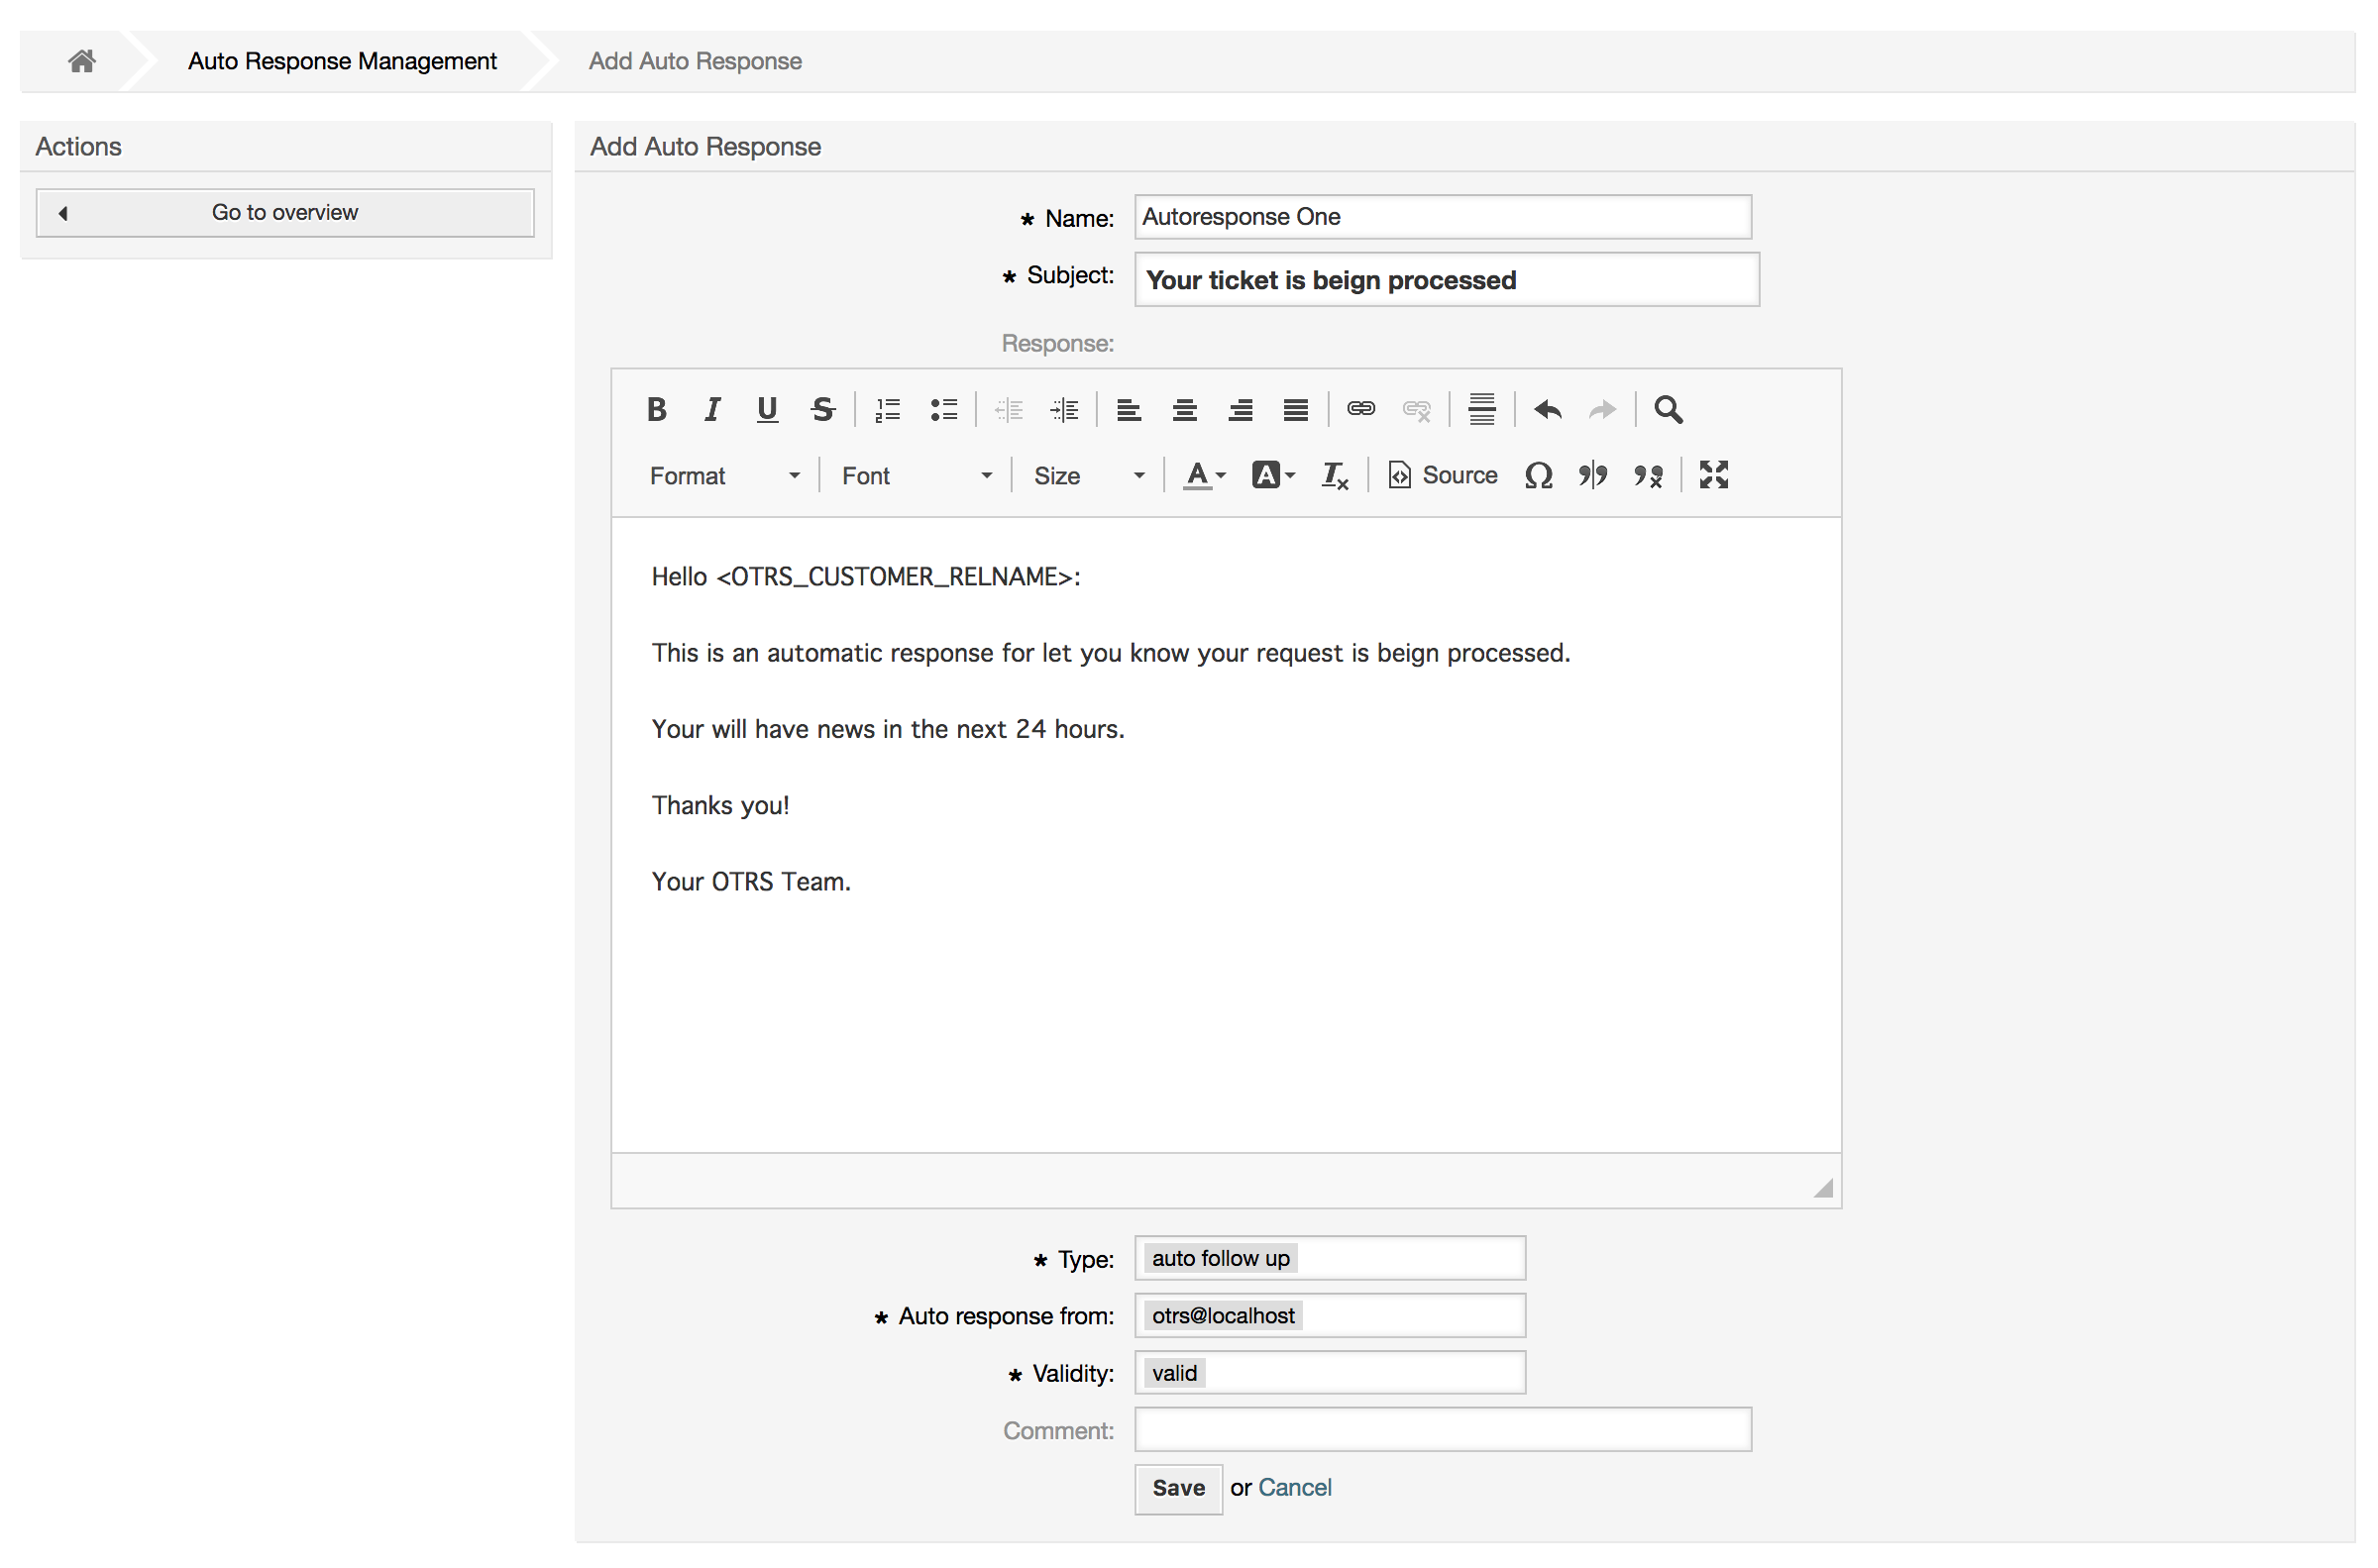
The subject and text of auto responses can be generated by variables, just as in signatures and salutations. If you insert, for example, the variable <OTRS_CUSTOMER_EMAIL[5]> into the body of the auto answer, the first 5 lines of the customer mail text will be inserted into the auto answer. You will find more details about the valid variables that can be used at the bottom of the screen shown in the Figure.
For every automatic answer, you can specify the event that should trigger it. The system events that are available after a default installation are described in the Table 4-4.
Table 4.4. Events for auto responses
| Name | Description |
|---|---|
| auto reply | Creation of a ticket in a certain queue. |
| auto reply/new ticket | Reopening of an already closed ticket, e.g. if a customer replies to such ticket. |
| auto follow up | Reception of a follow-up for a ticket. |
| auto reject | Automatic rejection of a ticket, done by the system. |
| auto remove | Deletion of a ticket, done by the system. |
Note
As with other OTRS entities, auto responses too cannot be deleted, only deactivated, by setting the Valid option to invalid or invalid-temporarily.
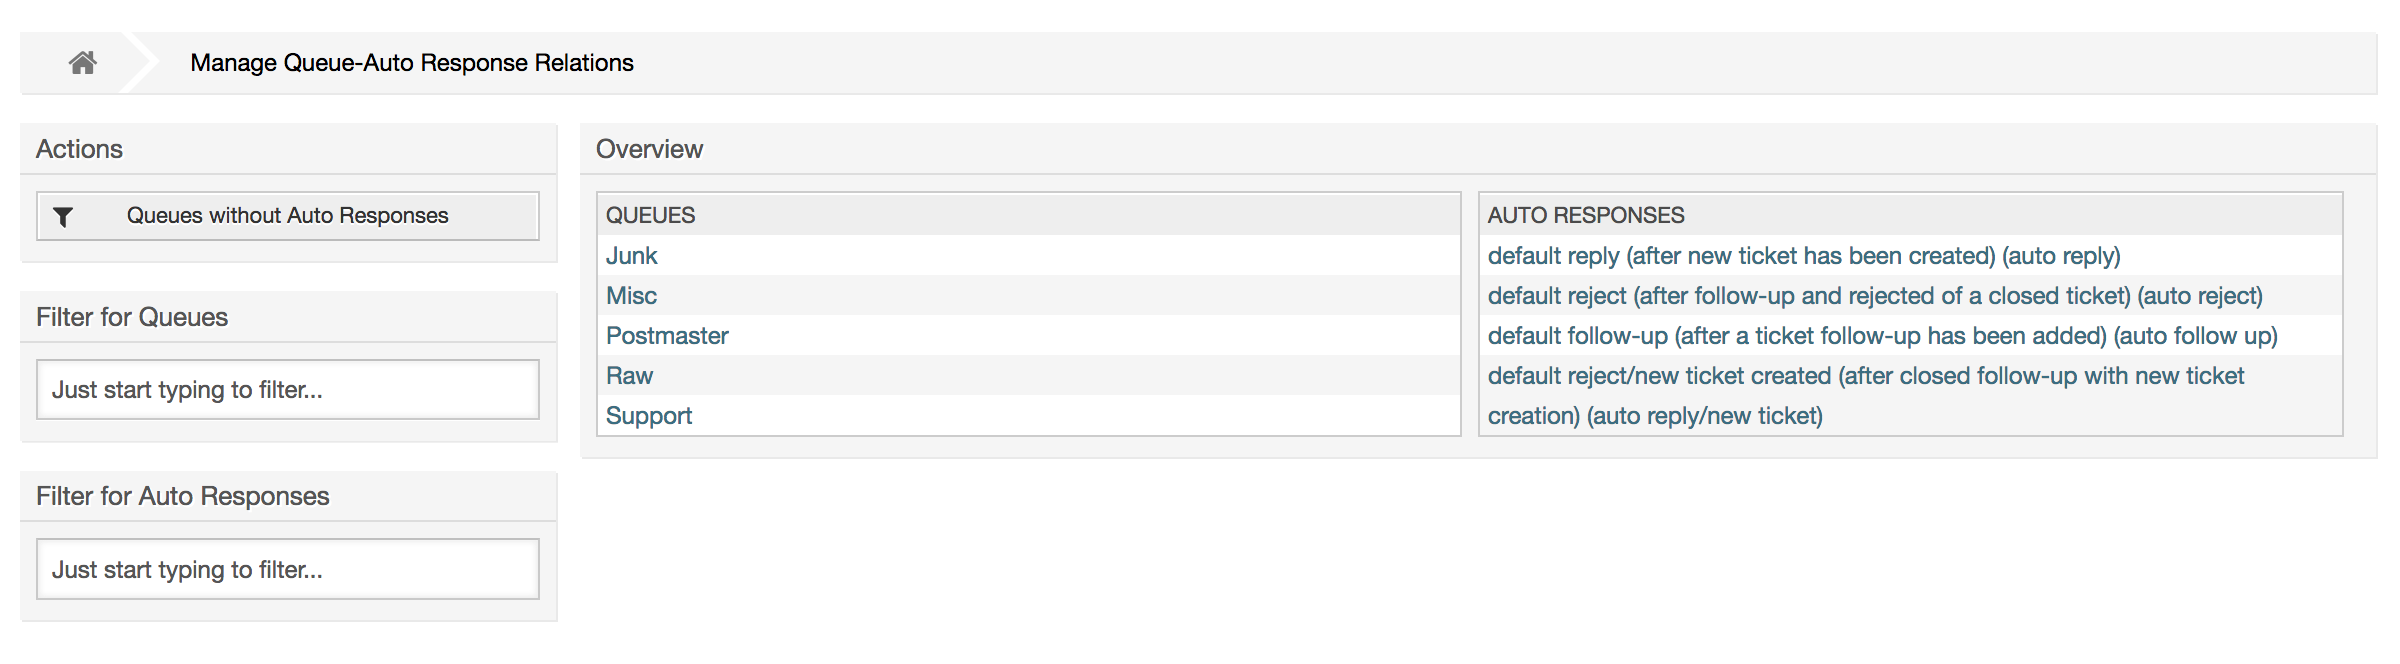
To add an auto response to a queue, use the "Auto Response <-> Queues" link on the Admin page (see figure below). All system events are listed for every queue, and an auto answer with the same event can be selected or removed via a listbox.

To define the different auto responses that will be available for a queue, click on the corresponding queue name (see figure below). It is also possible to edit an existing auto response - to do so, click on the response and edit in the same manner as editing a new auto response.
To enable OTRS to send emails, you need a valid email address to be used by the system. OTRS is capable of working with multiple email addresses, since many support installations need to use more than one. A queue can be linked to many email addresses, and vice versa. The address used for outgoing messages from a queue can be set when the queue is created. Use the "Email Addresses" link from the Admin page to manage all email addresses of the system (see figure below).
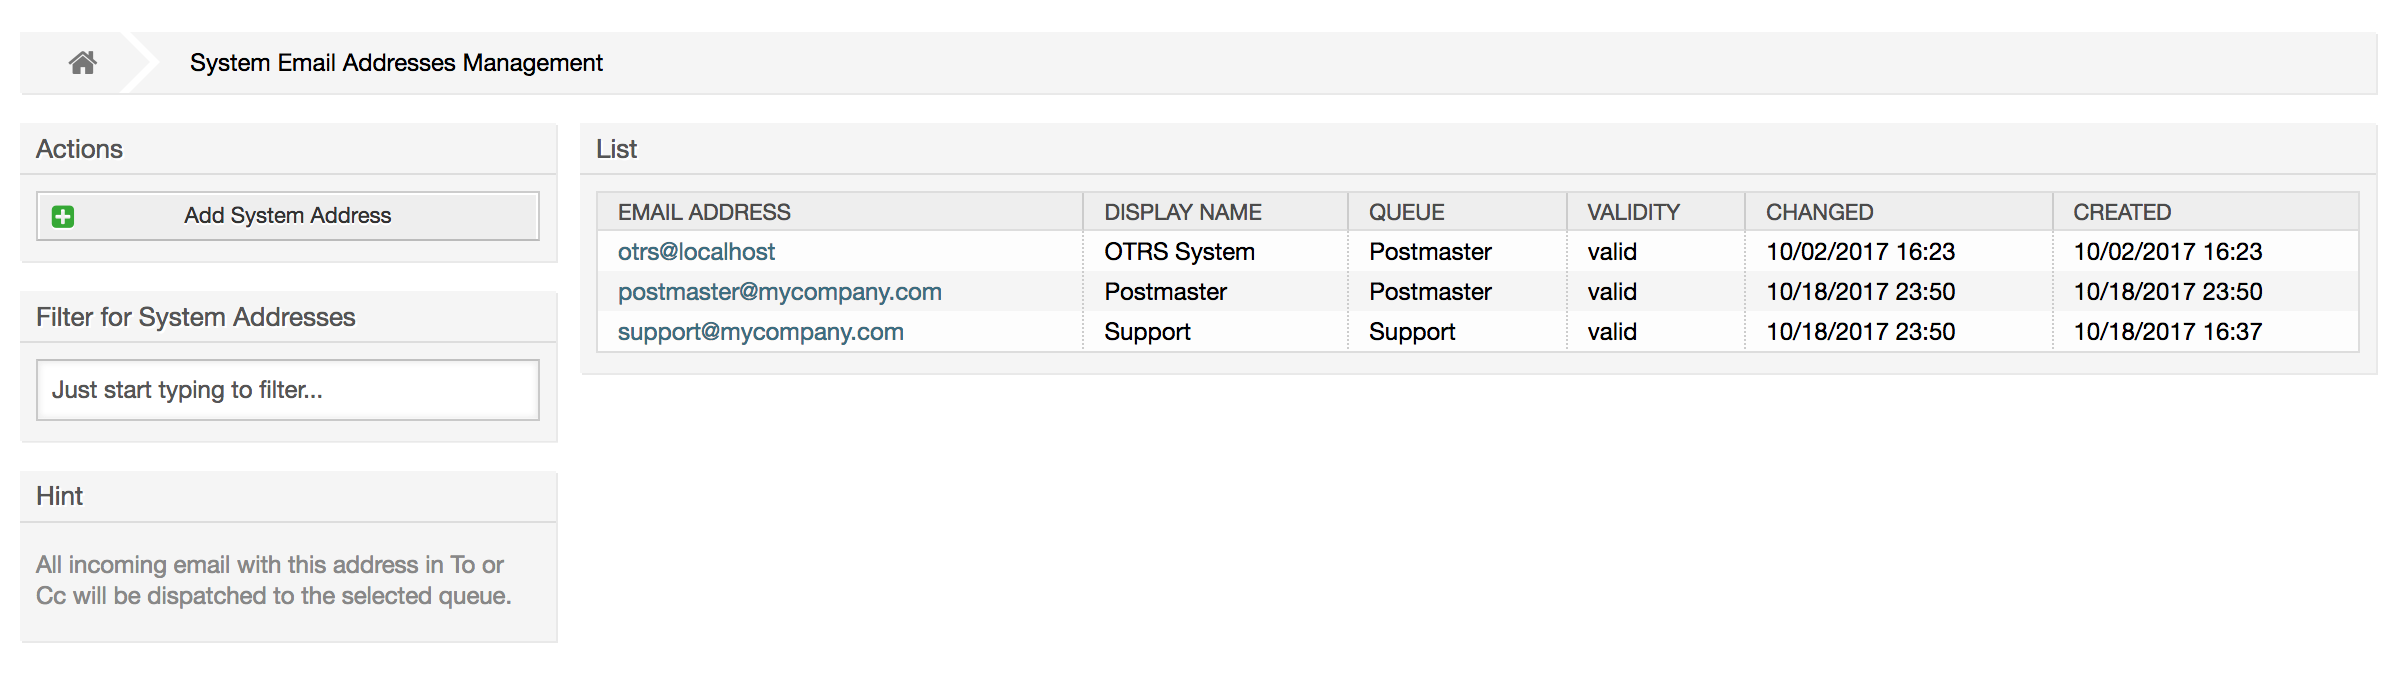
If you create a new mail address (see figure below),you can select the queue or sub queue to be linked with it. This link enables the system to sort incoming messages via the address in the To: field of the mail into the right queue.

Note
As with other OTRS entities, email addresses cannot be deleted, only deactivated by setting the Valid option to invalid or invalid-temporarily.
OTRS allows ticket notifications to be sent to agents and customers, based on the occurrence of certain events. Agents can customize their ticket notification settings via the preferences link.
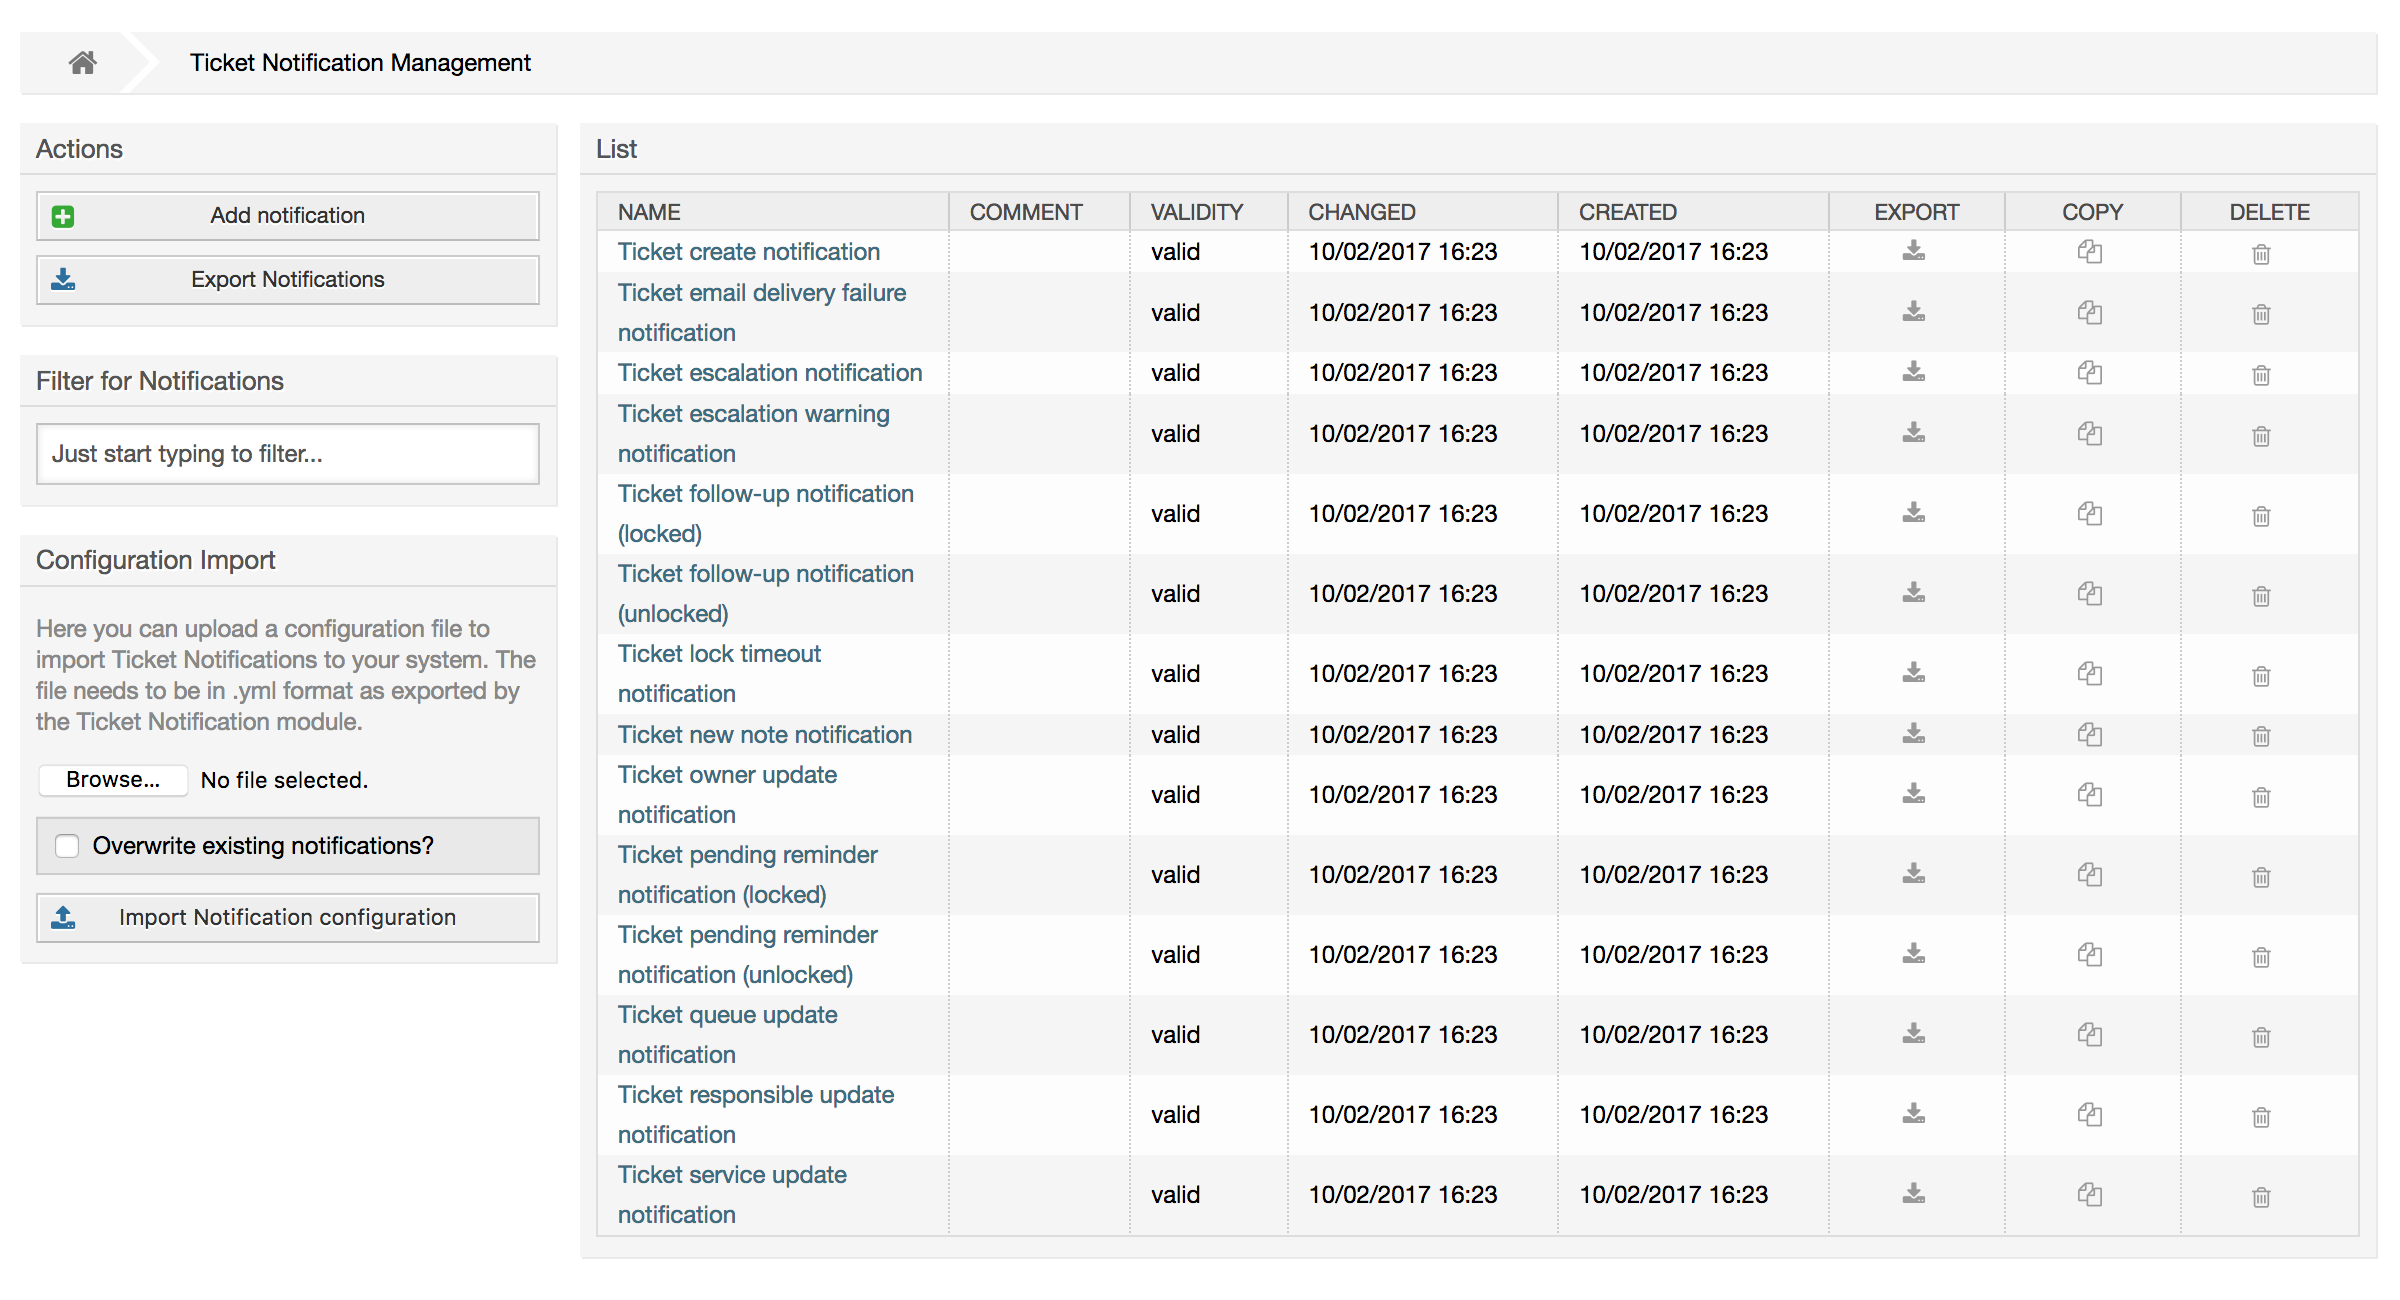
Through the "Ticket Notifications" link on the Admin page, you can manage the ticket notifications of your system (see figure below). OTRS comes with a set of predefined notifications that cover a wide range of use cases.
You can customize many aspects of the notifications. Click on the notification you want to change, and its content will be loaded for editing (see figure below).
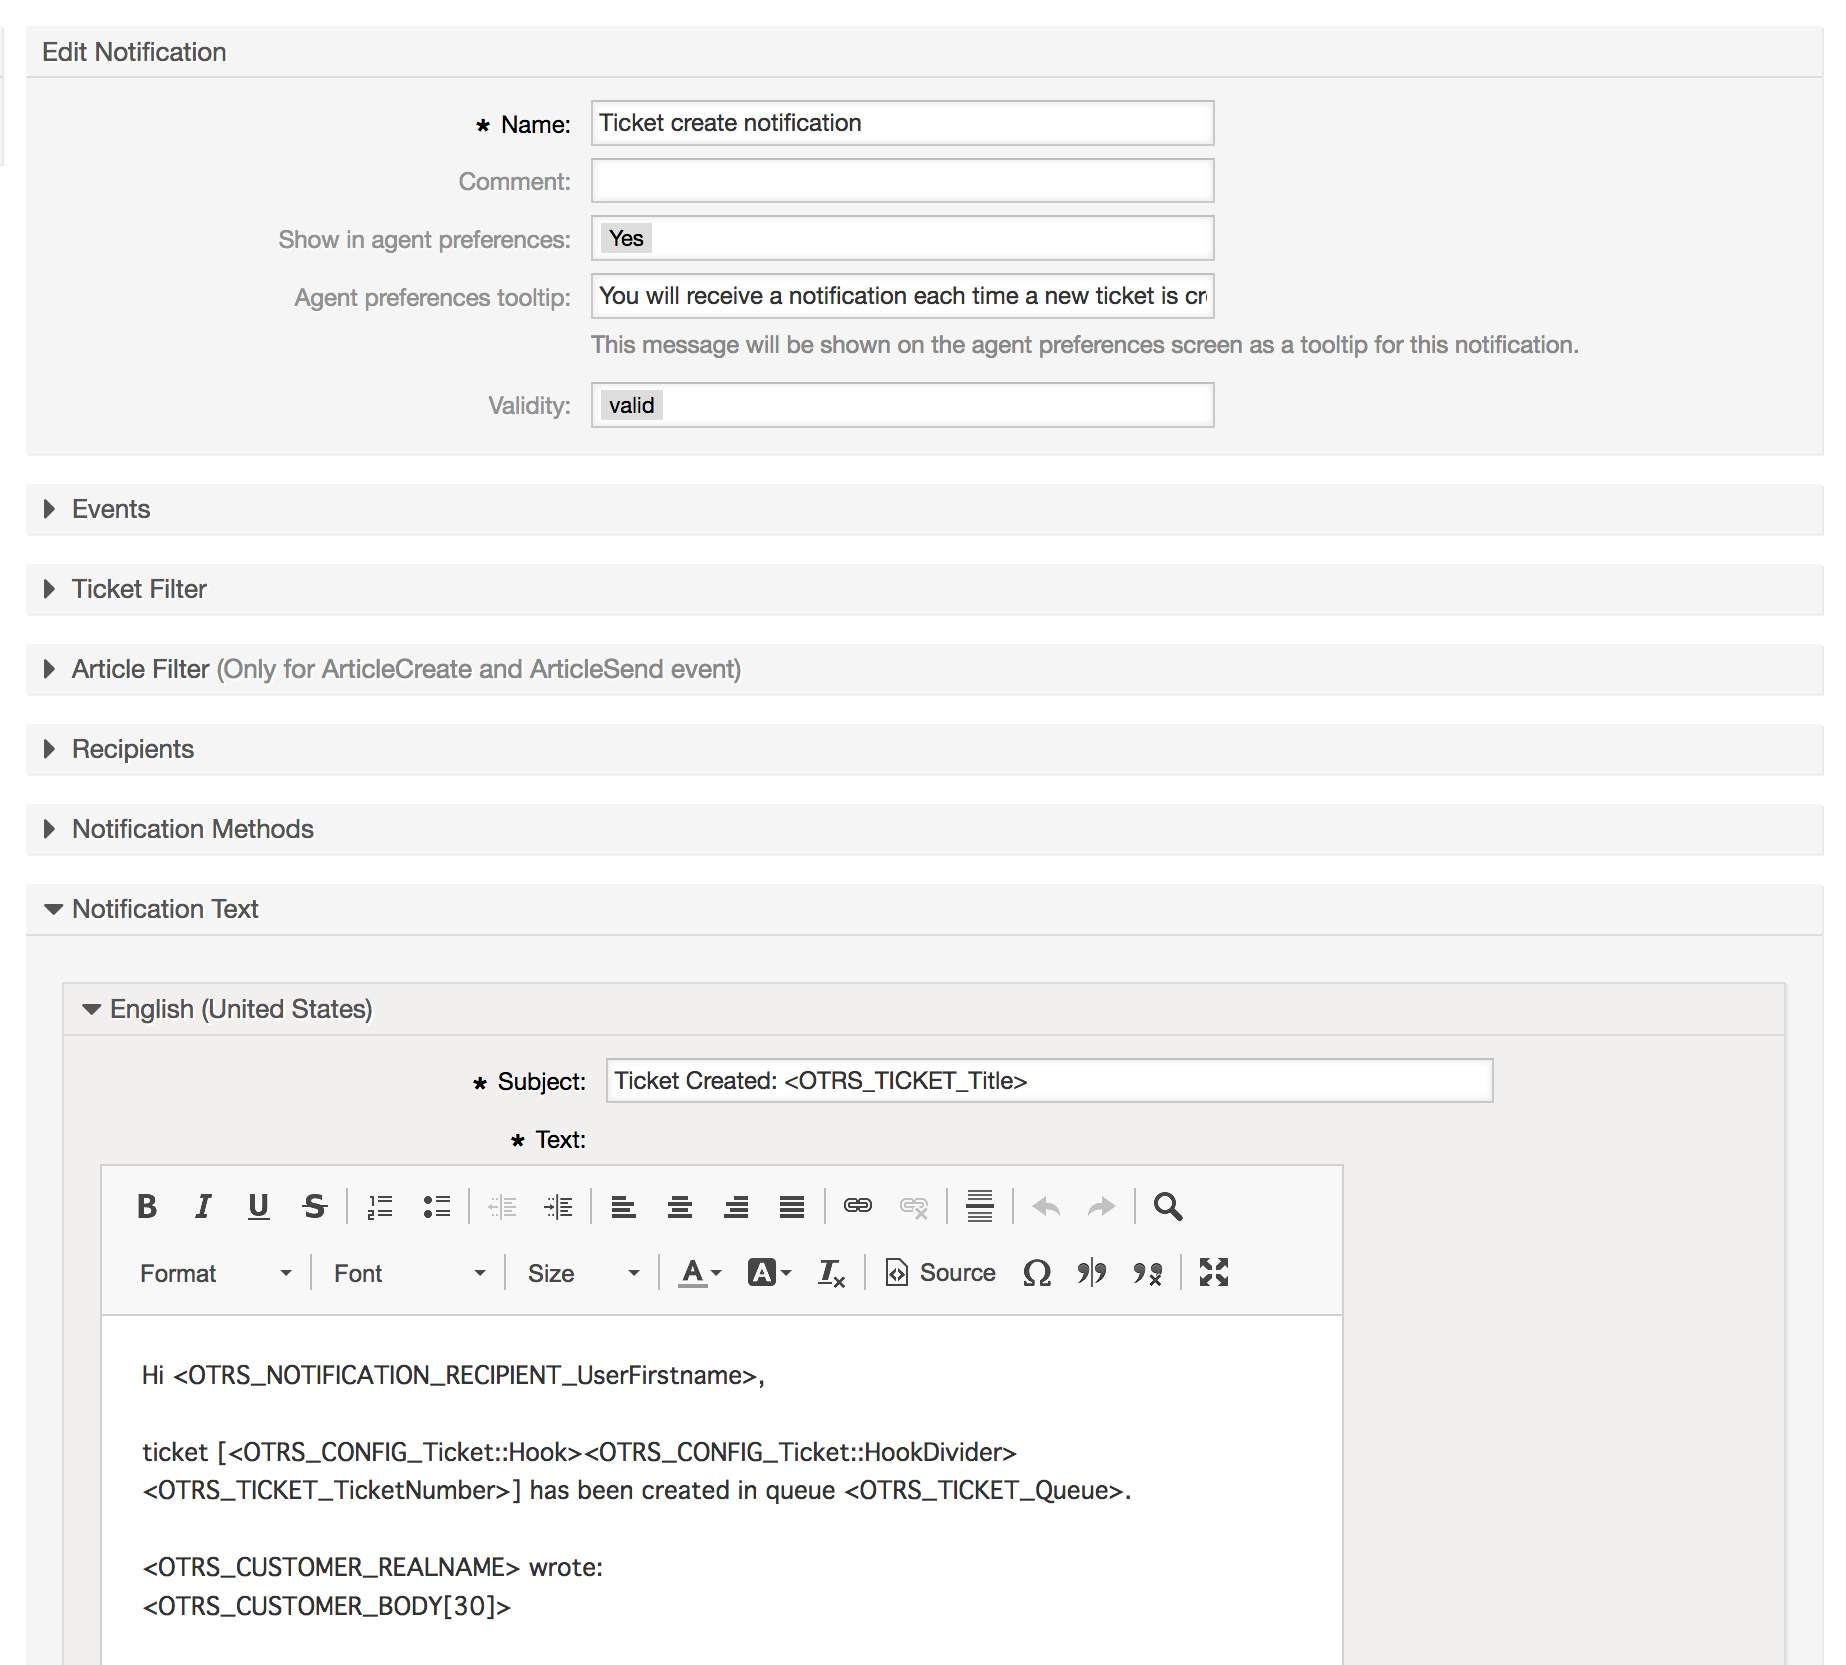
You can edit the basic data of this notification such as name and comment, and control if the agents may choose to receive this notification (per transport method). For every language, a subject and body can be added/edited to configure what will actually be sent as the notification content.
Just as with signatures and salutations, it is possible to dynamically create the content of a notification by using special variables. You can find a list of variables at the bottom of the screen.
You can choose which events should trigger this notification, and limit it to tickets which match certain criteria (ticket and/or article filter). This makes it possible to create different notifications for different queues, priorities or other criteria that might be relevant for your system.
The recipients of the notification can be configured according to different criteria (groups, roles, individual agents etc.). All configured recipients will receive the notification.
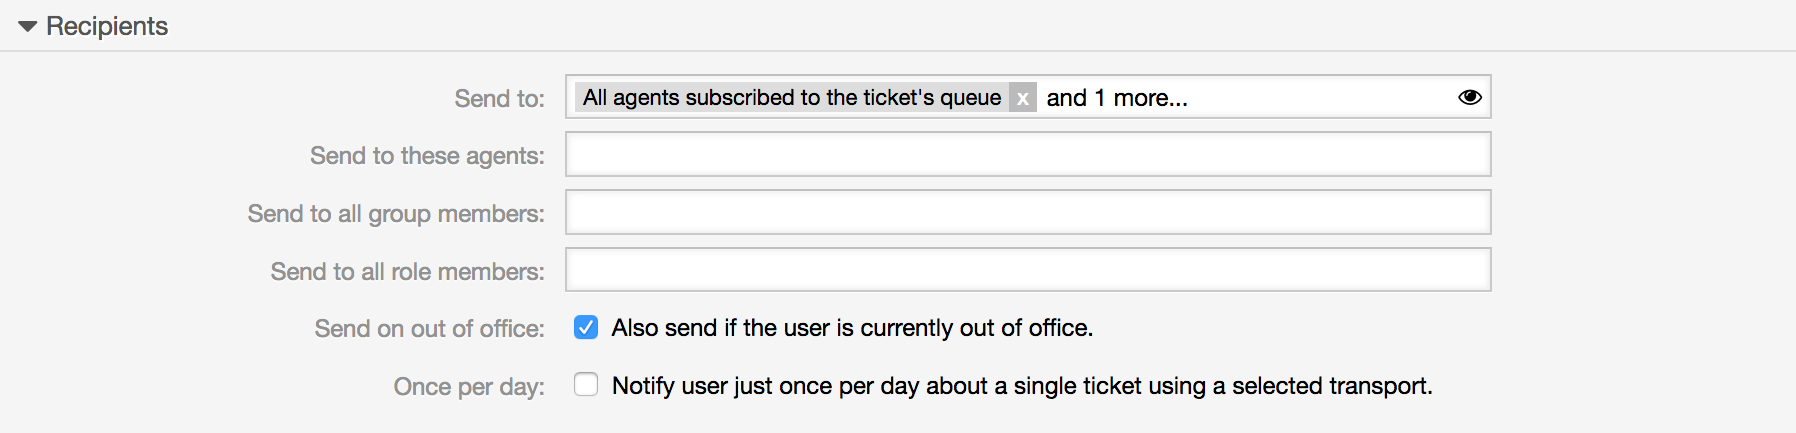
Additionally, you can specify if the notification should be sent to agents who are out of office, and limit the sending to once per day and ticket (e. g. pending reminder notification).
Notifications can be sent with different notification methods. The "Email" notification method is available in OTRS Free, with OTRS Business Solution™ you also get the possibility to store and view the notifications in the database (so that no email client is needed to use OTRS) as well as to send them via SMS (e. g. for very important notifications).
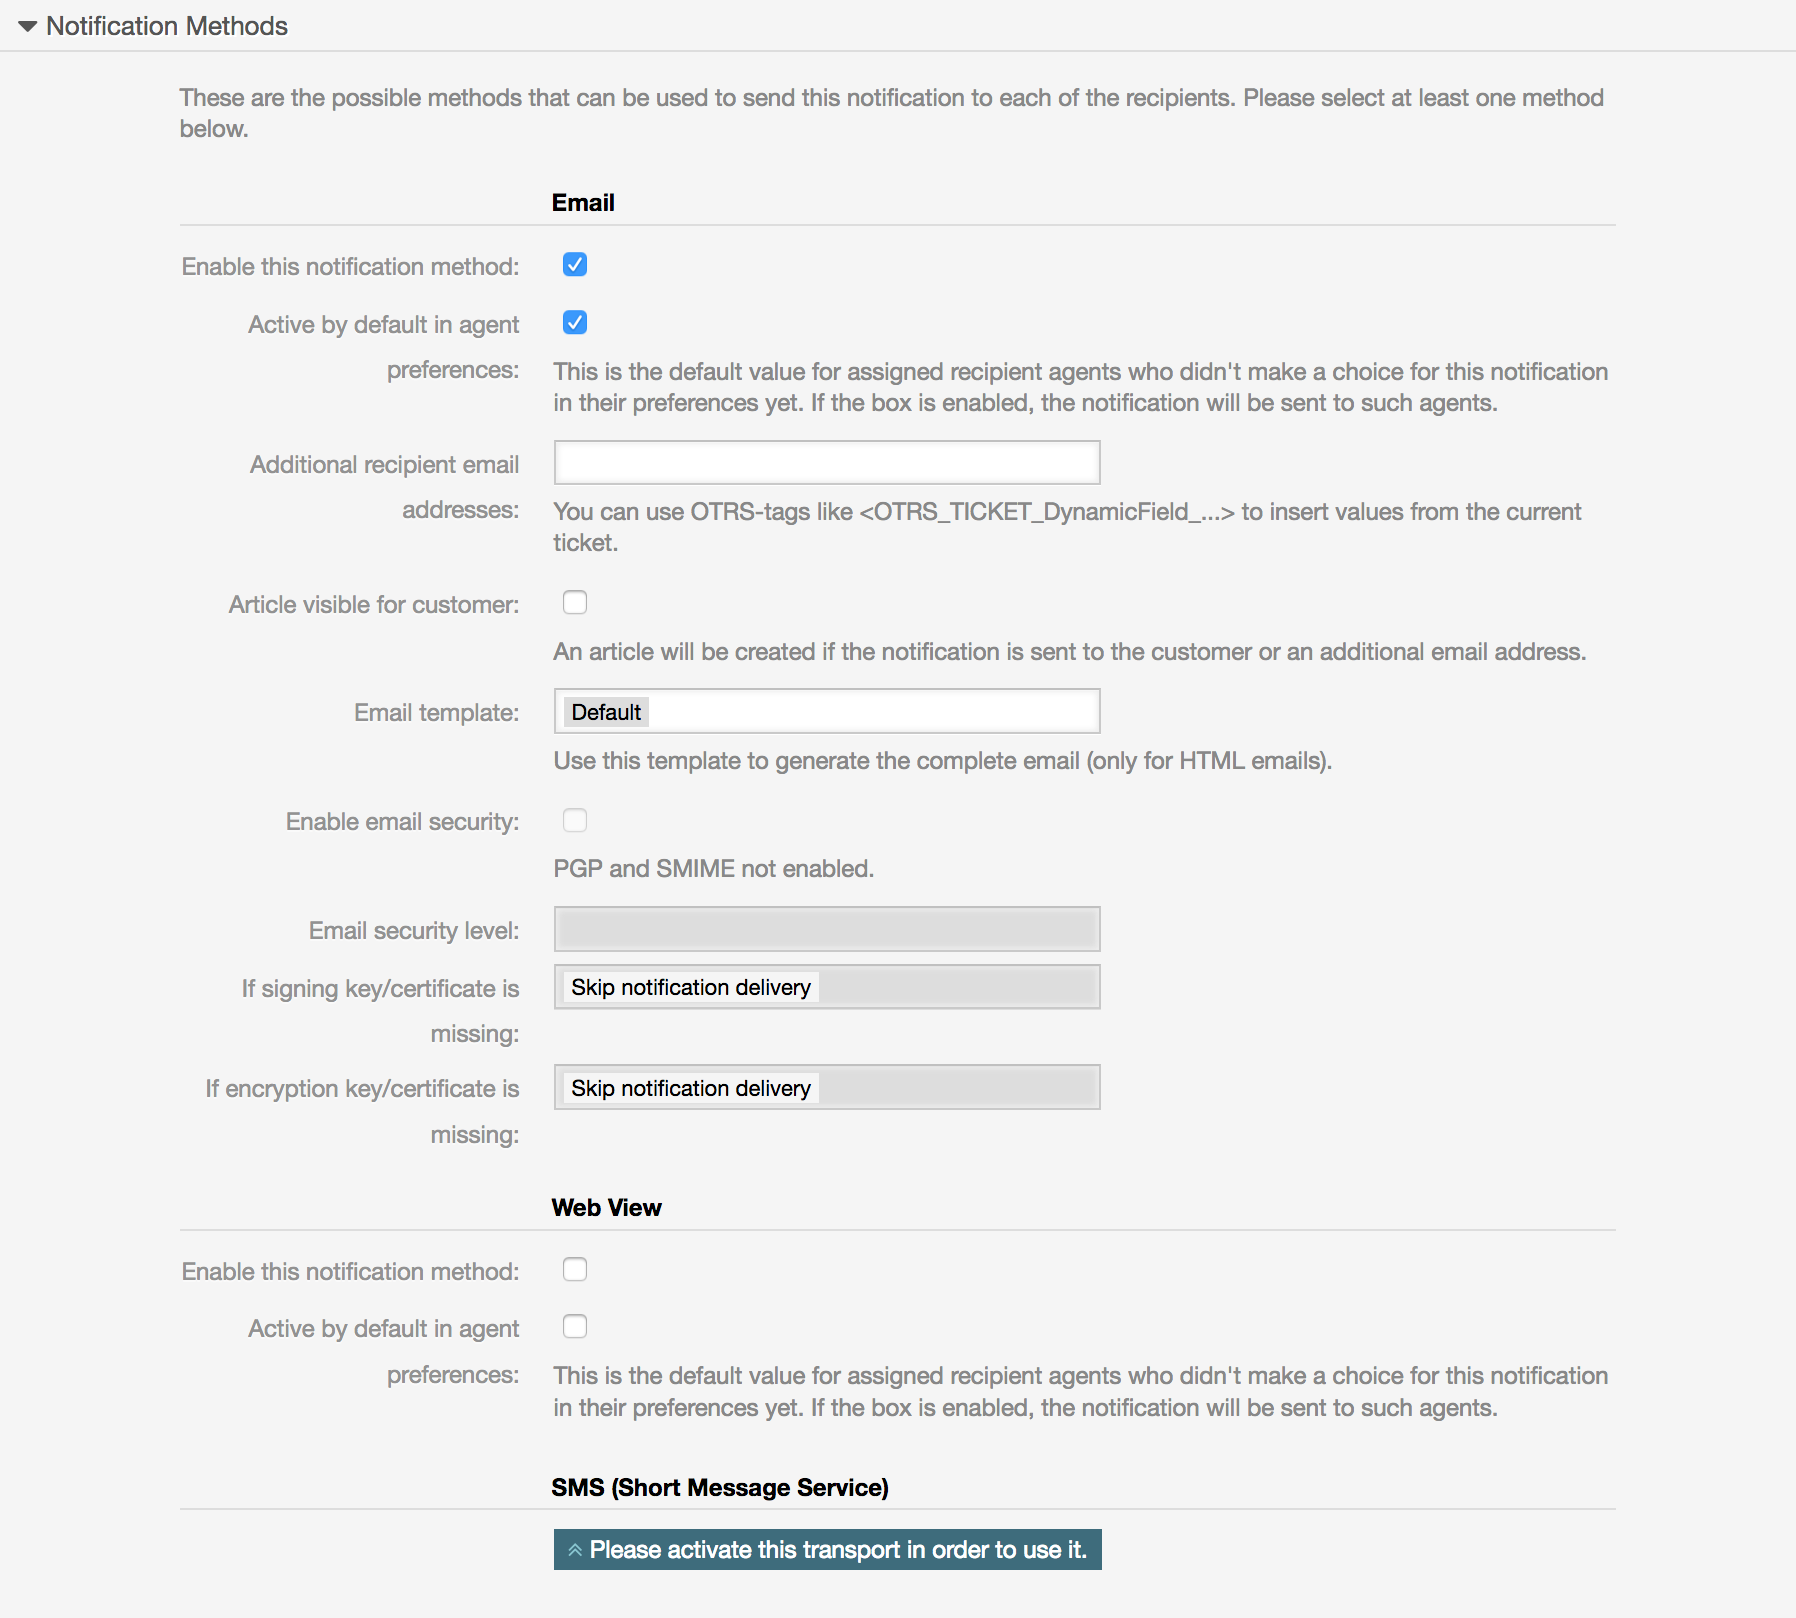
The field 'Additional recipient email addresses' provides the possibility to use OTRS-tags like <OTRS_TICKET_DynamicField_...> to insert values from the current ticket. The according SMS field (only available in OTRS Business Solution™) also has this feature.
Since OTRS 5s Email transport contains security options for each notification, that includes signing and encrypting possibilities with PGP and S/MIME and the opportunity to decide what to do in case of missing key or certificate.
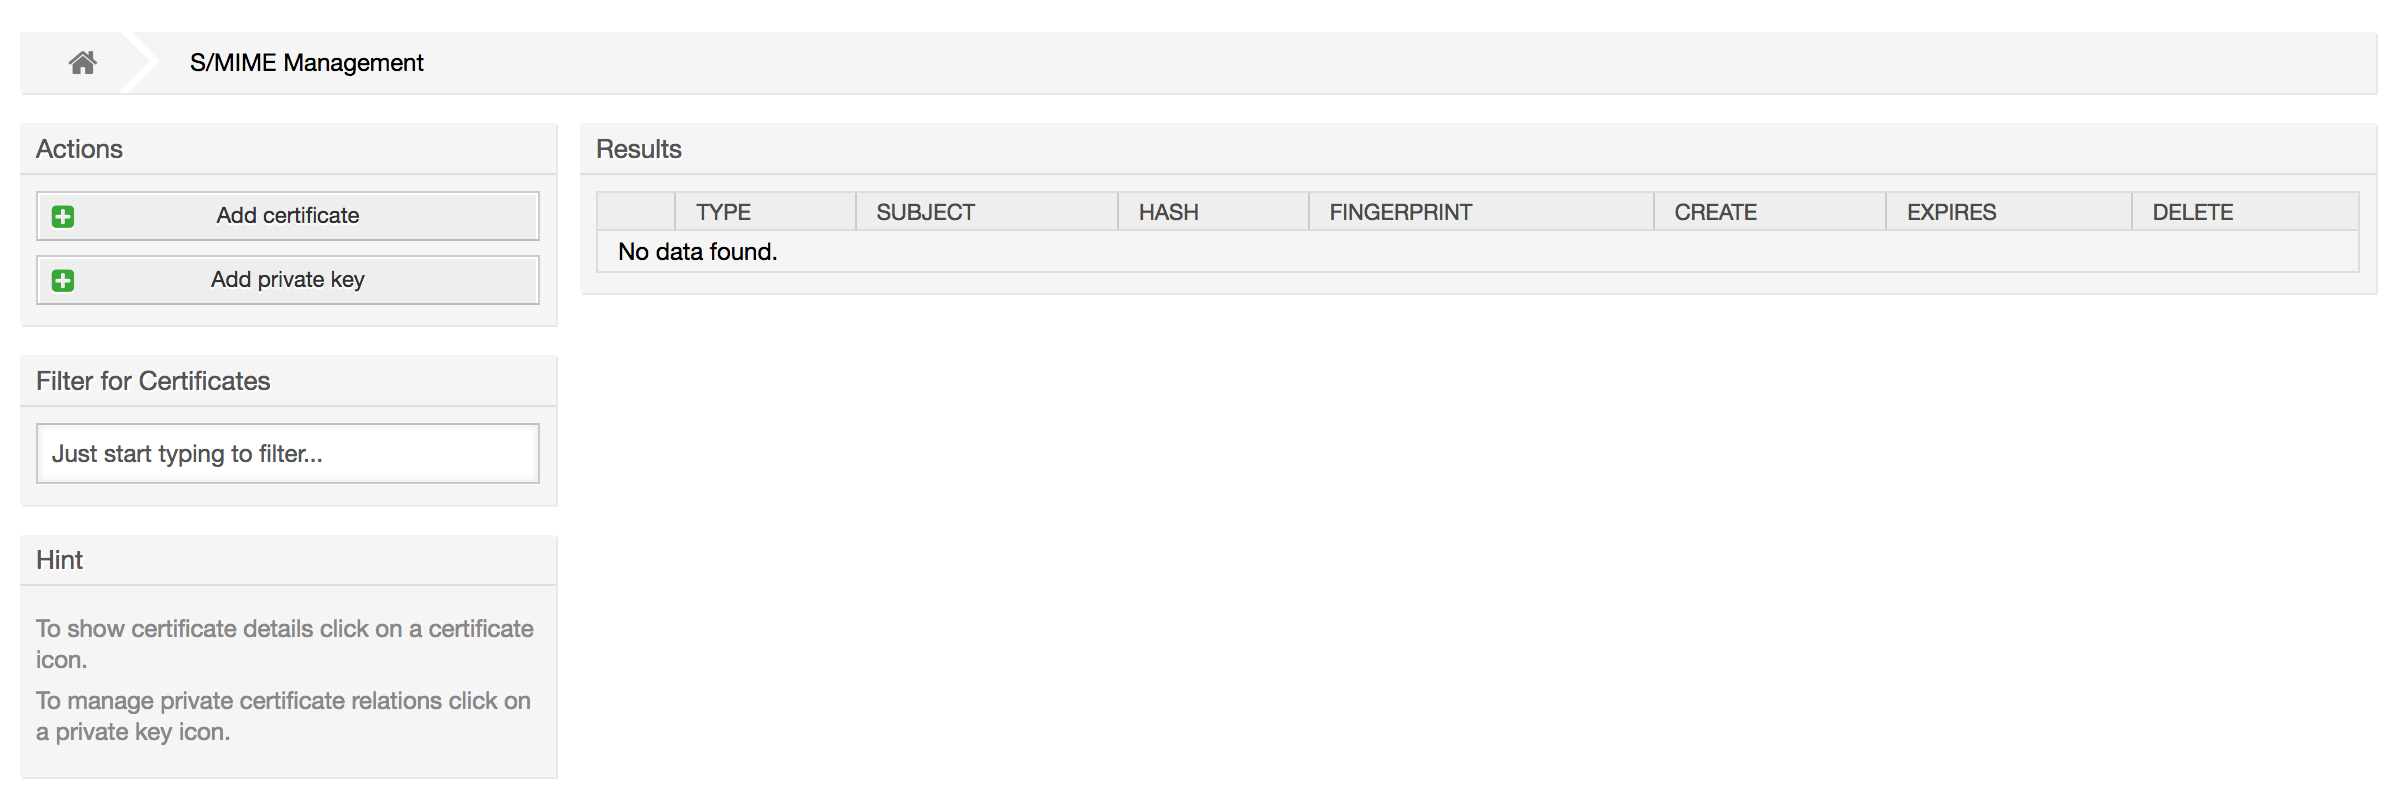
OTRS can process incoming S/MIME encoded messages and sign outgoing mails. Before this feature can be used, you need to activate it and change some configuration parameters in the SysConfig.
The "S/MIME Certificates" link on the Admin page allows you to manage your S/MIME certificates (see figure below). You can add or remove certificates, and also search through the SMIME data.
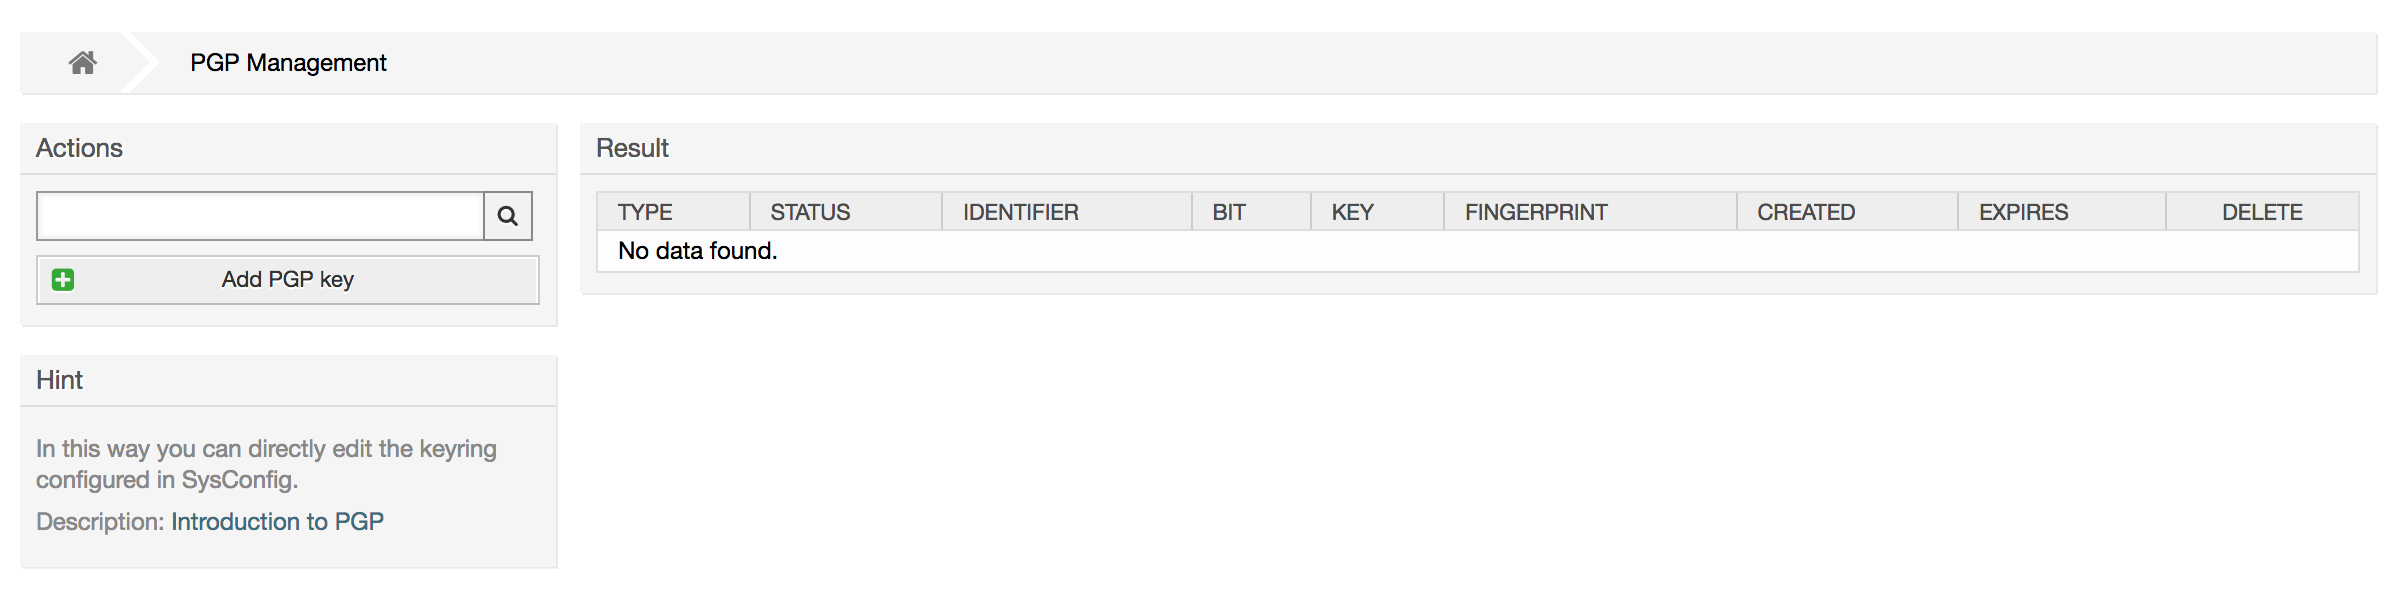
OTRS handles PGP keys, which allows you to encrypt/decrypt messages and to sign outgoing messages. Before this feature can be used, you need to activate it and change some configuration parameters in the SysConfig.
Through the "PGP Keys" link on the Admin page, it is possible to manage the key ring of the user who shall be used for PGP with OTRS (see figure below), e.g. the local OTRS user or the web server user. It is possible to add and remove keys and signatures, and you can search through all data in your key ring.
Through the "States" link on the Admin page, you can manage the different ticket states you want to use in the system (see figure below).
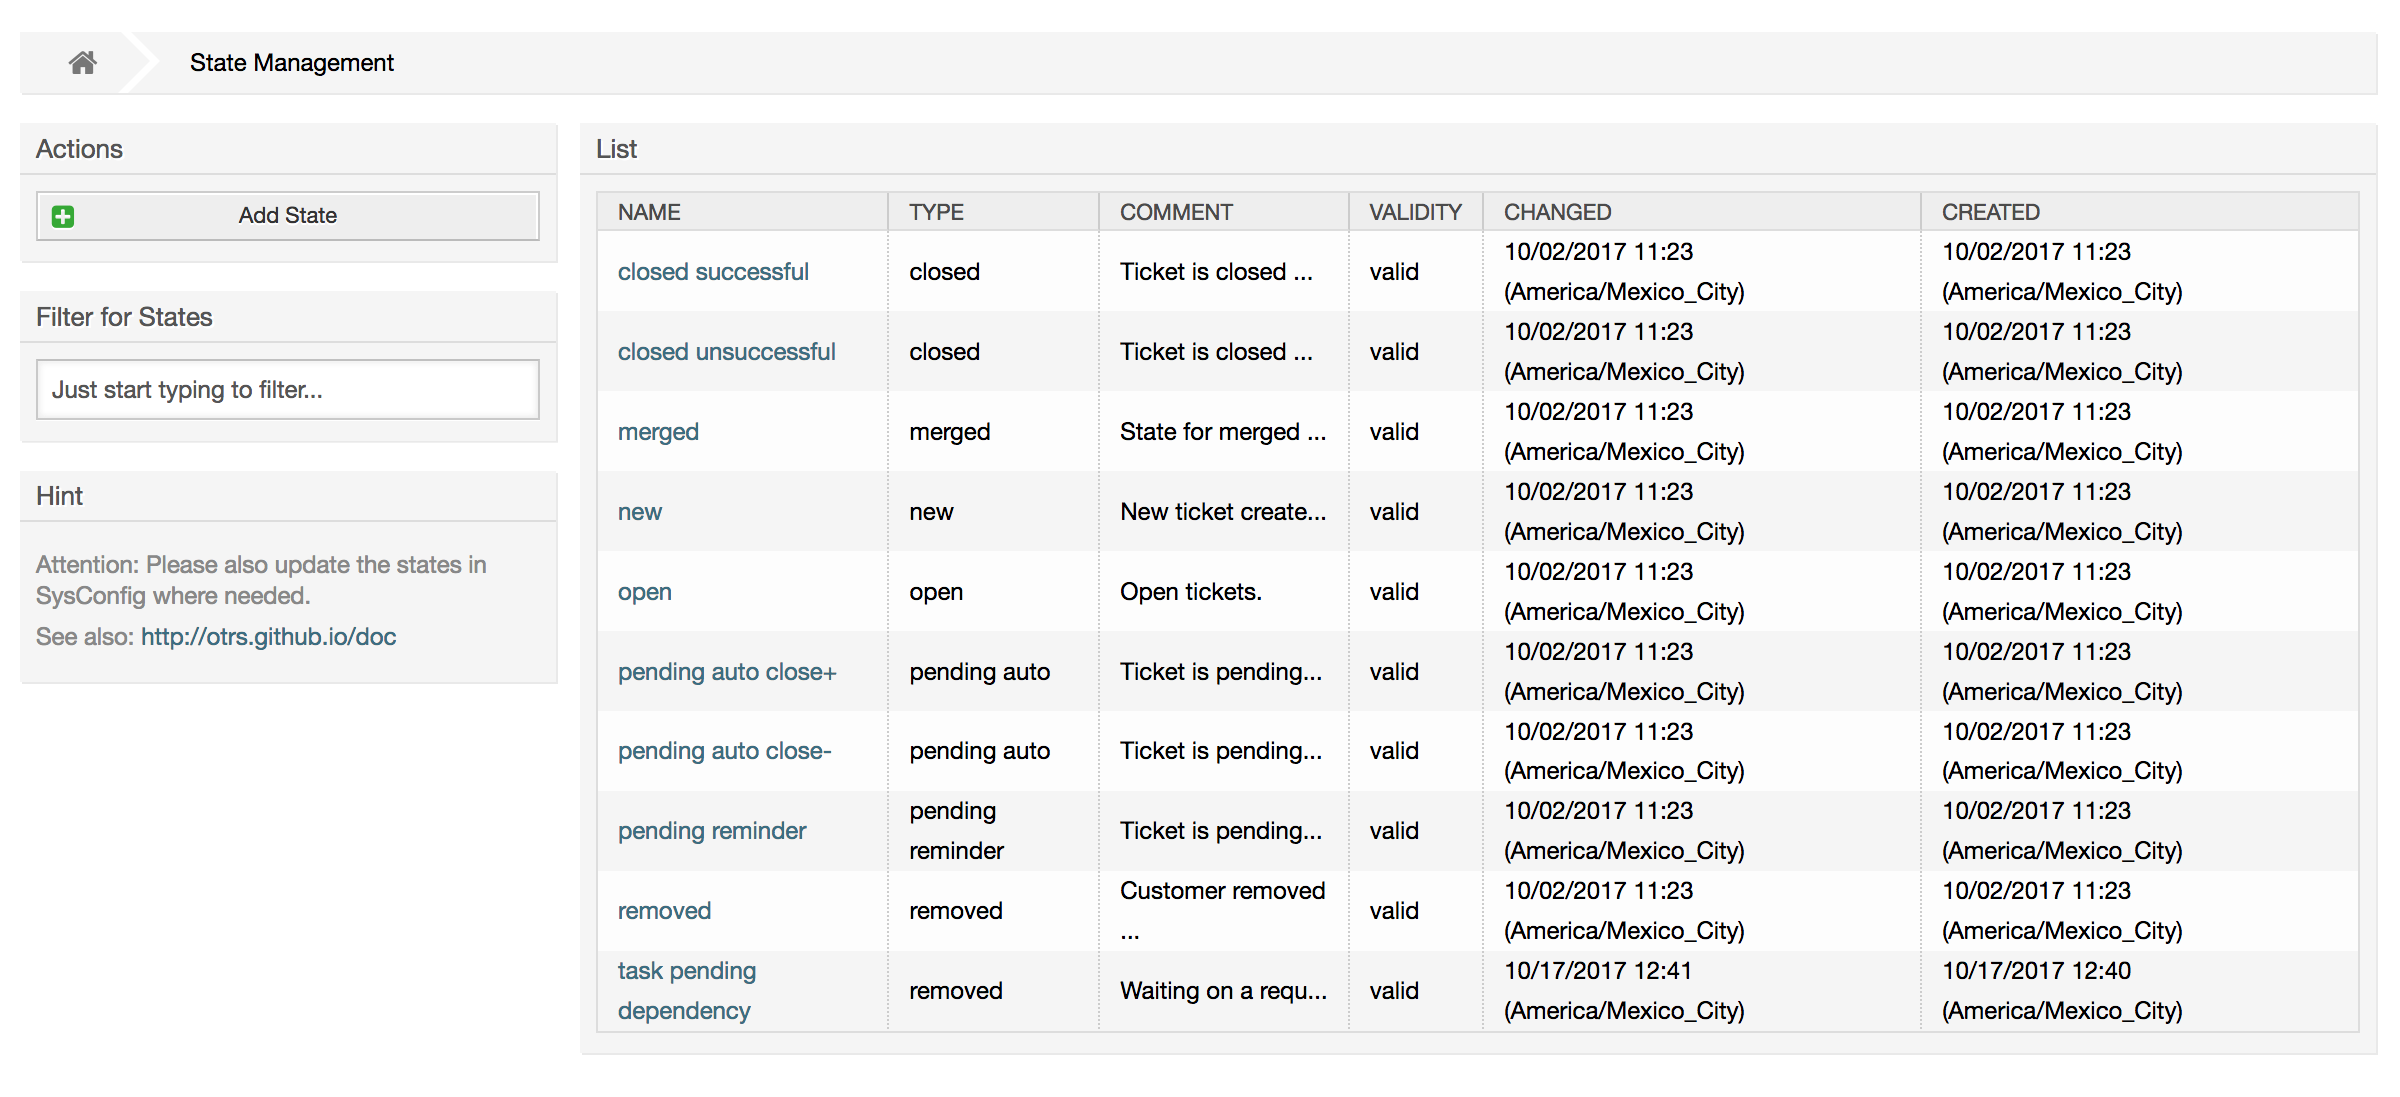
After a default setup, there are some states defined:
closed successful
closed unsuccessful
merged
new
open
pending auto close+
pending auto close-
pending reminder
removed
Every state is linked to a type, which needs to be specified if a new state is created. By default the state types are:
closed
merged
new
open
pending auto
pending reminder
removed
The System Configuration link leads to the section where many OTRS configuration options are maintained.
The system configuration link on the admin page loads the graphical user interface for the system configuration (see figure below). You can upload your own configuration files for the system, as well as backup all current settings into a file. Almost all configuration parameters of the OTRS framework and any installed extensions can be viewed and changed using this interface. All configuration parameters are part of a certain group, which makes it possible to navigate quickly through the vast number of existing parameters. It is also possible to perform a full-text search over all parameters.
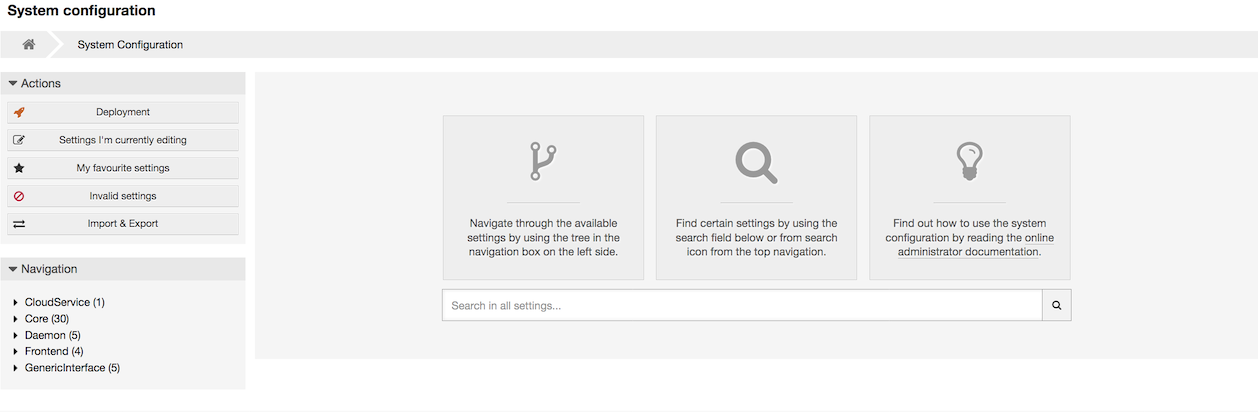
The graphical user interface of the system configuration is described in detail in the chapter "Configuring the system through the web interface".
There are several possibilities to transport new emails into the ticket system. One way is to use a local MTA and the otrs.PostMaster.pl script that pipes the mails directly into the system. Another possibility is the use of mail accounts which can be administrated through the web interface. The "PostMaster Mail Accounts" link on the Admin page loads the management console for the mail accounts (see figure below). OTRS supports the mail protocols: POP3, POP3S, IMAP and IMAPS.
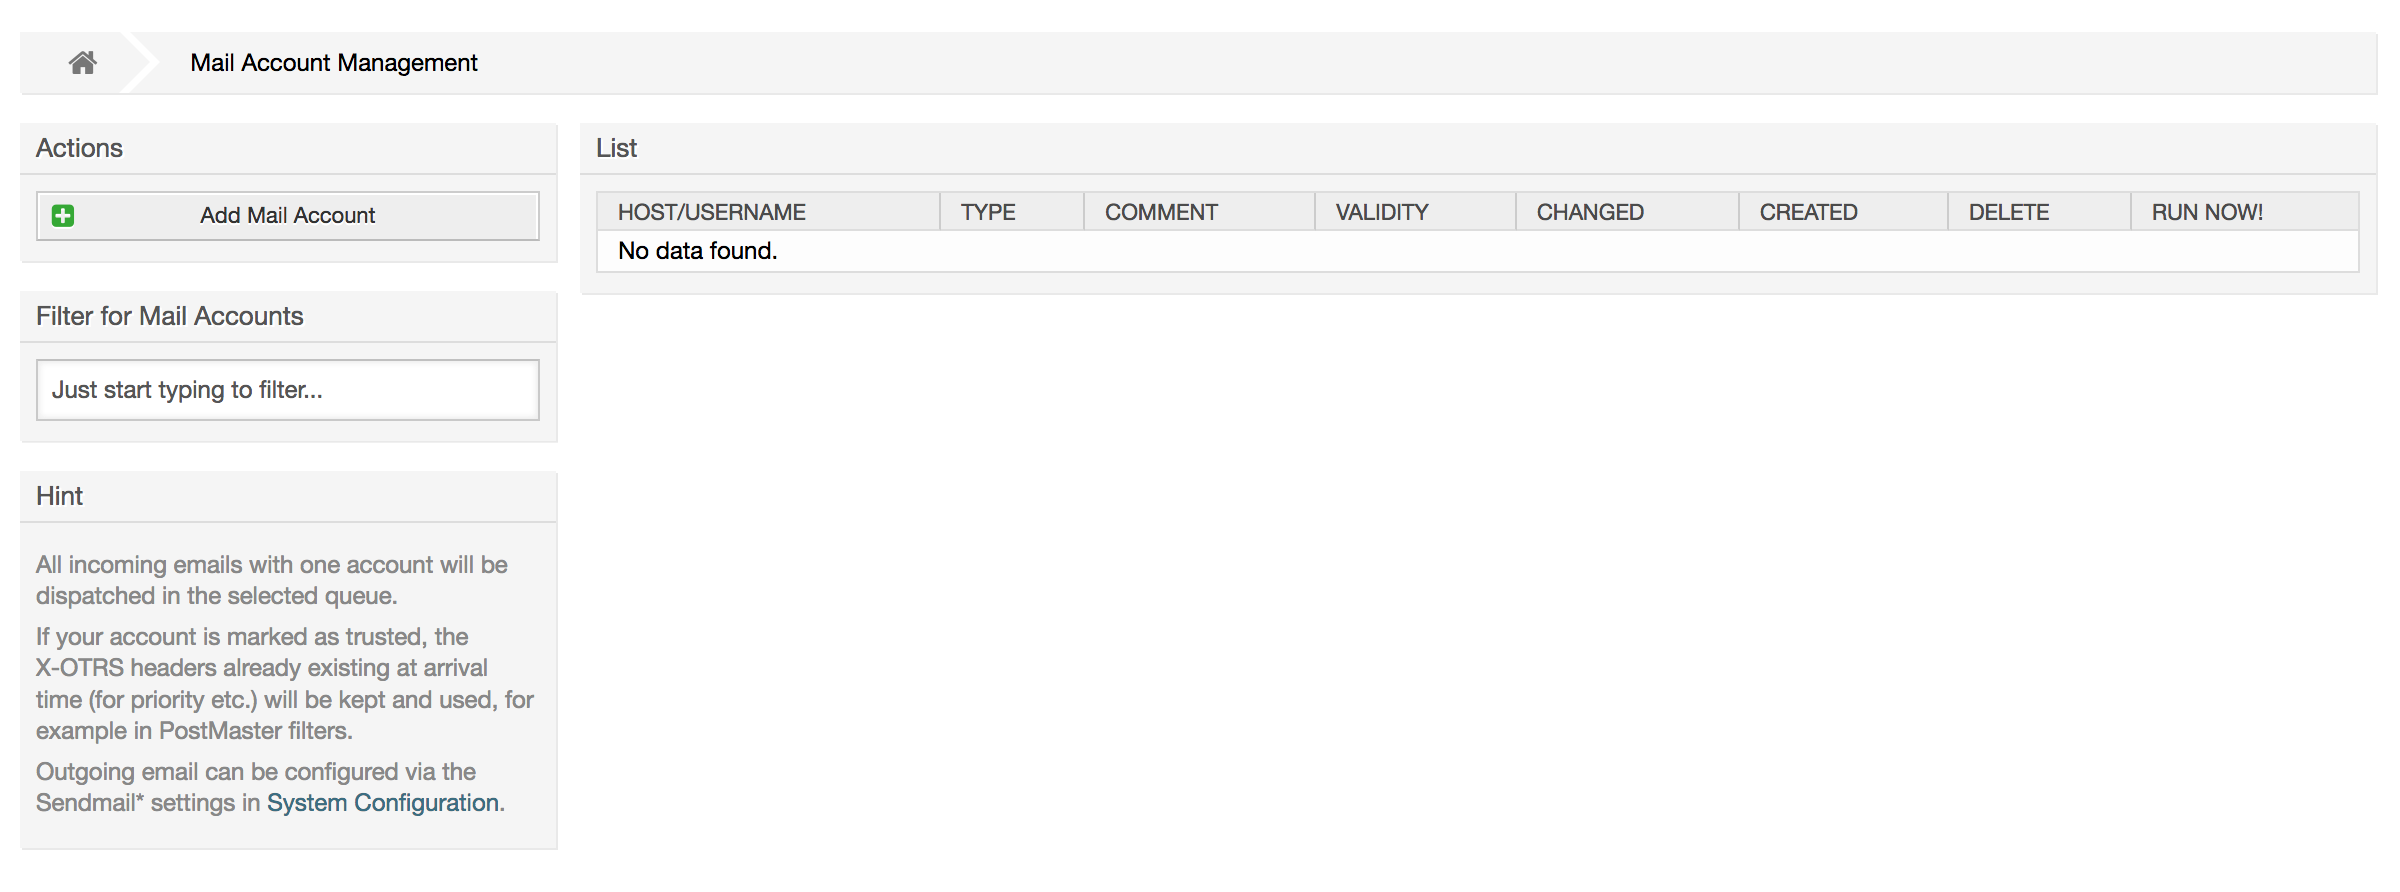
See the section about PostMaster Mail Accounts for more details.
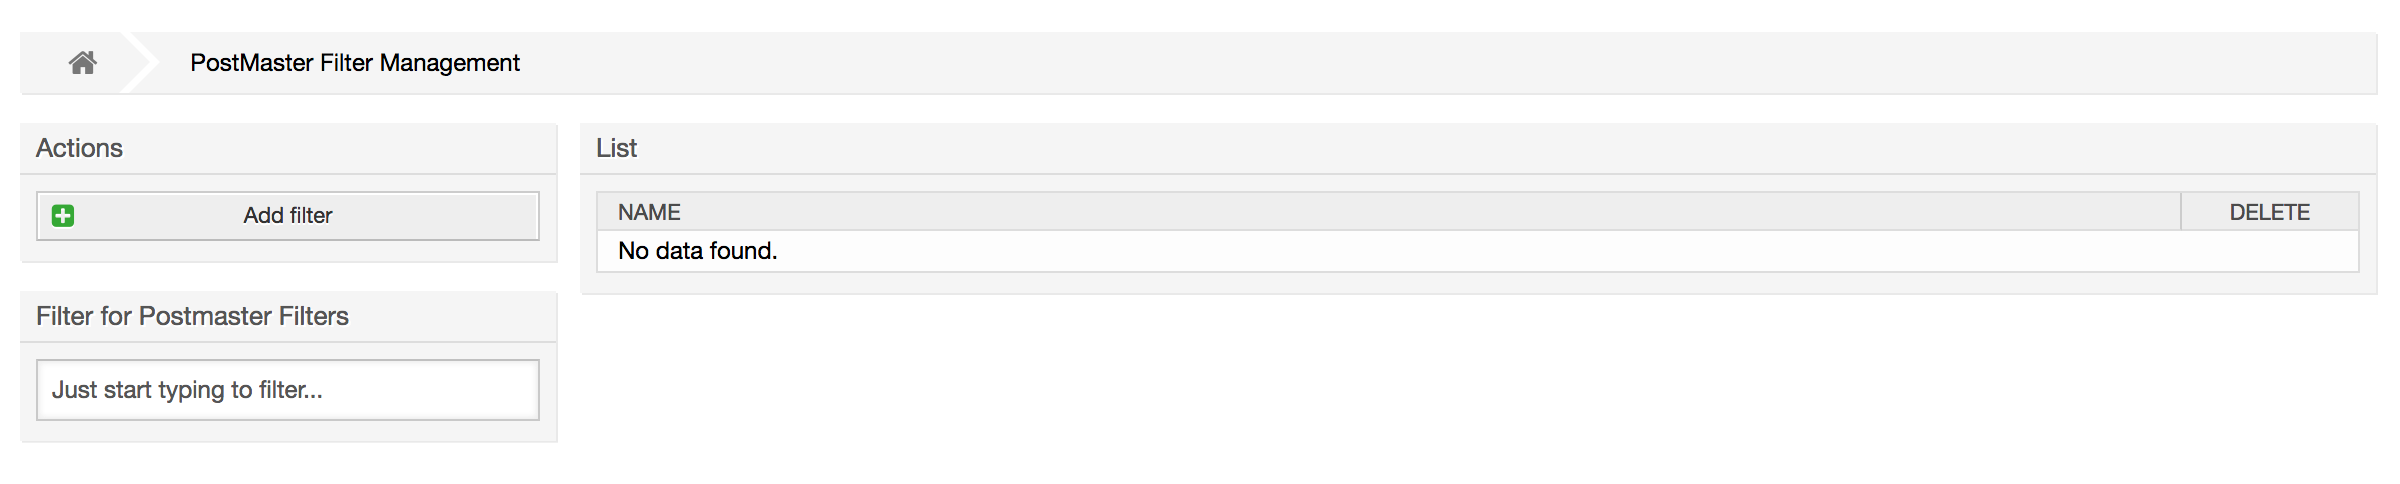
OTRS has the capability to filter incoming email messages. For example, it is possible to put certain emails automatically into specified queues, or to set a specific state or ticket type for some mails. The filters apply to all incoming mails. Several filter conditions can be defined per each mail header. You can manage your filters via the link "PostMaster Filter" on the Admin page (see figure below).
A filter consists of one or more criteria that must be met in order for the defined actions to be executed on
the email. Filter criteria may be defined for the headers or the body of an email, e.g. search for specific
header entries, such as a sender address, or on strings in the body. Even regular expressions can be used for
extended pattern matching. If your filter matches, you can set fields using the X-OTRS
headers in the GUI. These values will be applied when creating the ticket or follow-up message in OTRS. The
table below lists the different X-OTRS headers and their meaning.
Note
You also can use X-OTRS-FollowUp-* headers to set values for follow up emails.
Table 4.5. Function of the different X-OTRS-headers
| Name | Possible values | Description |
|---|---|---|
| X-OTRS-Priority: | 1 very low, 2 low, 3 normal, 4 high, 5 very high | Sets the priority of a ticket. |
| X-OTRS-Queue: | Name of a queue in the system. |
Defines the queue in which the ticket should be sorted. If a queue is set with this header, this
setting has priority over all other filter rules that refer to queues. If you use a sub-queue,
specify it as Parent::Sub.
|
| X-OTRS-Lock: | lock, unlock | Sets the lock state of a ticket. |
| X-OTRS-Ignore: | Yes or True | If this X-OTRS header is set to "Yes", the incoming message will completely be ignored and never delivered to the system. |
| X-OTRS-State: | new, open, closed successful, closed unsuccessful, ... | Sets the next state of the ticket. |
| X-OTRS-State-PendingTime: | e. g. 2010-11-20 00:00:00 | Sets the pending time of a ticket (you also should sent a pending state via X-OTRS-State). You can specify absolute dates like "2010-11-20 00:00:00" or relative dates, based on the arrival time of the email. Use the form "+ $Number $Unit", where $Unit can be 's' (seconds), 'm' (minutes), 'h' (hours) or 'd' (days). Only one unit can be specified. Examples of valid settings: "+50s" (pending in 50 seconds), "+30m" (30 minutes), "+12d" (12 days). Note that settings like "+1d 12h" are not possible. You can specify "+36h" instead. |
| X-OTRS-Type: | default (depends on your setup) | Sets the type of a ticket (if Ticket::Type is activated). |
| X-OTRS-Service: | (depends on your setup) |
Sets the service of a ticket (if Ticket::Service is active). If you want to set a
sub-service you should specify it as Parent::Sub.
|
| X-OTRS-SLA: | (depends on your setup) | Sets the SLA of a ticket (if Ticket::Service support is active). |
| X-OTRS-CustomerUser: | CustomerUser | Sets the customer user for the ticket. |
| X-OTRS-CustomerNo: | CustomerNo | Sets the customer ID for this ticket. |
| X-OTRS-SenderType: | agent, system, customer | Sets the type of the ticket sender. |
| X-OTRS-IsVisibleForCustomer: | 0, 1 | Controls if the article is shown in the customer interface. |
| X-OTRS-DynamicField-<DynamicFieldName>: | Depends on Dynamic Field configuration (Text: Notebook, Date: 2010-11-20 00:00:00, Integer: 1) |
Saves an additional info value for the ticket on <DynamicFieldName> Dynamic
Field.
|
| X-OTRS-Loop: | True | If this X-OTRS header is set, no auto answer is delivered to the sender of the message (mail loop protection). |
| X-OTRS-FollowUp-State-Keep: | 0, 1 |
If this X-OTRS header is set, the incoming follow-up message will not change the ticket state. For
this purpose the header can be customized in the SysConfig using option
KeepStateHeader.
|
| X-OTRS-AttachmentExists: | no, yes | Depending on whether attachments are included in the email this X-OTRS header is set to 'yes', or it has a 'no' value if no attachments are included. |
| X-OTRS-AttachmentCount: | (number of attachments) | This X-OTRS header contains as value the number of attachments which are contained in the email (i.e. '0' for mails without attachments). |
You should specify a name for every filter rule. Filter criteria can be specified in the section "Filter Condition". Choose via the list boxes for "Header 1", "Header 2" and so on for the parts of the messages where you would like to search, and specify on the right side the values you wish to filter on. In the section "Set Email Headers", you can choose the actions that are triggered if the filter rules match. You can select for "Header 1", "Header 2" and so on to select the X-OTRS-Header and set the associated values (see figure below).
Filter rules are evaluated in alphabetical order, and are all executed except if the "Stop after match" setting has been set to "Yes" in one of the rules (in this case evaluation of the remaining filters is canceled).
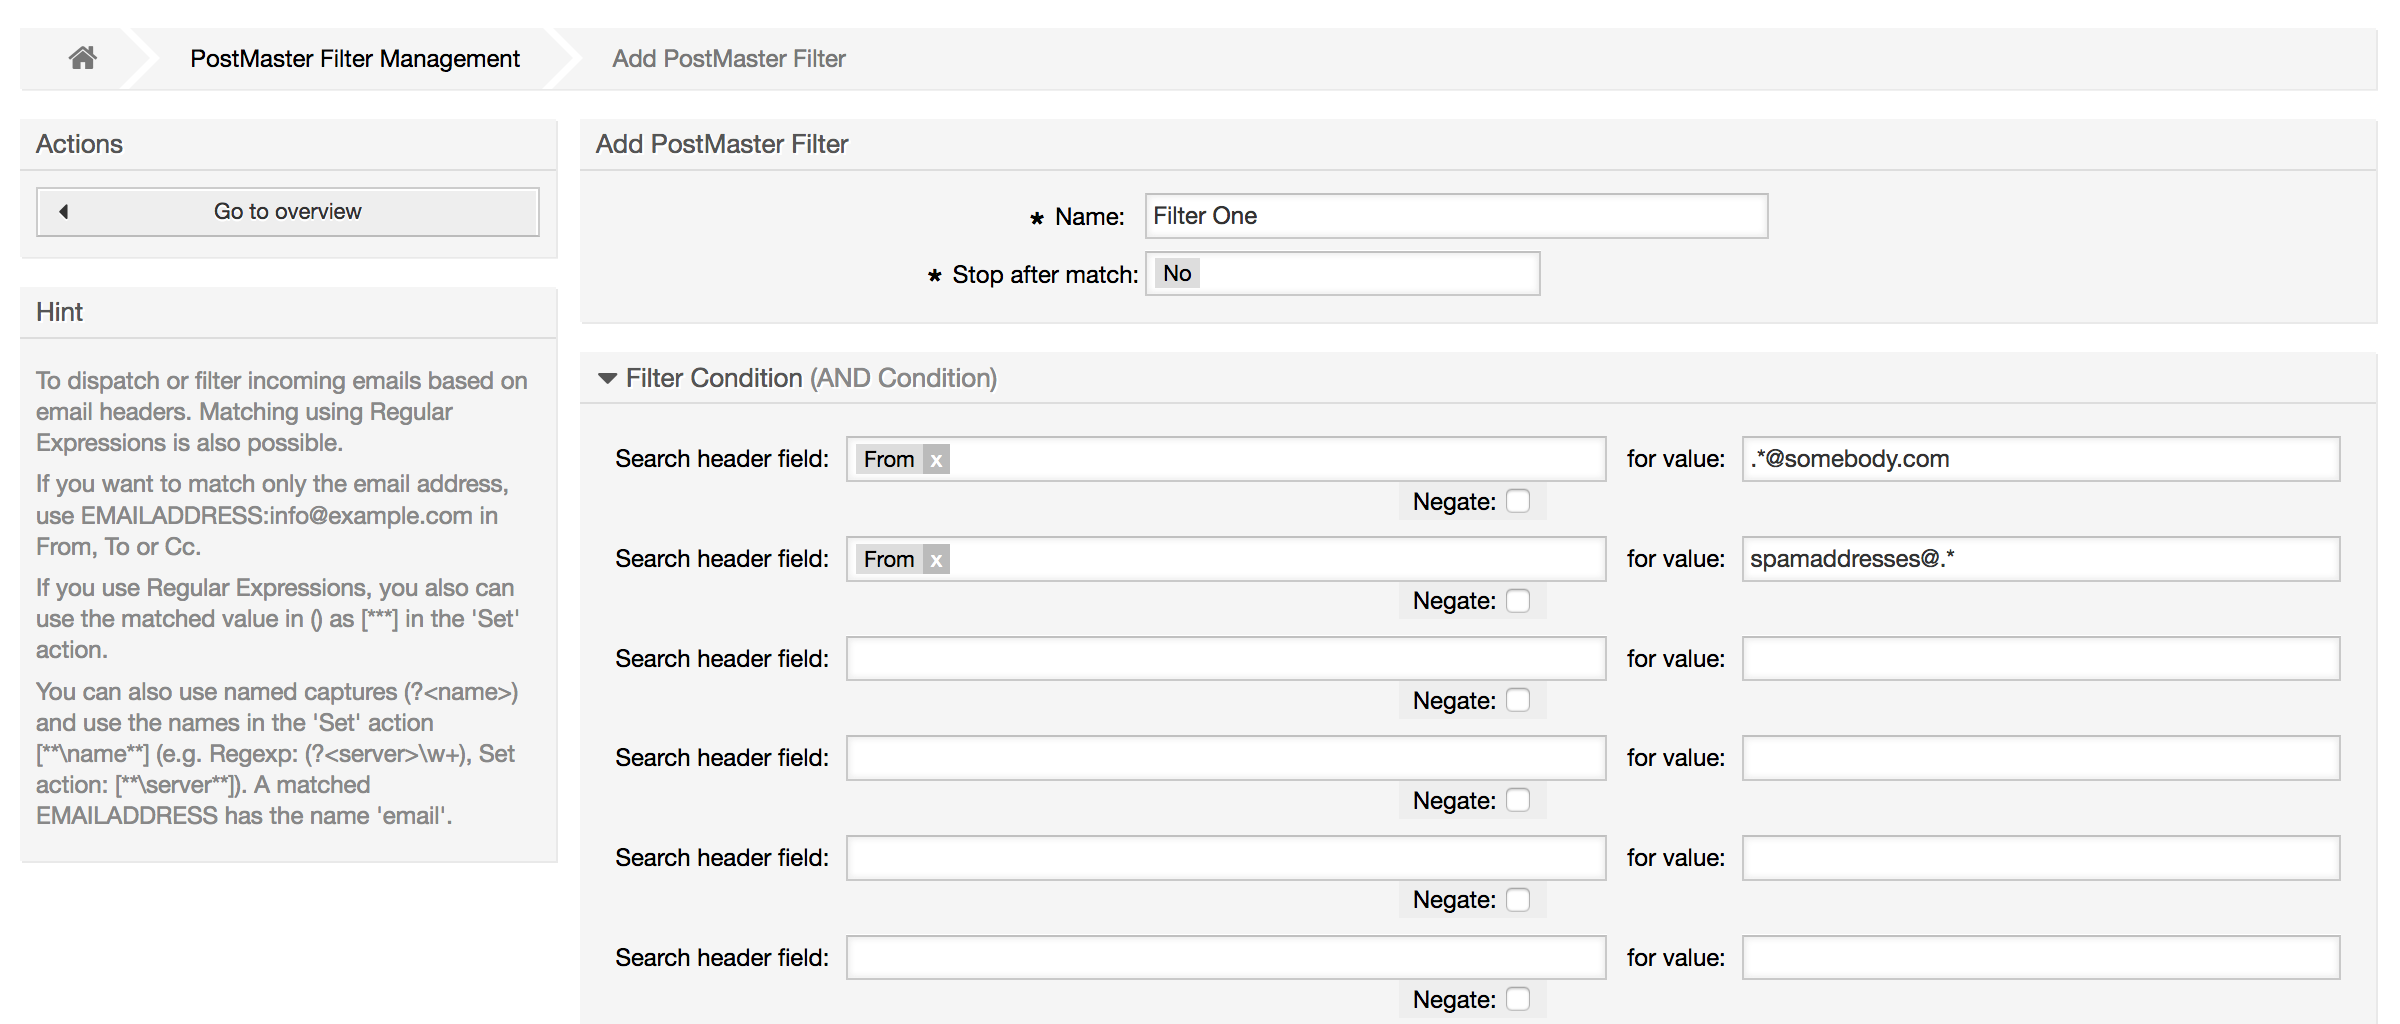
Example 4.1. Sort spam mails into a specific queue
A useful filter rule would be to let OTRS automatically move mails marked for spam, by using a spam detection tool such as SpamAssassin, into the "Junk" queue. SpamAssassin adds the "X-Spam-Flag" header to every checked mail. When the mail is marked as spam, the Header is set to "Yes". So the filter criteria would be "X-Spam-Flag: Yes". To create a filter rule with this criteria you can insert the name as, for example, "spam-mails". In the section for "Filter Condition", choose "X-Spam-Flag:" for "Header 1" from the listbox. Insert "Yes" as value for this header. Now the filter criteria is specified. To make sure that all spam mails are placed into the "Junk" queue, choose in the section for "Set Email Headers", the "X-OTRS-Queue:" entry for "Header 1". Specify "Junk" as value for this header. Finally add the new filter rule to activate it for new messages in the system.
There are additional modules that can be used to filter incoming messages more specifically. These modules might be useful when dealing with larger, more complex systems.
The GenericAgent is a tool to execute tasks automatically. The GenericAgent, for example, can close or move tickets, send notifications on escalated tickets, etc.
Click the link "GenericAgent" on the Admin page (see figure below). A table with all automated jobs in the system is displayed. These jobs can then be edited, run manually or removed entirely.

Click the "Add job" button to create a new job. You first need to supply a name. Then you can specify how the job will be executed: automatic at fixed times (like a cronjob, this mode will operate on all tickets found by the ticket filter) or based on ticket events (right after a single ticket was modified, if it matches the ticket filter). Note that if you manually run event based jobs from the overview screen, they will operate on all tickets fund by the ticket filter.
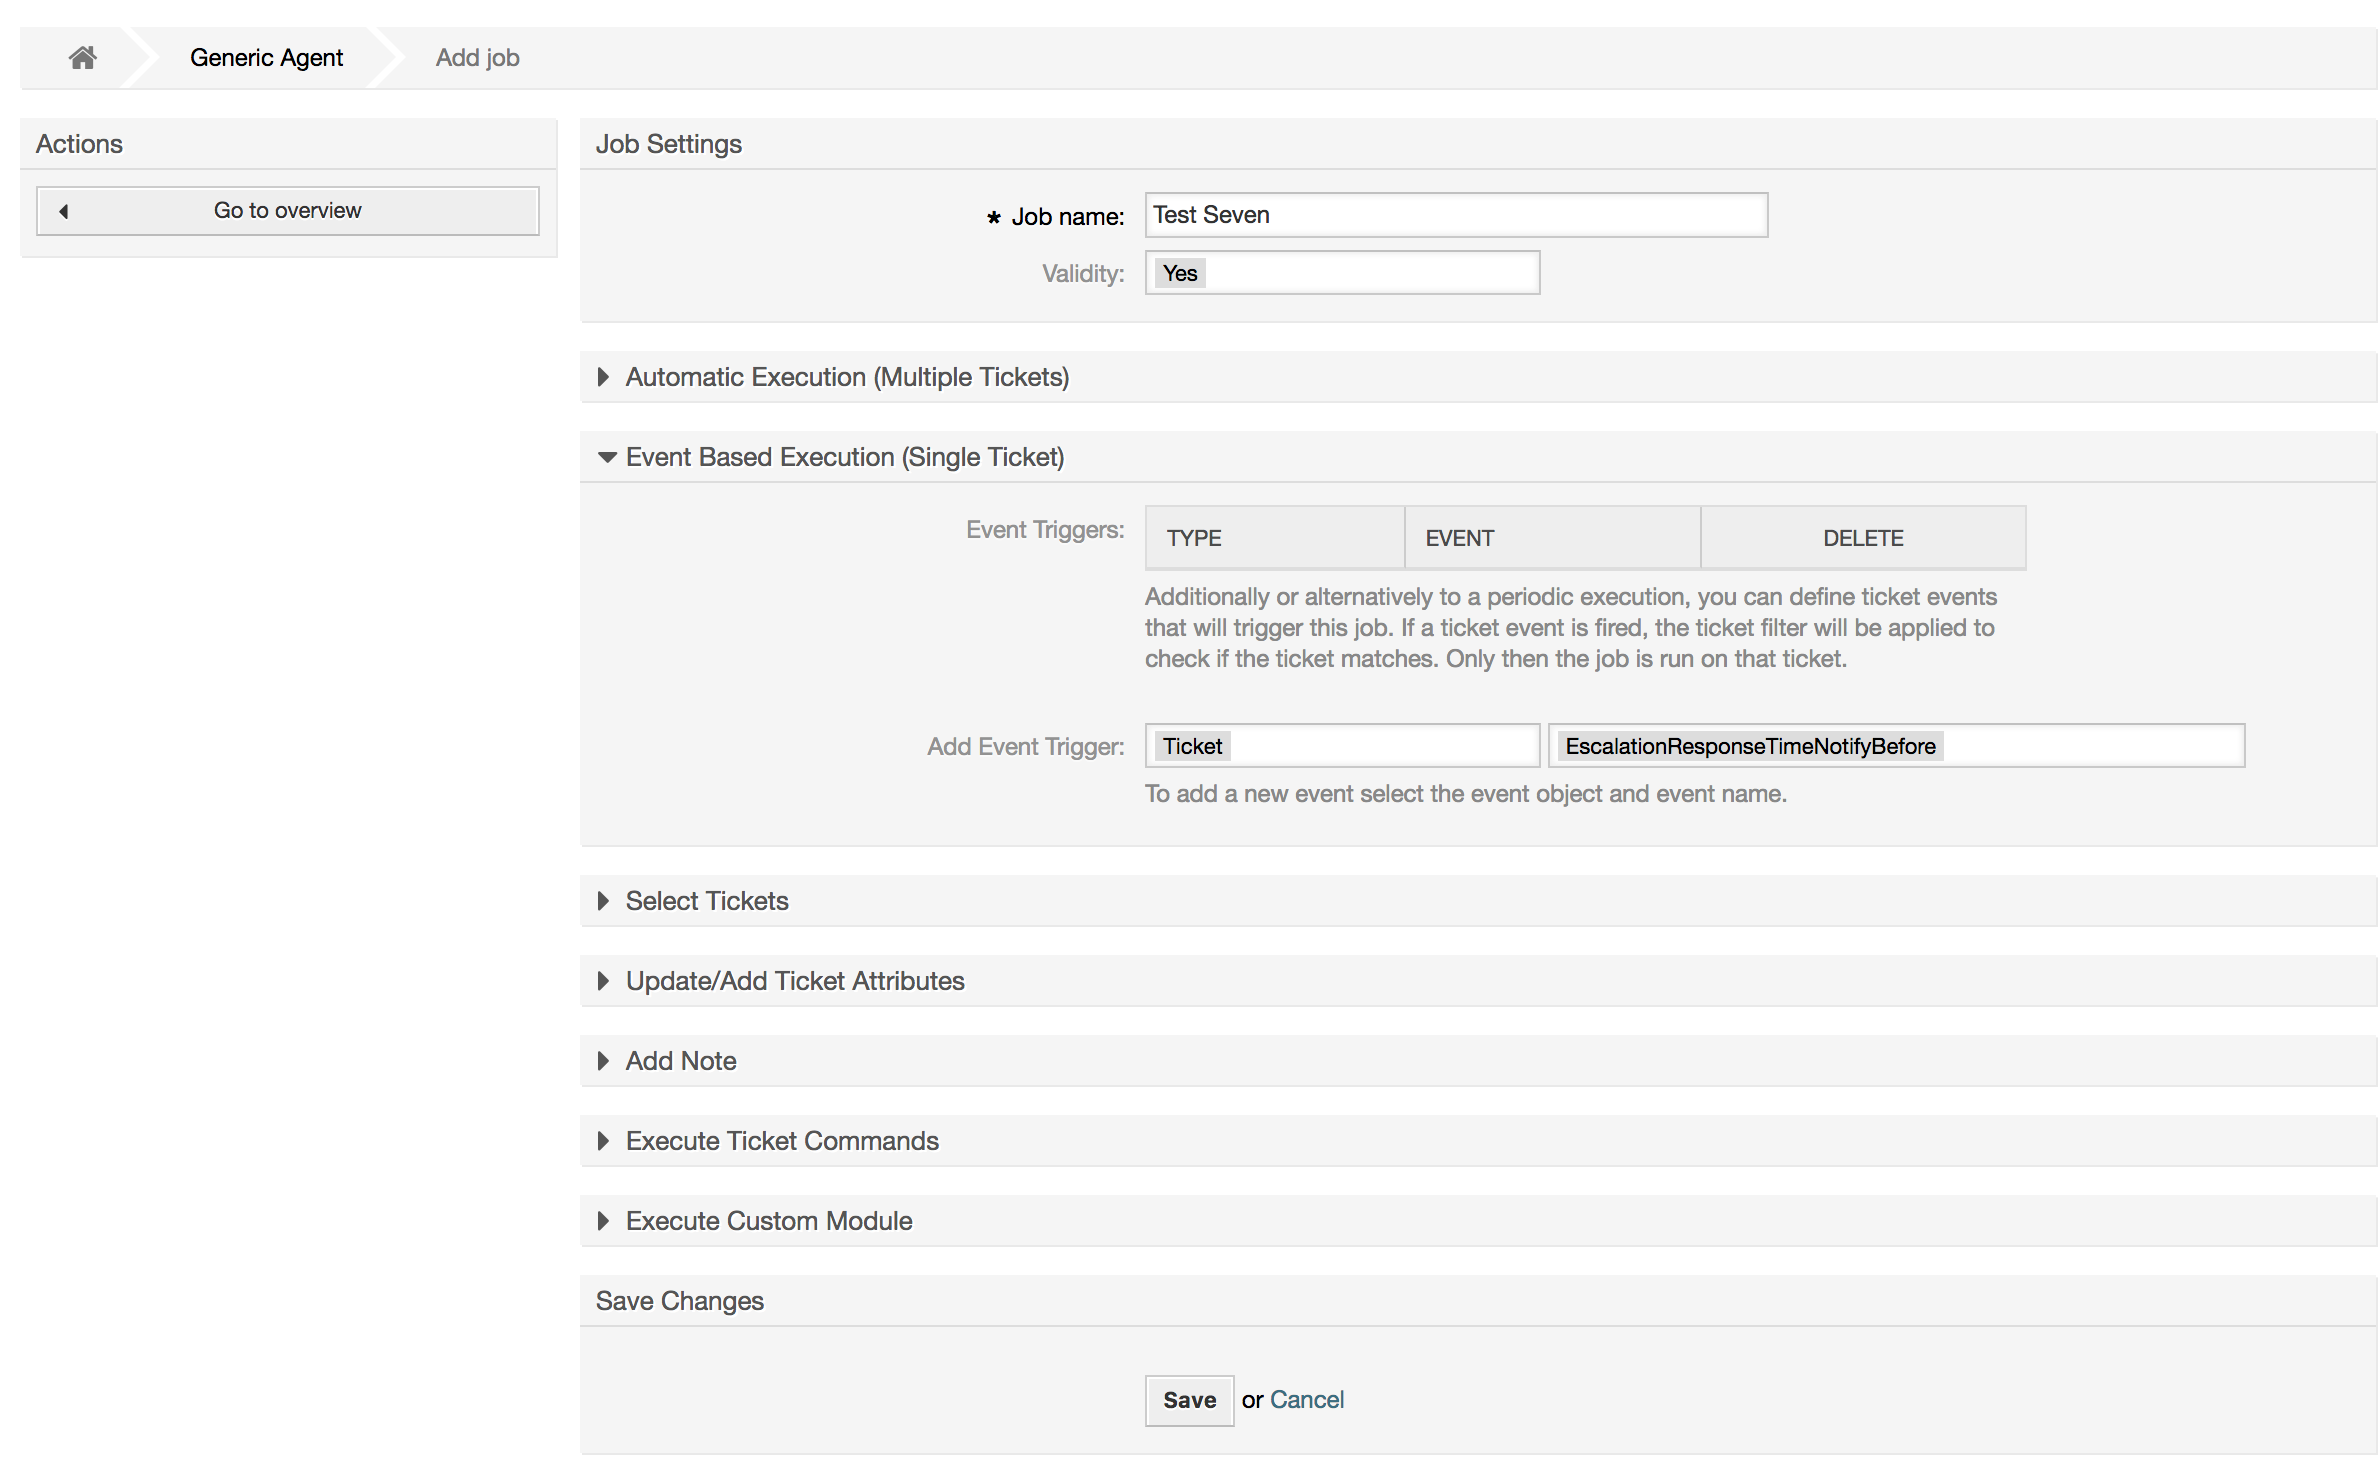
For every job, you can specify a ticket filter, for example to only operate on tickets in a certain queue. All filter criteria must be met for a job to be run on a ticket.
Finally, the ticket can be modified by setting various ticket fields like a new queue or state. It is possible to attach a note to the ticket(s) or run a customized module. You also have the option to delete the ticket(s) from the database. This can be useful to purge outdated or invalid data from the system.
Warning
If you use the ticket delete function, all affected tickets and their attachments will be removed from the database and cannot be restored!
After editing a job, OTRS will return to the overview screen. There you have the possibility to run any job manually. If you choose to run a job, you will first see all tickets which will be affected when the job actually is run. This list helps you to verify that the job is working as intended. At this point no changes have been made to these tickets yet. Only if you confirm the screen the job will be executed.
OTRS administrators can send messages to specific users or groups. The "Admin Notification" link on the Admin page opens the screen where the agents and groups that should be notified can be selected (see figure below).
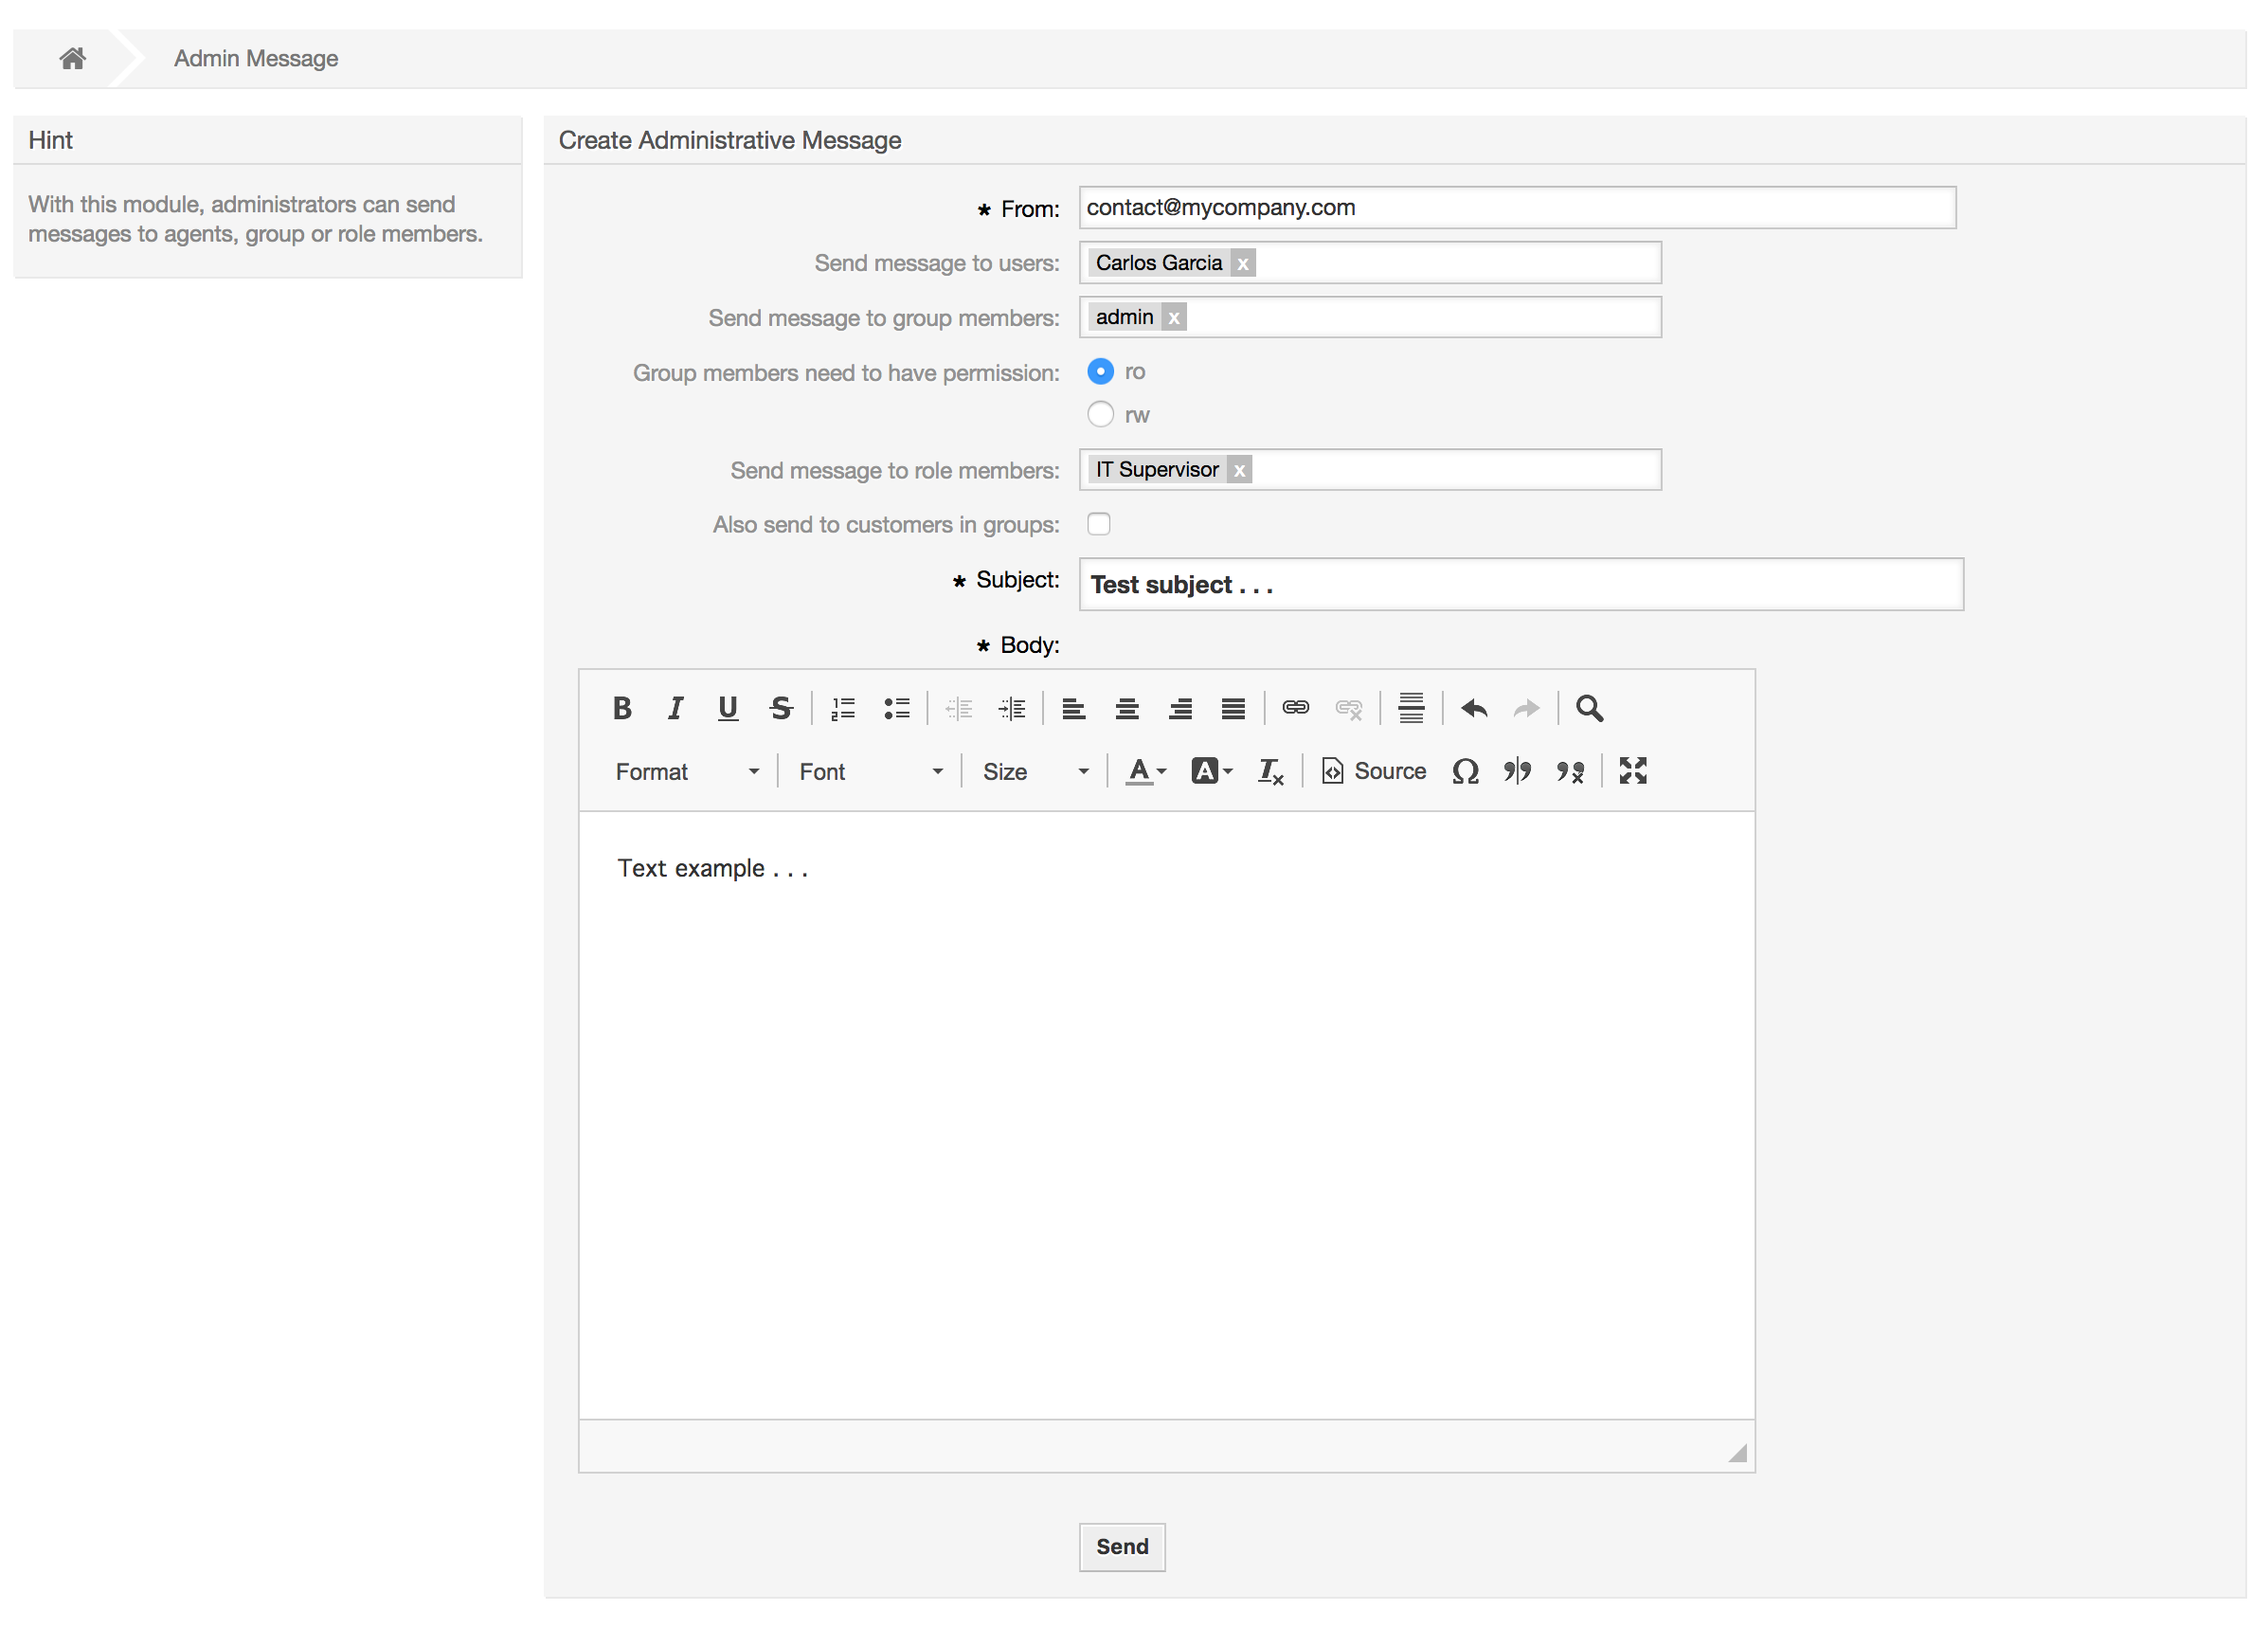
It is possible to specify the sender, subject and body text of the notification. You can also select the agents, groups and roles who should receive the message.
You can see all logged in users and their session details by clicking the "Session Management" link in the admin area (see figure below).
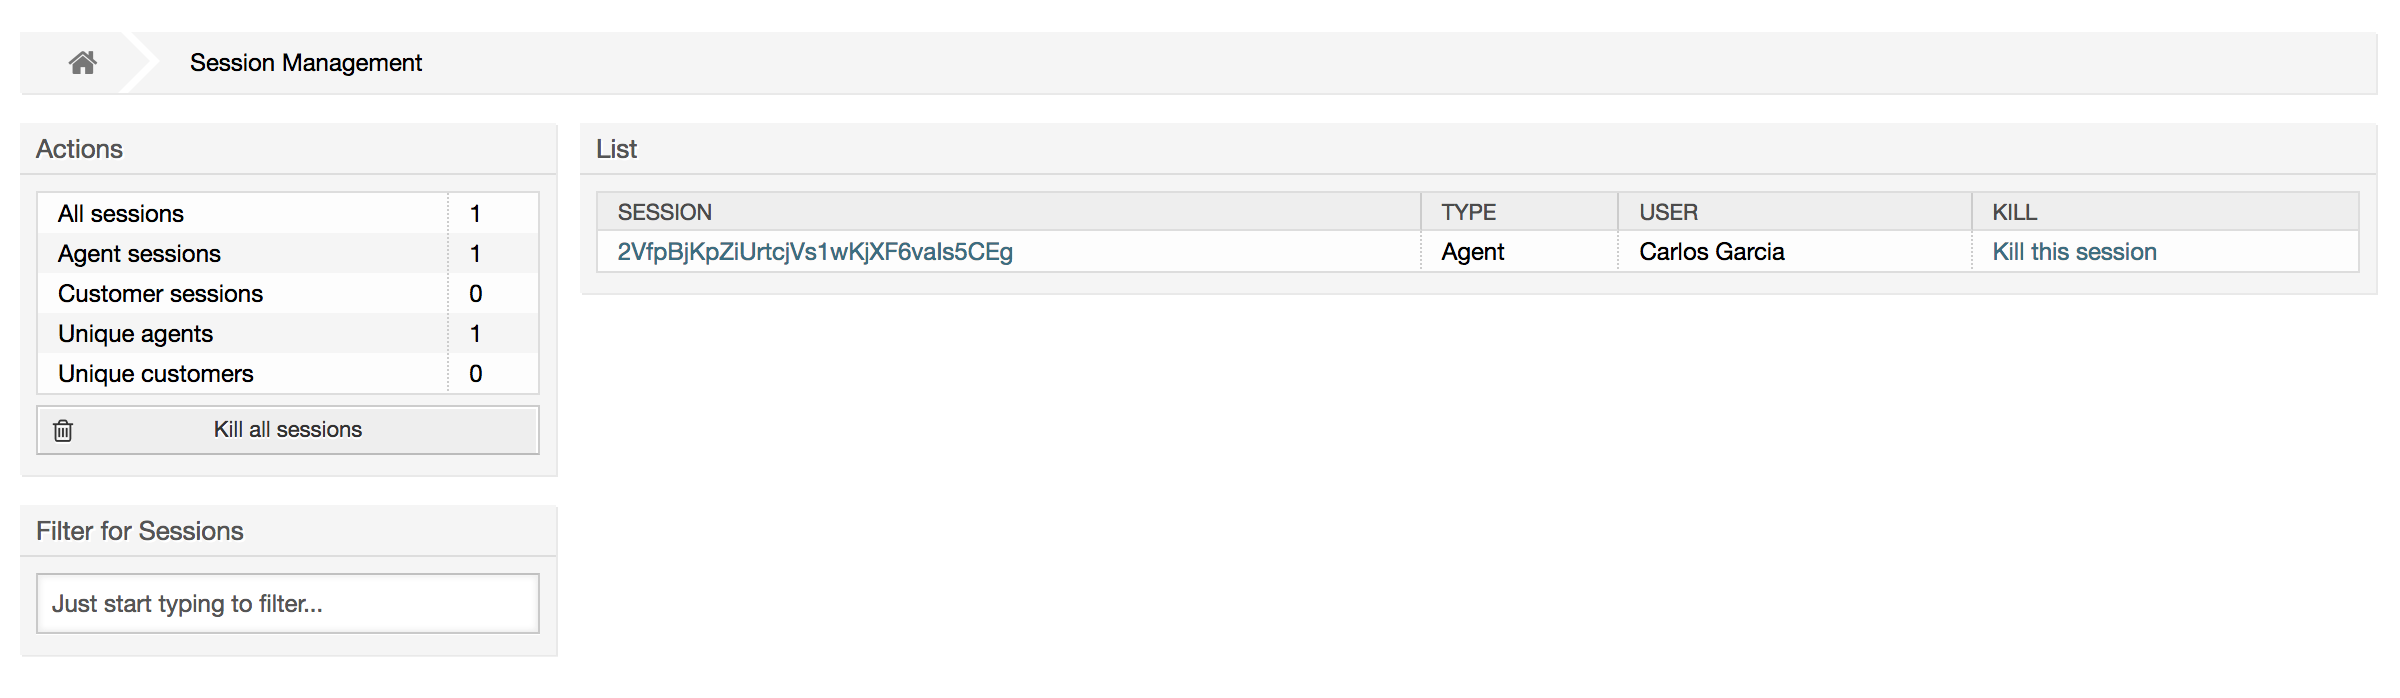
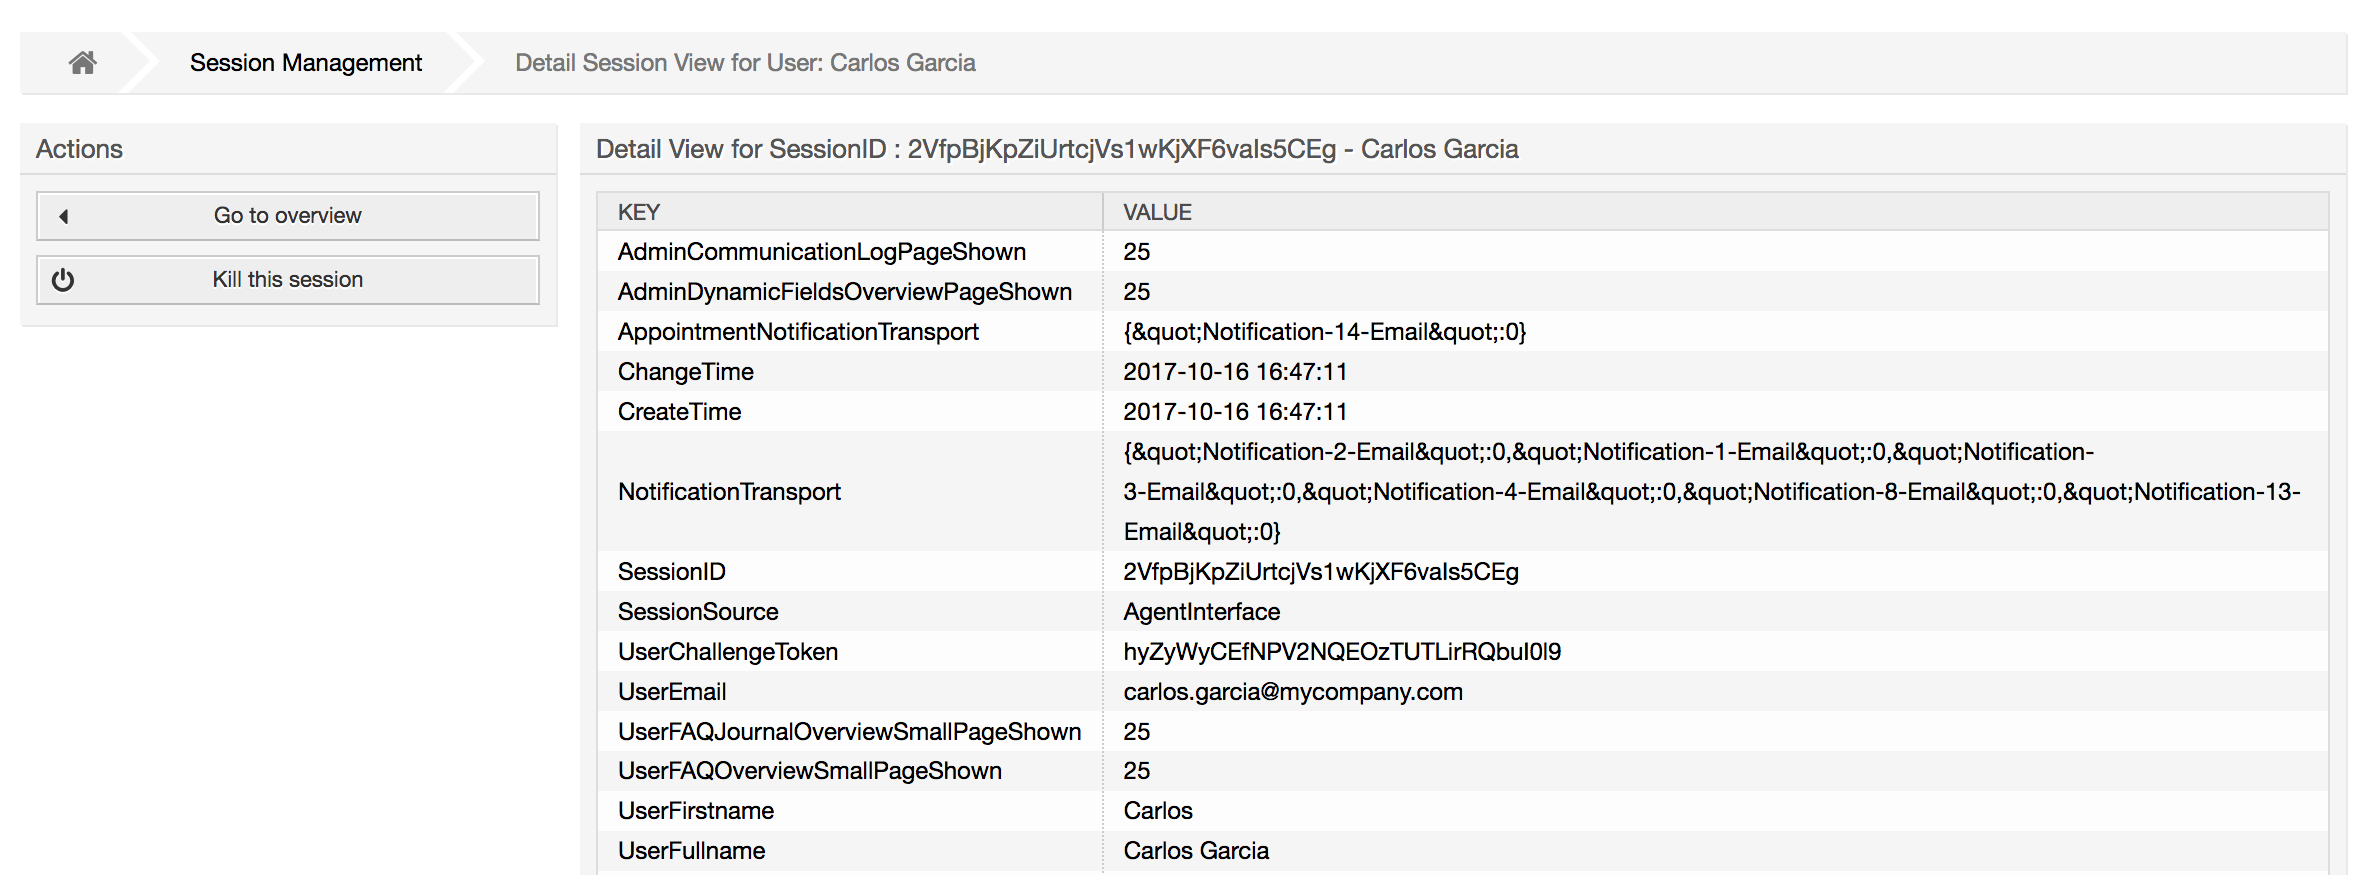
Some statistics about all active sessions are displayed, e.g. how many agents and customer users are logged in and the number of active sessions. Any individual session can be removed by clicking on the Kill this session link on the right-hand side of the list. You also have the option to Kill all sessions, which can be useful if you want to take the system offline. Detailed information for every session is available, too (see figure below).
System Maintenance give the option to schedule one or more maintenance periods for the system. During this period no agents or customers can login into the system (except for Agents in the "admin" group). Current logged users and customers receive a notification about the maintenance (before and during the maintenance period). Administrators have the option to kill the sessions for logged agents and customers, all this in preparation to be able to make changes in the system (e.g. a system update) in a "safe" environment.
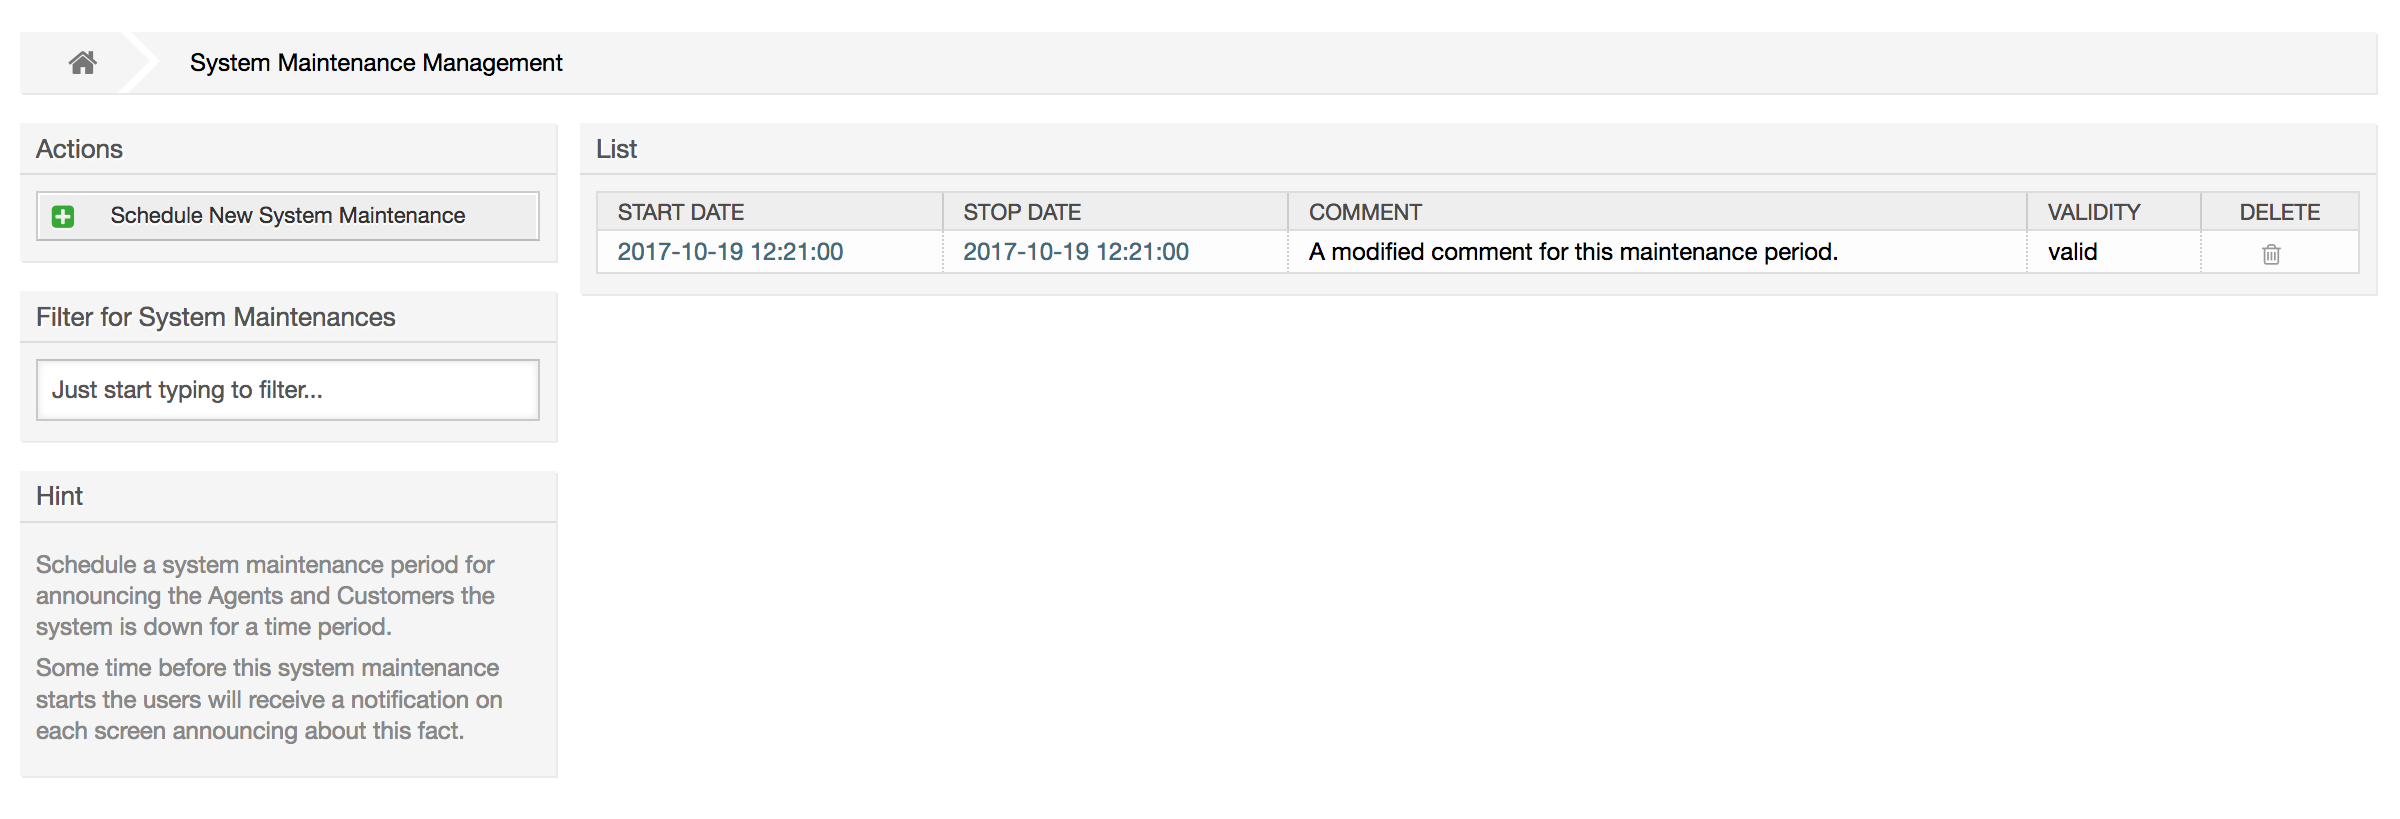
The Start Date and the Stop Date are required fields, and the only rule for this combination is that Start Date can not be a date after the Stop Date.
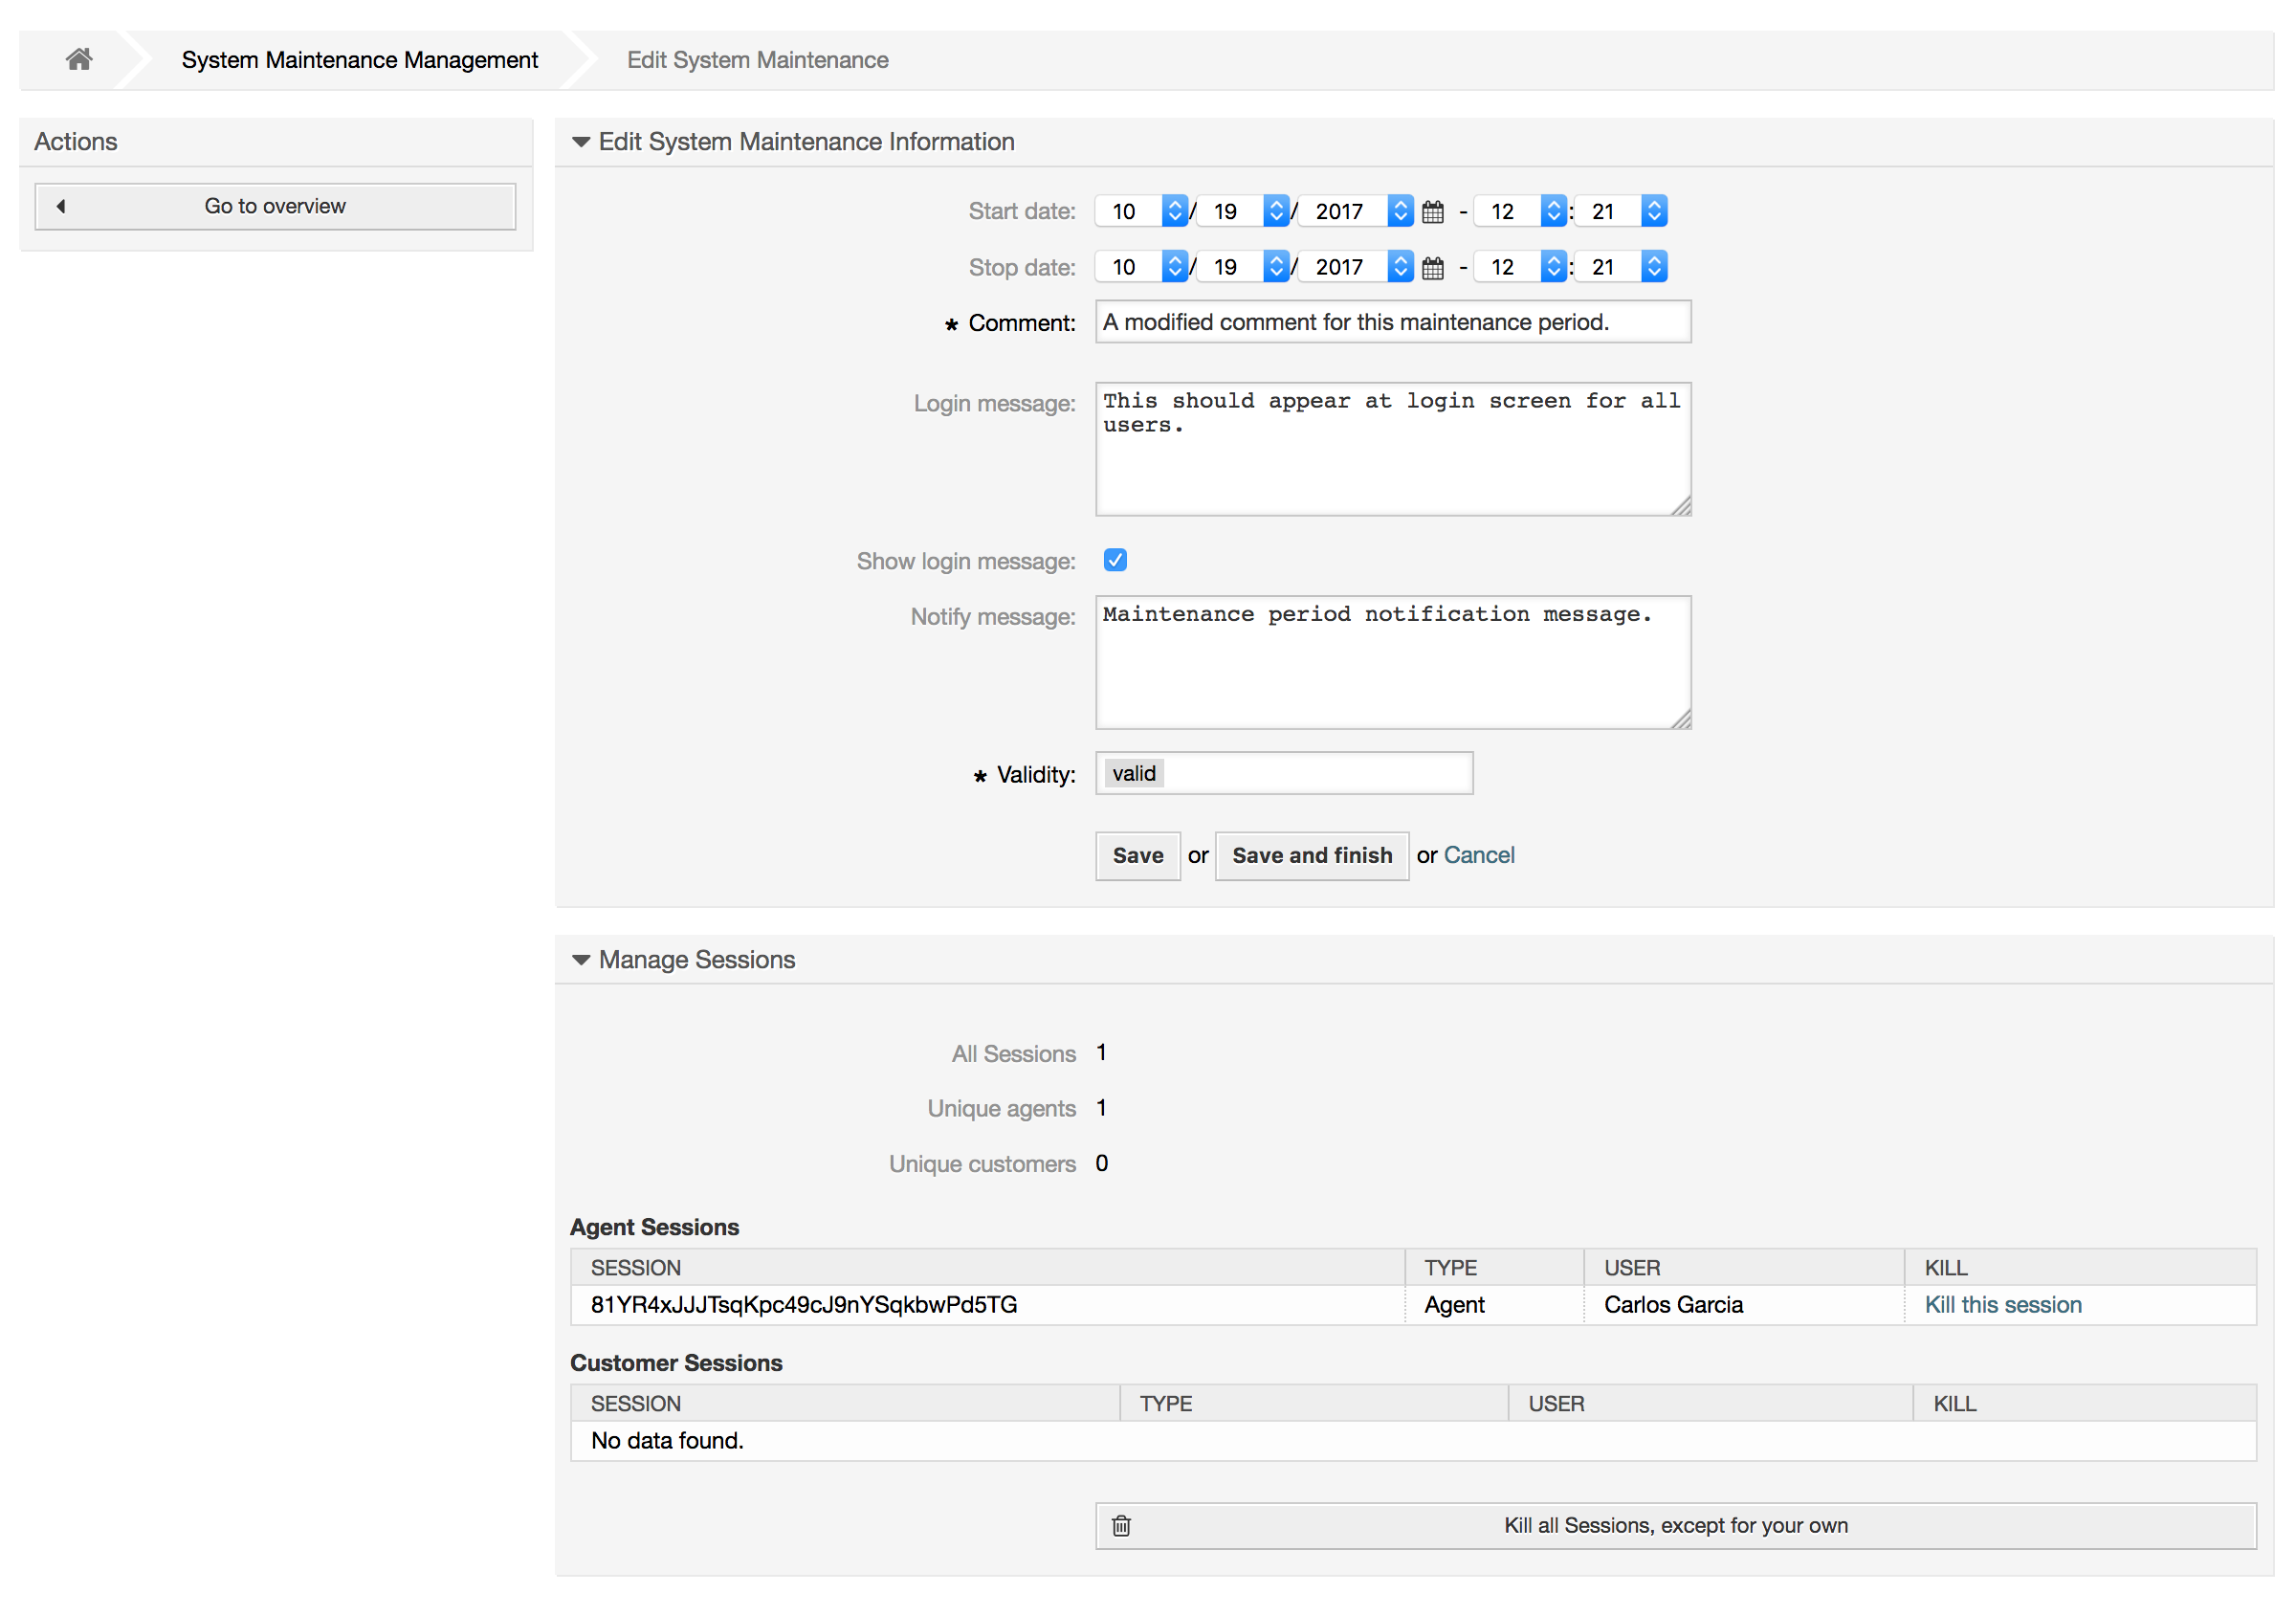
After a new maintenance period is defined an overview and details about the current active sessions is shown, from there administrators can kill this sessions one by one or all of them (except current) if it is needed.
The "System Log" link on the Admin page shows the log entries of the system, reverse chronologically sorted with most recent first (see figure below).
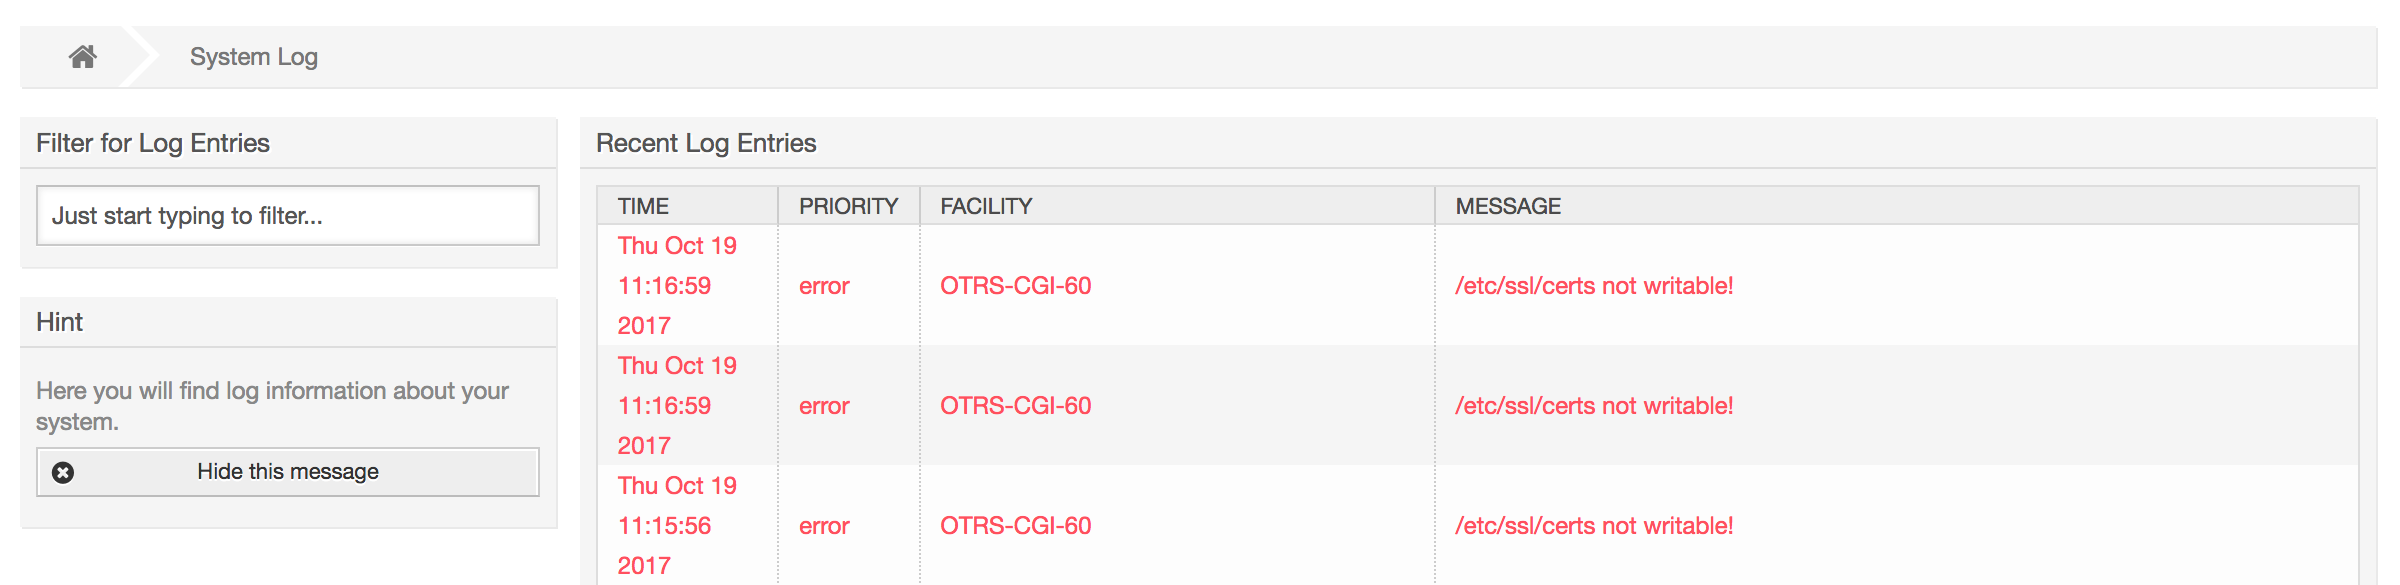
Each line in the log contains a time stamp, the log priority, the system component and the log entry itself.
Note
System logs are available via the web interface only on Linux / Unix systems.
The Communication Log frontend in the Admin area allows you to inspect the internal logs about communication handling in OTRS, i.e. sending/receiving emails.
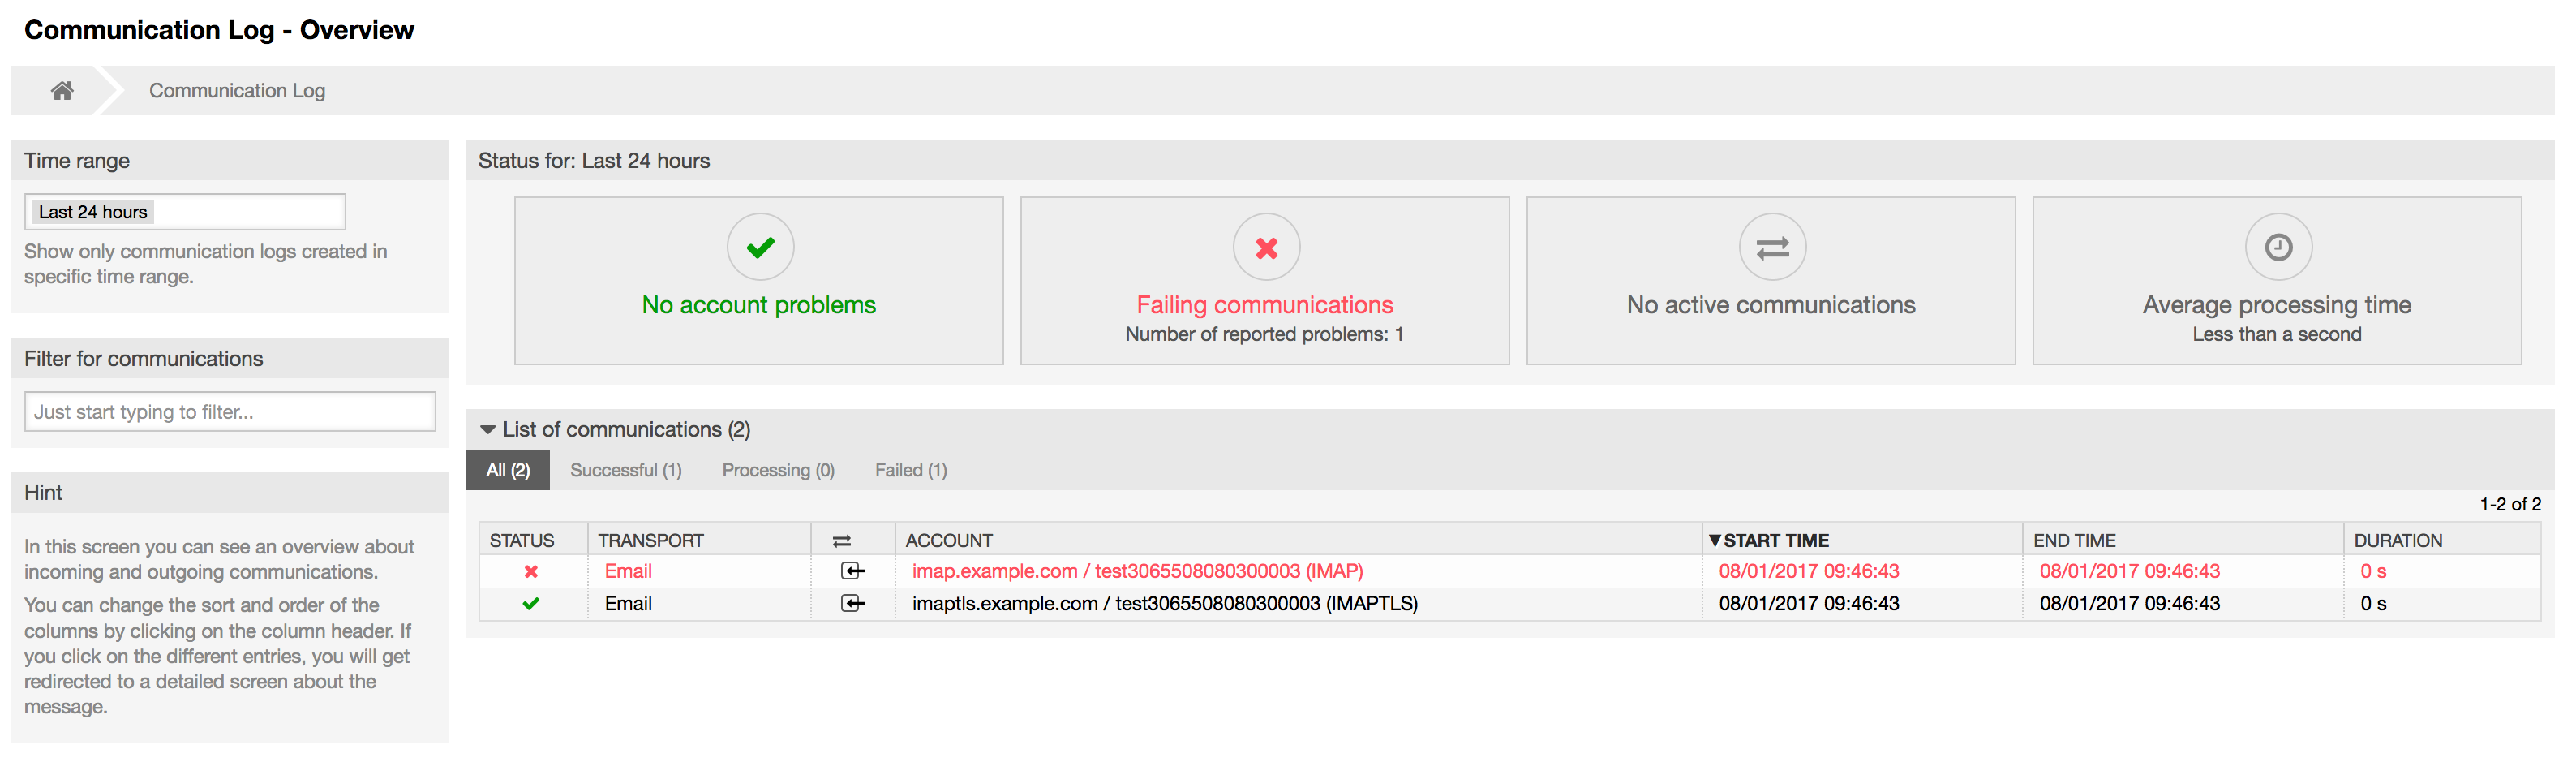
Overview page is a dashboard-like screen with several metrics indicating the overall health of the system, depending on filtered communications.
Account status will signal if you have any issues with configured accounts used for fetching or sending messages.
Communication status will notify you if there are any errors with either account connections or message processing.
Communication state widget will display if there are any active communications currently in the system.
Average processing time is a cumulative time statistic that is needed to complete a communication.
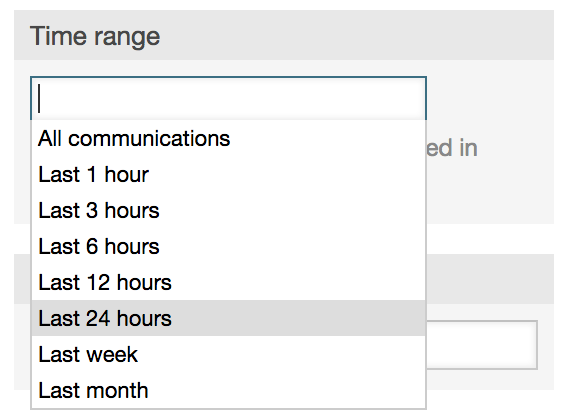
You can select the time range in the left sidebar in order to filter communications depending on their creation time. In addition to this, you can also dynamically filter for any keywords, state of the communication, and you can sort the overview table by all columns.
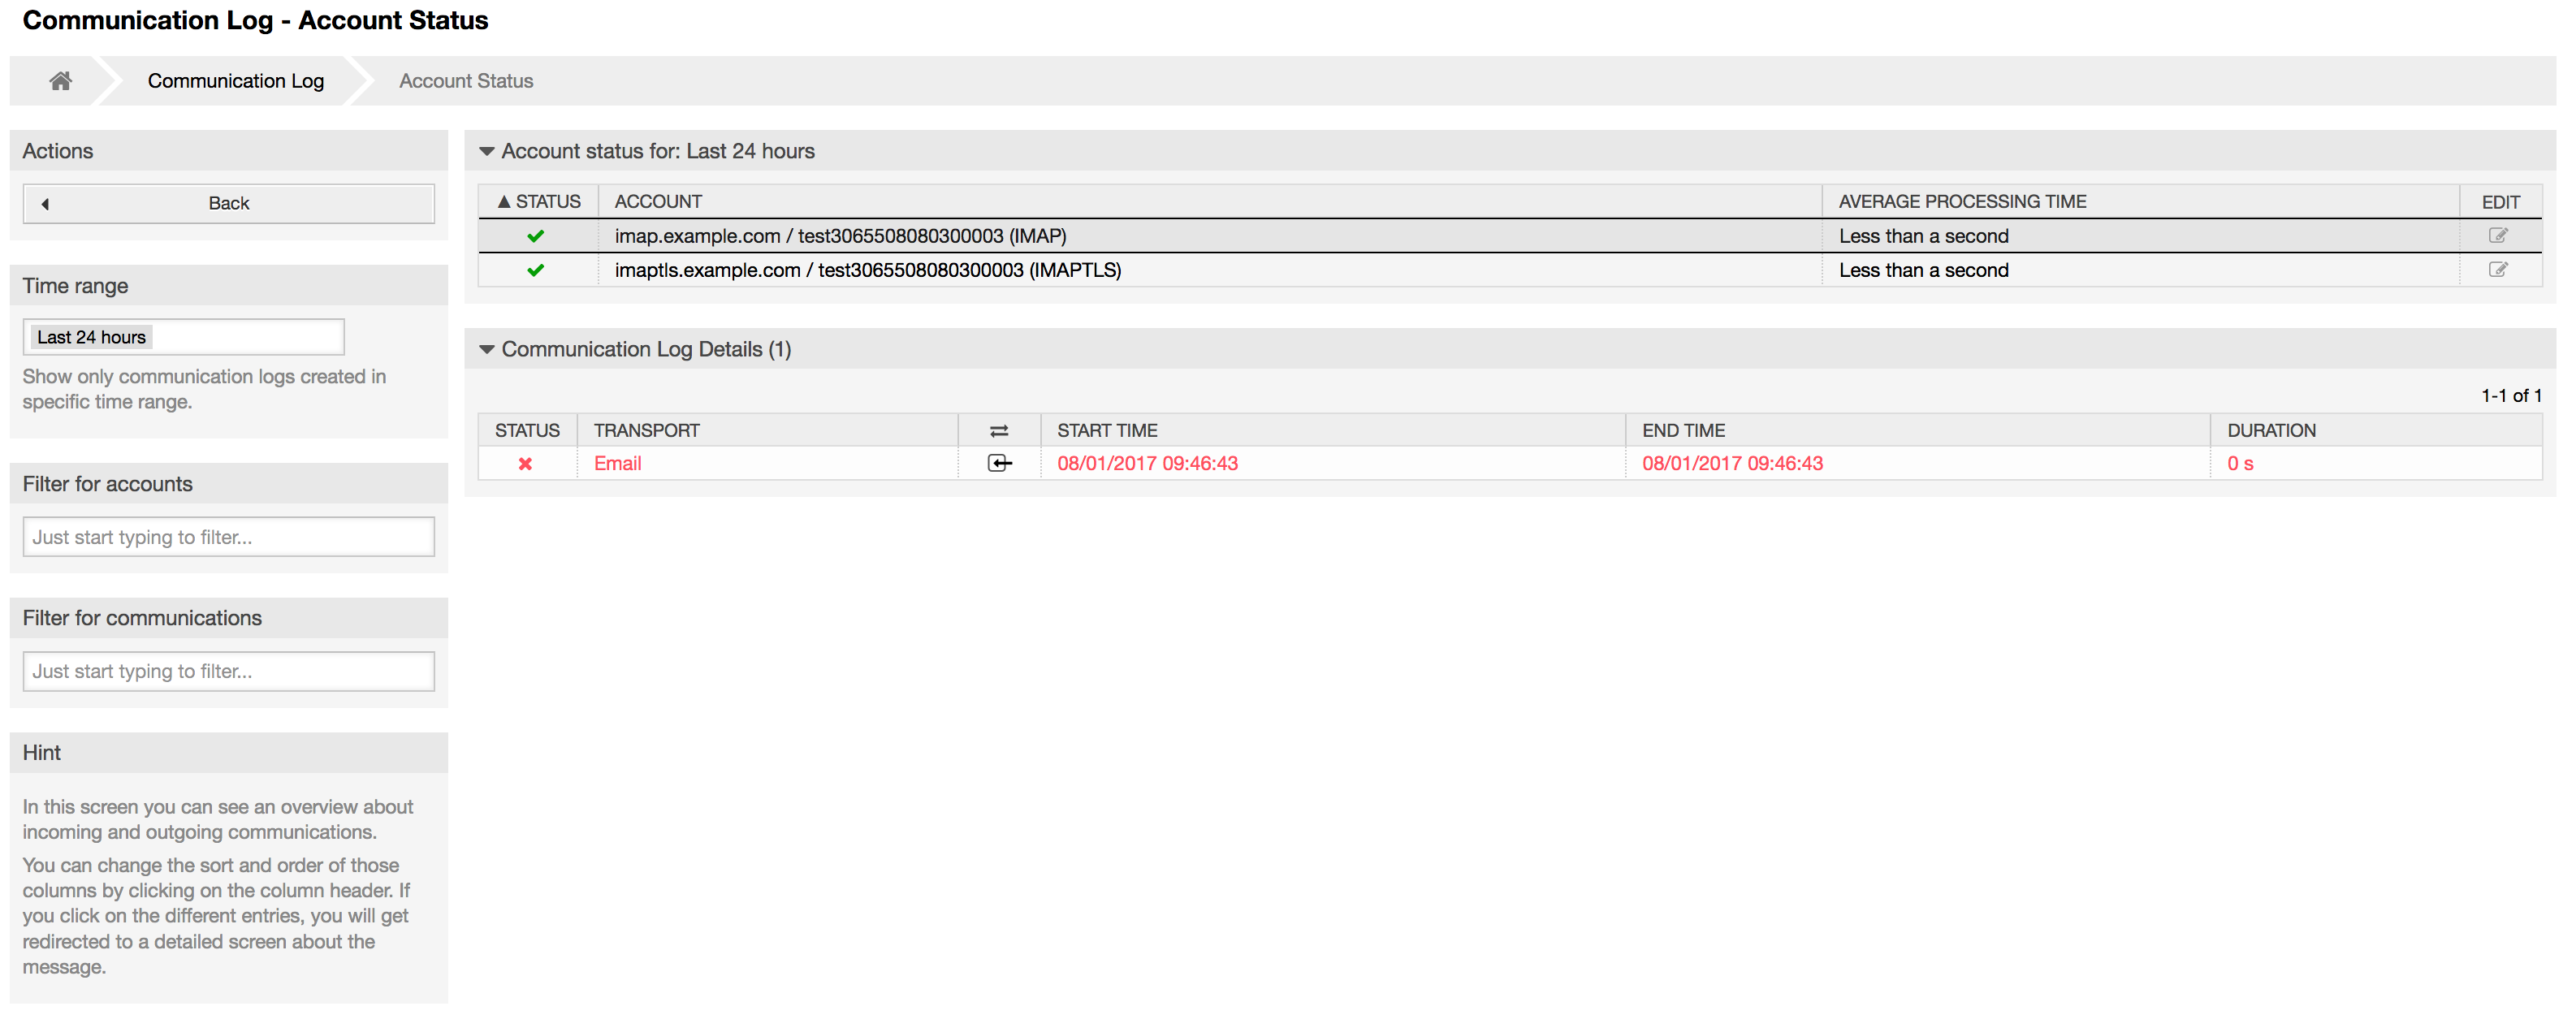
Clicking on account widget will take you to the account status screen, where you can further filter for communications that are related to specific accounts.
If you click on a communication row in any table, you will be presented with a detailed view screen.
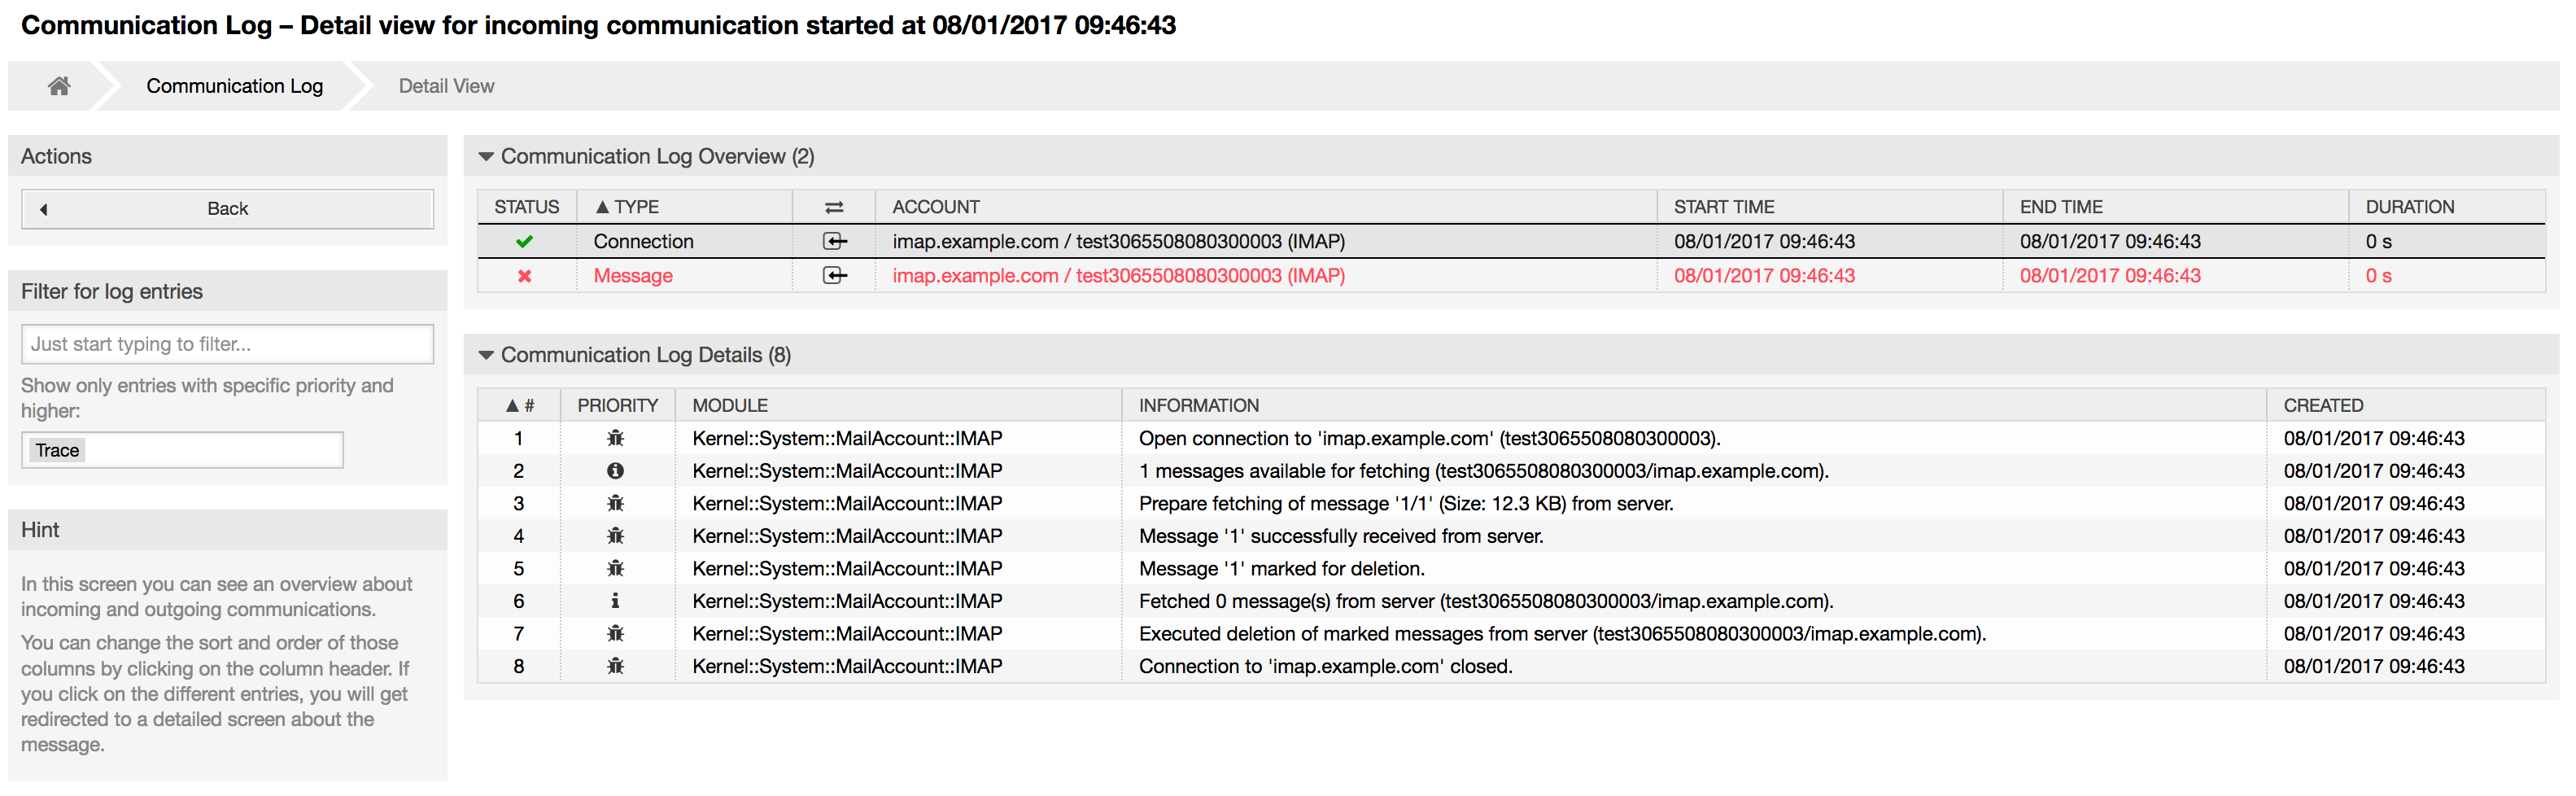
Every communication can contain one or more logs, which can be of Connection or Message type.
Connection logs will contain any log messages coming from the modules responsible for connecting to your accounts and fetching/receiving messages.
Message logs will contain any log messages related to specific message processing. Any module working on message themselves can log their actions in this log, giving you a clear overview of what's going on.
You can filter log entries based on their priority, by choosing desired priority in the left sidebar.
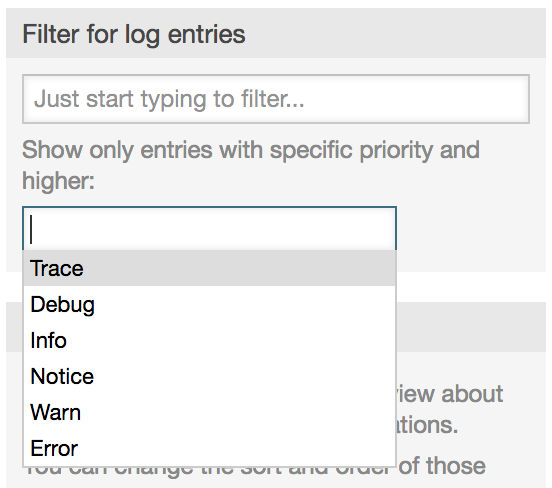
Log level rules apply: by selecting a specific priority, you will get log entries that have that priority set and higher, with Error being the highest.
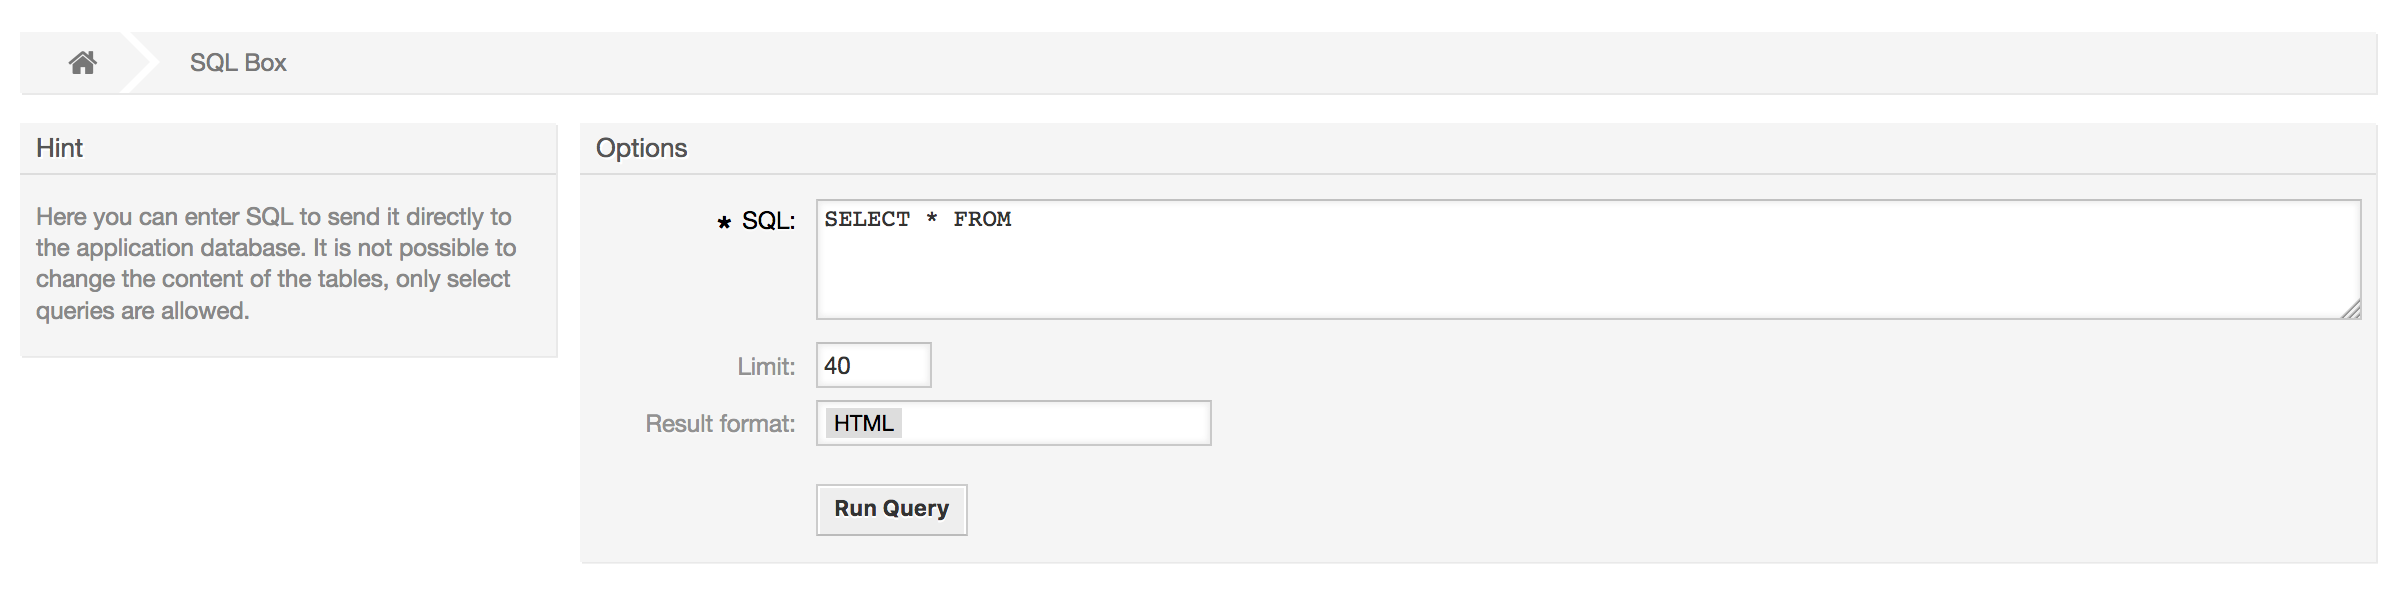
The "SQL Box" link on the Admin page opens a screen that lets you query the content of the tables in the OTRS database (see figure below). It is not possible to change the content of the tables, only 'select' queries are allowed.
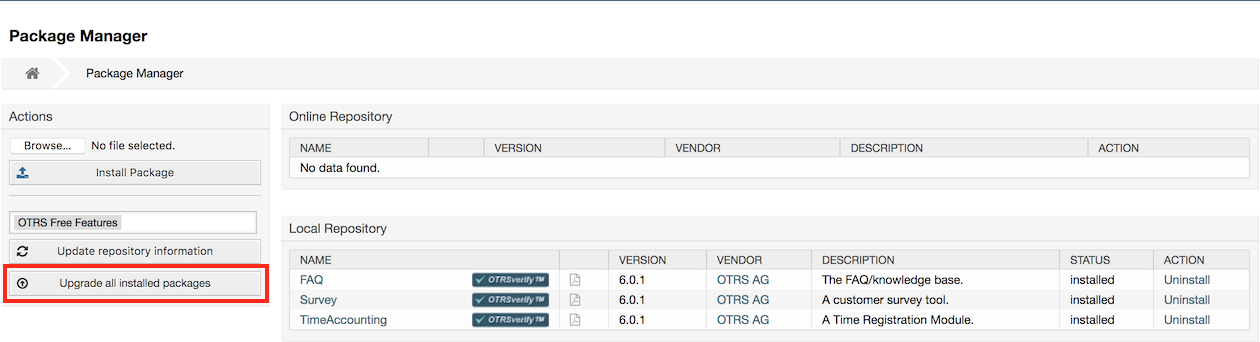
Using the Package Manager link on the Admin page, you can install and manage packages that extend the functionality of OTRS (see figure below). See the Additional applications section for a discussion on the extensions that are available from the OTRS repositories.
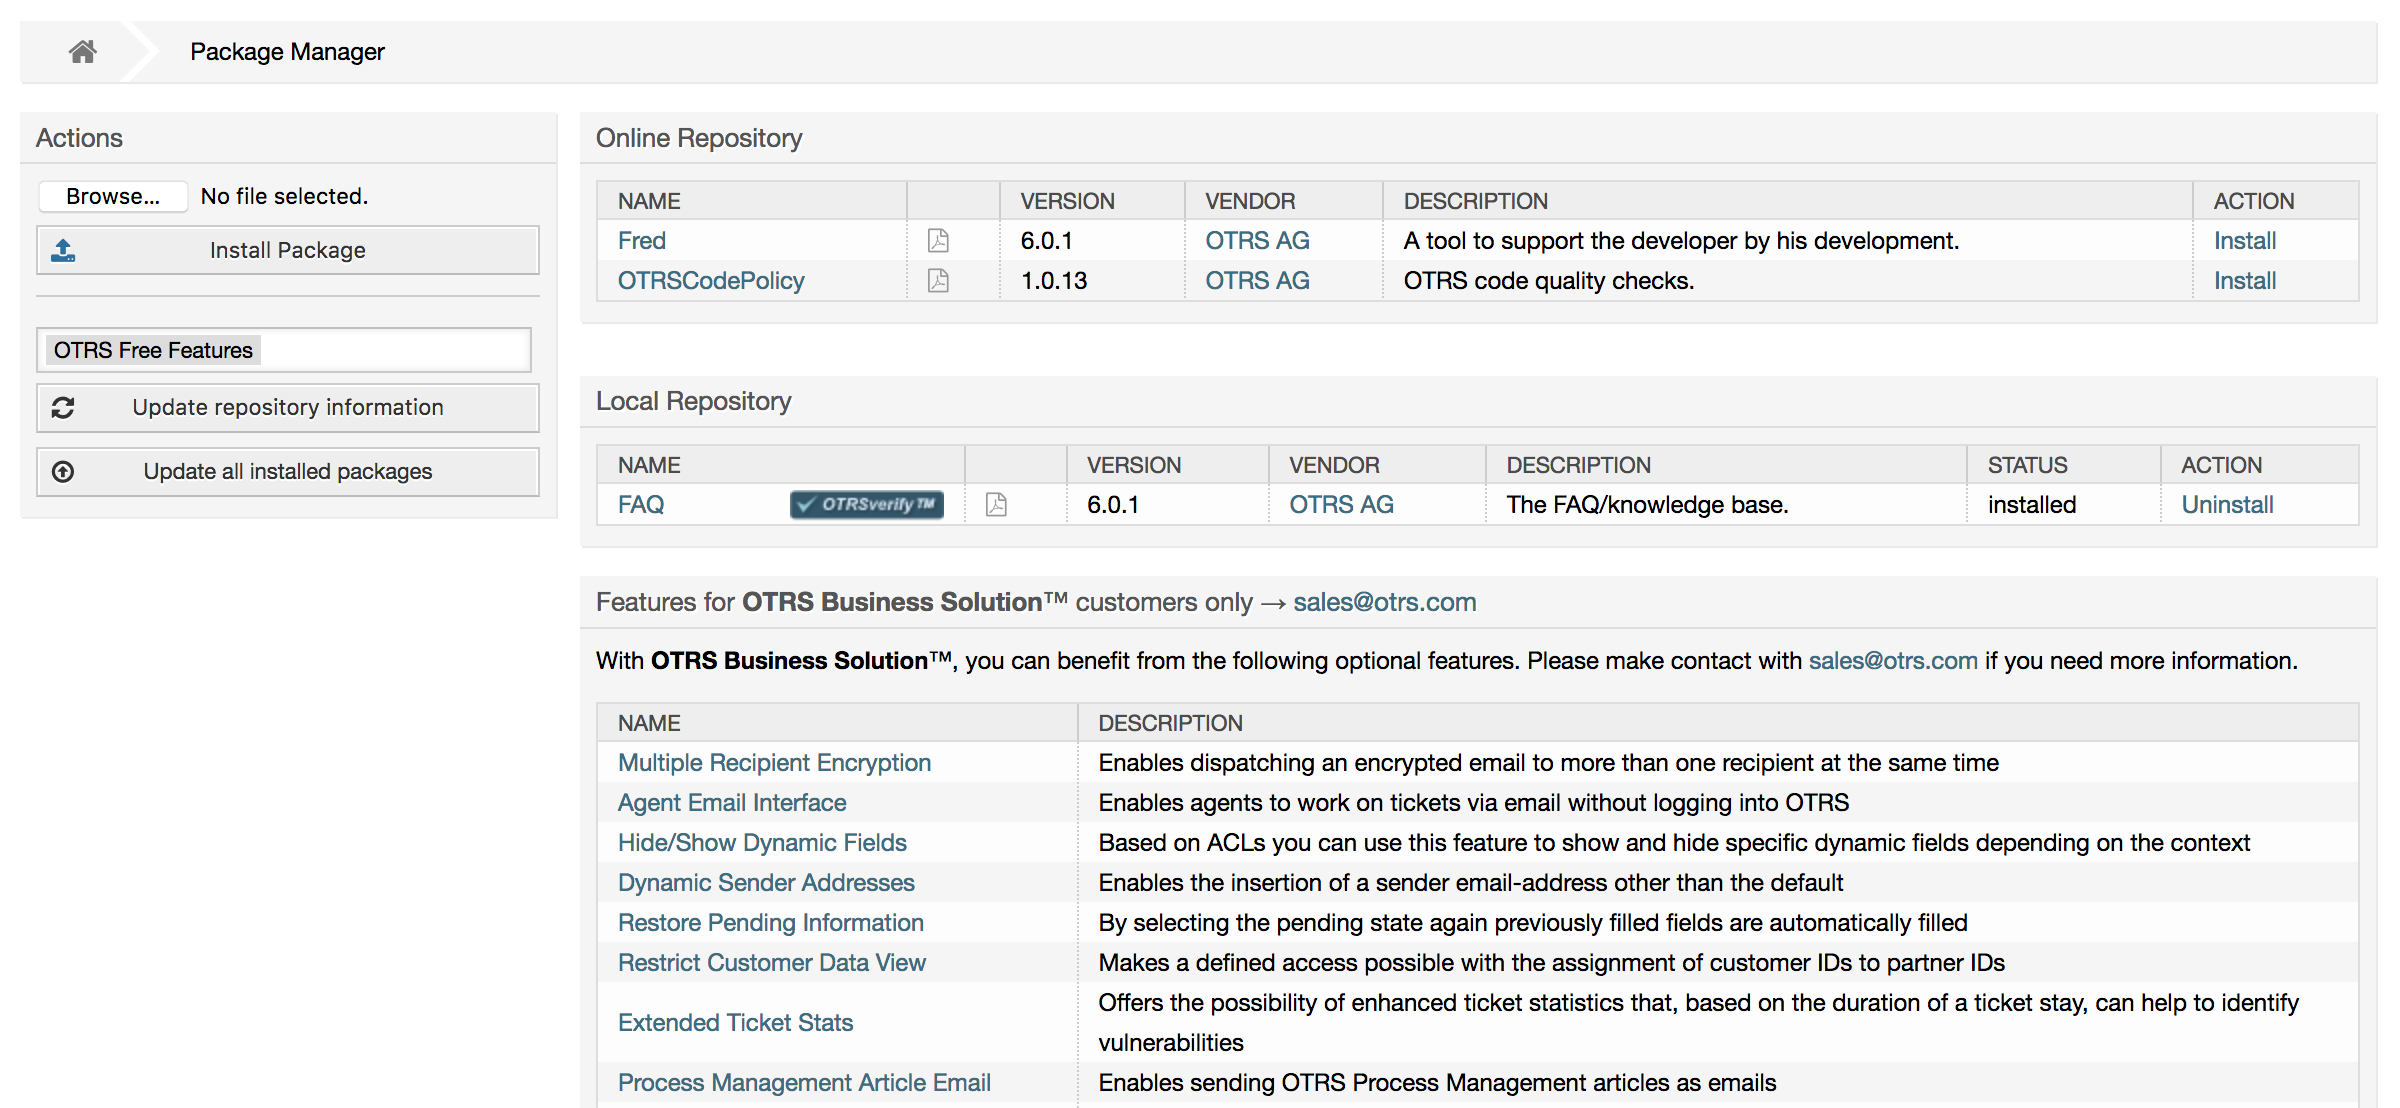
The Package Manager shows the OTRS addon packages you currently have installed on your server, together with their version numbers.
You can install packages from a remote host by selecting the repository in the Online Repository section, and clicking the Update repository information button. The available packages are displayed in the corresponding table. The right side of the screen shows the available packages. To install a package, click on Install. After installation, the package is displayed in the Local Repository section.
To update an installed package, the list of available packages in the online repository will show Update in the Action column for any package that has a higher version than the one that is installed locally. Just click Update and it will install the new package version on your system.
In some cases, such as when your OTRS system is not connected to the Internet, you can also install those packages that you have downloaded to a local disk. Click the Browse button on the Actions side bar, and select the .opm file of the package on your disk. Click Open and then Install Package. After the installation has been completed, the package is displayed in the Local Repository section. You can use the same steps for updating a package that is already installed.
In special cases, you might want to configure the Package Manager, e.g., to use a proxy or to use a local repository. Just take a look at the available options in SysConfig under Core::Package.
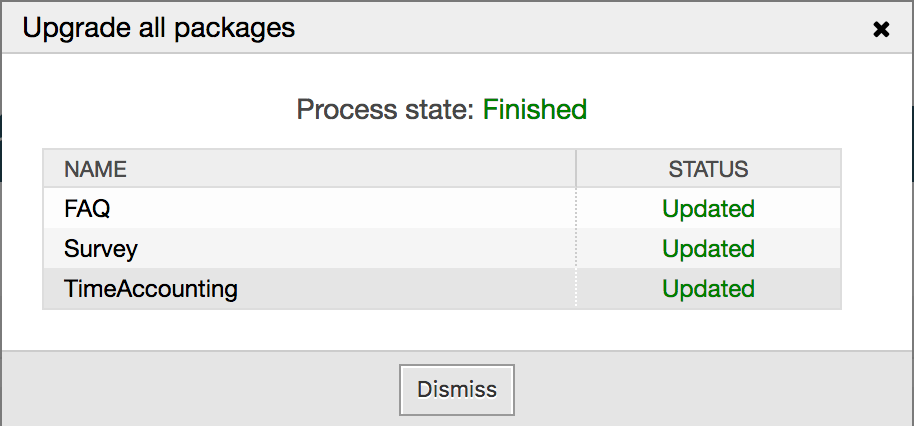
Since OTRS 6, a new button labeled Update all installed packages has been added to the
sidebar of the package manager screen. When this button is pressed, an OTRS Daemon task will be scheduled to
update all packages. Alternatively, this action can be also issued from the command line interface by using
the Admin::Package::UpgradeAll console command.
This feature reads the information of all defined package repositories and determines if there is a new version for every installed package in the system and calculates the correct order to update the packages respecting all other package dependencies, even if new versions of existing packages require new packages not yet installed in the system.
Note
If there are packages installed that do not have a corresponding repository defined in the system, they can not be updated by this feature and will be marked as failed (due to the missing on-line repository).
When the process to update all packages is running, a notification bar is added to the package manager screen for easier identification. When notification link is clicked, a progress summary is displayed with the current progress. Also, when the process is running package actions such as "Install", "Update", "Uninstall" and "ReInstall" some actions on the screen might be temporarily disabled in order to avoid conflicts.

When the process finishes (only if it was started in the graphical user interface) the progress notification will change to indicate the new state: it becomes green if all packages was correctly updated or red if there where any failures. Clicking on this notification will show the final summary. In the summary table, a tooltip for the status column of every package can indicate more details about the state. After closing this window, the package manager screen will refresh to show the new version of the installed packages.
The Web Services link leads to the graphical interface where web services (for the OTRS Generic Interface) are created and maintained (see figure below).

The graphical interface for web services configuration is described in more detail in the section "Web Service Graphical Interface".
Dynamic Fields is the place where you setup and manage custom fields for tickets and articles (see figure below).

The dynamic fields configuration is described in more detail in the section "Dynamic Fields Configuration".
Each dynamic field type has its own configuration settings and therefore its own configuration screen.
Note
In the OTRS framework, dynamic fields can only be linked to tickets and articles by default, but they can be extended to other objects as well.
Via calendar management interface it is possible to add and edit multiple calendars.
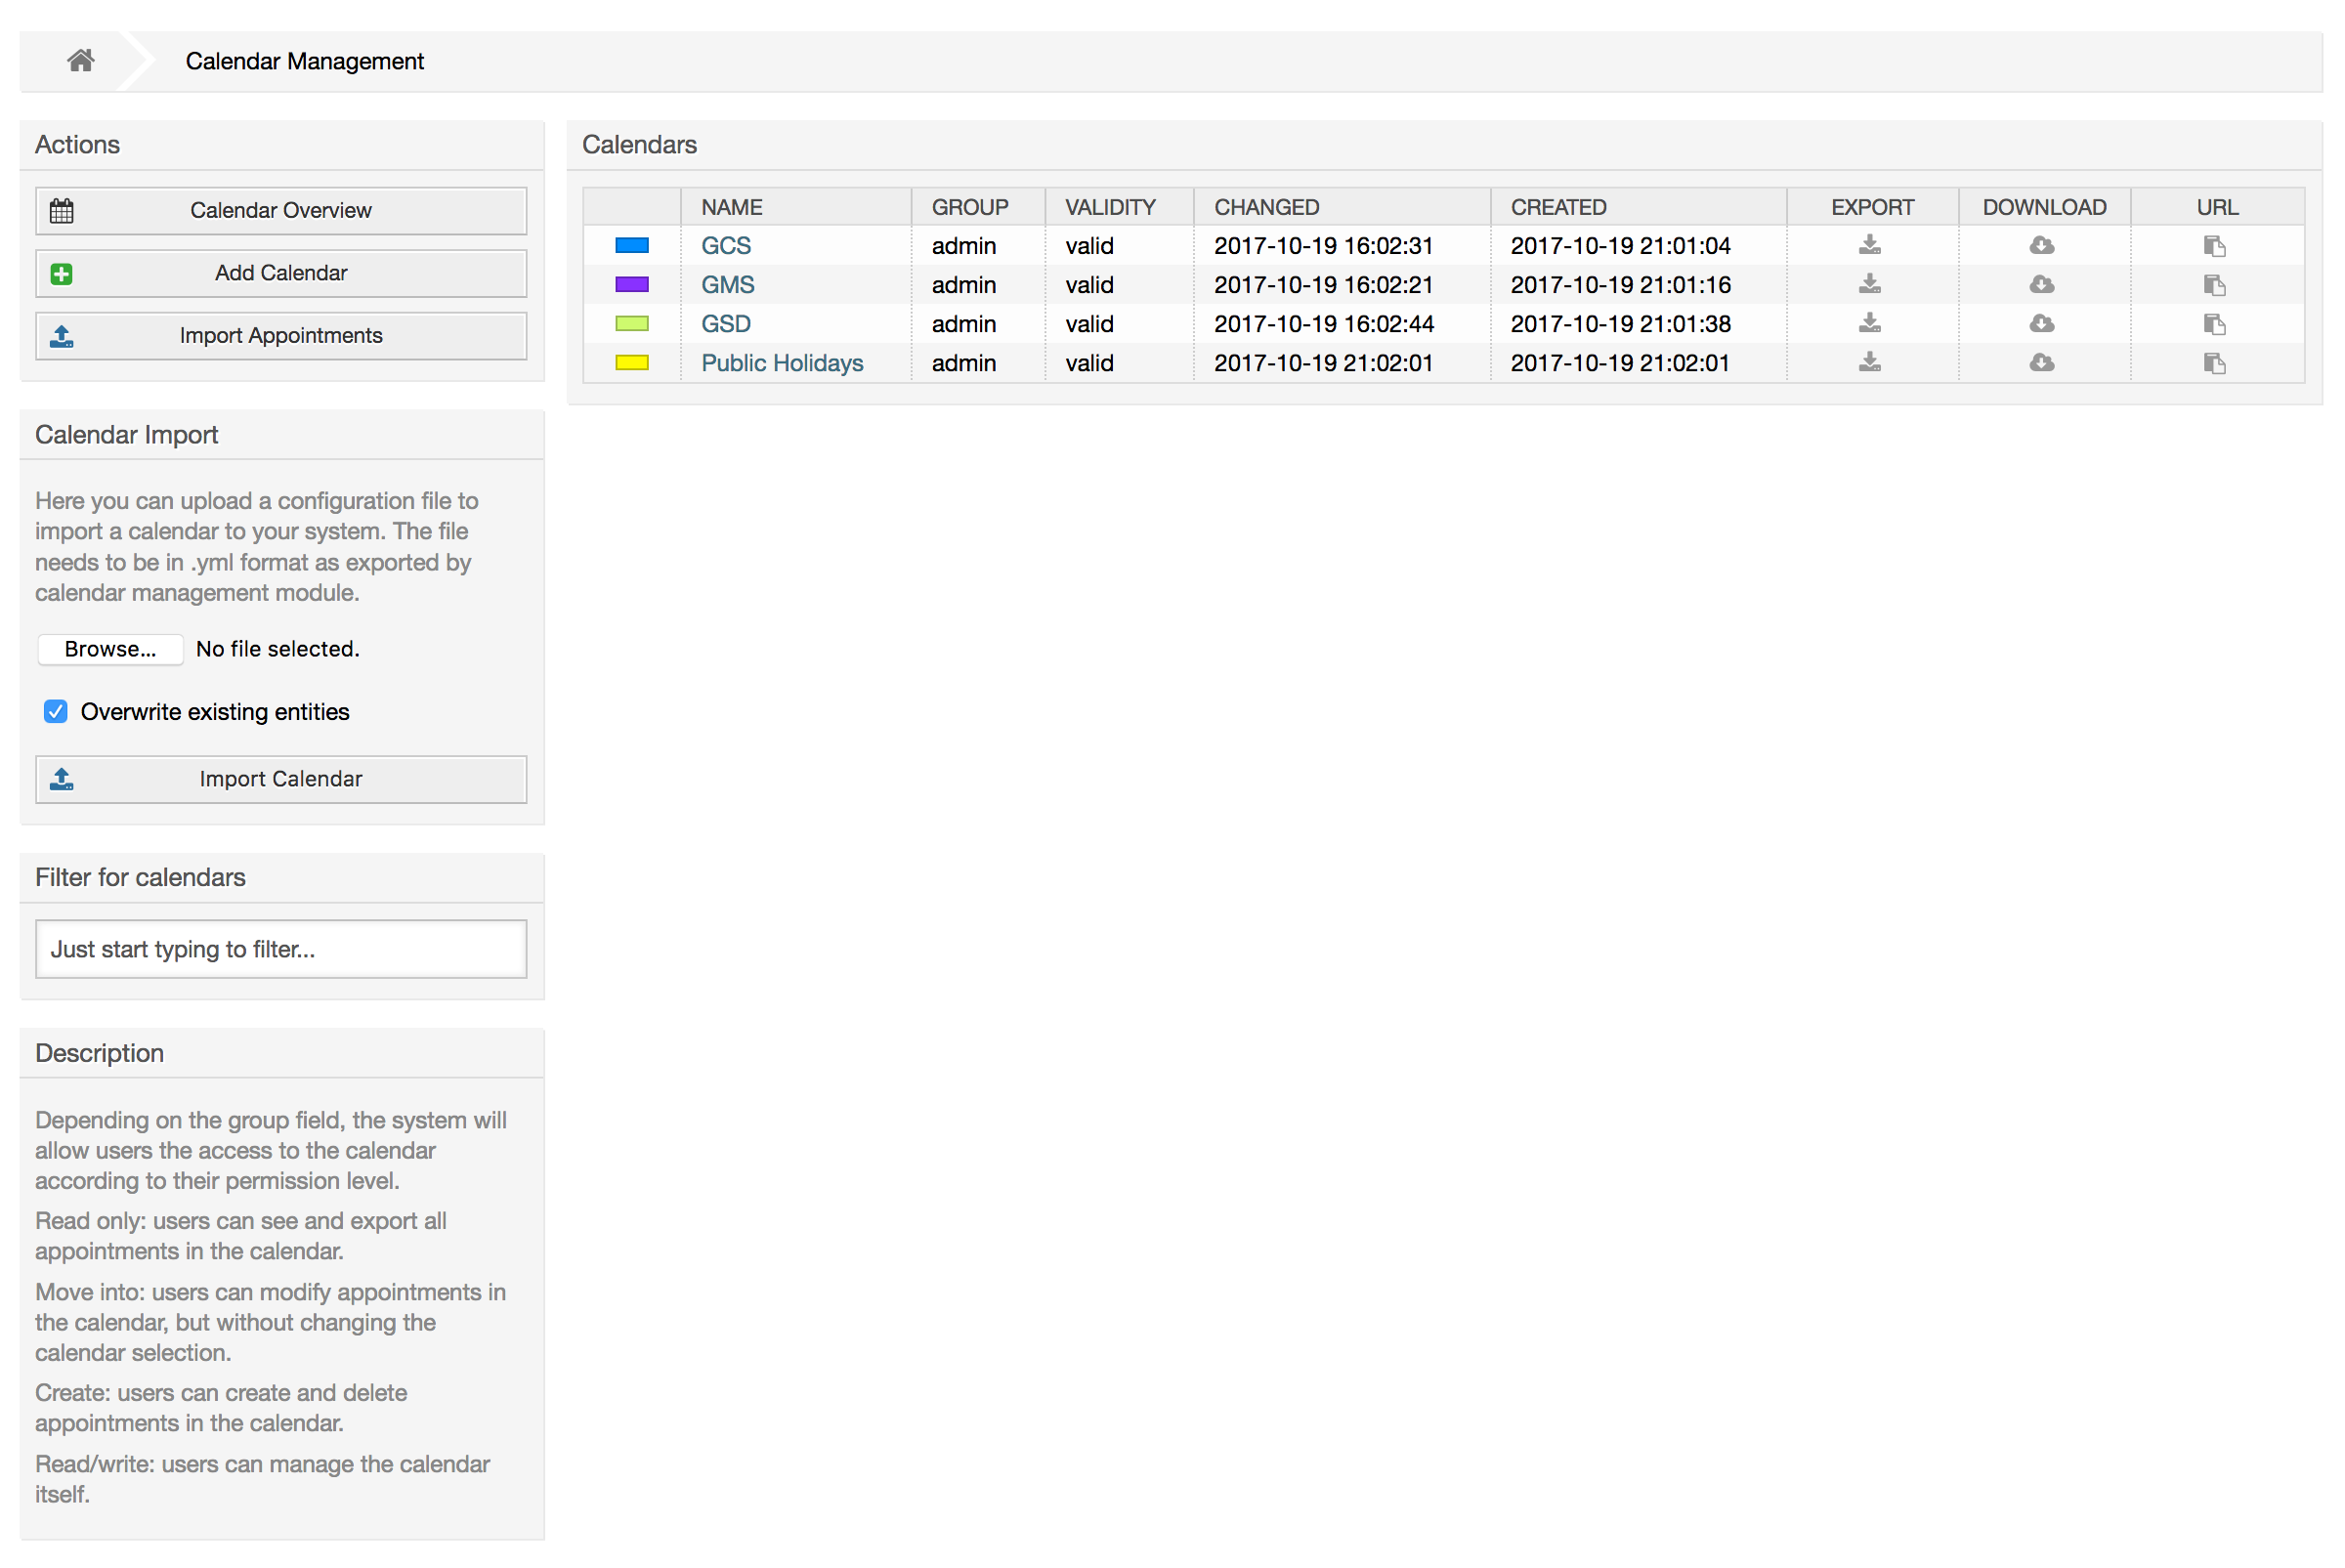
The calendar management is described in more detail in the section Calendar Management.