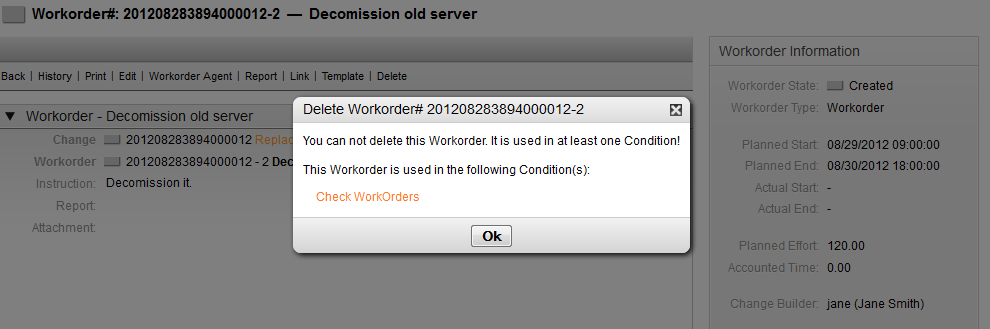
Within a Change, the system offers a "Add Work Order" feature which enables any number of sub-tasks (Work Orders) related to a selected Change to be entered.
Once a Change is created, it effectively serves as a container for the definition of sub-tasks, i.e. Work Orders, and these Work Orders can now be defined by the Change Builder.
Table 8.8. Attributes of a Work Order
| Attribute | Required Field | Details |
|---|---|---|
| Title | Yes | Short description / name of Work Order. |
| Instruction | No | Longer text description of the Work Order. |
| Work Order Type | Yes | Selection list to define the type of Work Order, e.g. approval, work order, PIR, etc. |
| Category | Yes | Defines the type of Change, e.g "3 normal", etc. |
| Impact | Yes | Defines the effects or impact of the Change, e.g. "4 high", etc. |
| Priority | Yes | Defines the priority of the Change, e.g. "5 very high", "3 normal", etc. |
| State | Yes | When creating a new Change, the status is automatically set. When modifying an existing Change the Change Builder and Change Manager can manually set the status. Available statuses and result statuses are defined by the integrated State Machine, see the section called “ Change State Machine ” . |
| Requested (by customer) Date | No | If required, this attribute can be deactivated via SysConfig for the 'ChangeEdit', 'ChangeAdd' and 'ChangeZoom' templates, and display the customer's desired implementation date. |
| Attachment | No | Enables related files and documents to be attached |
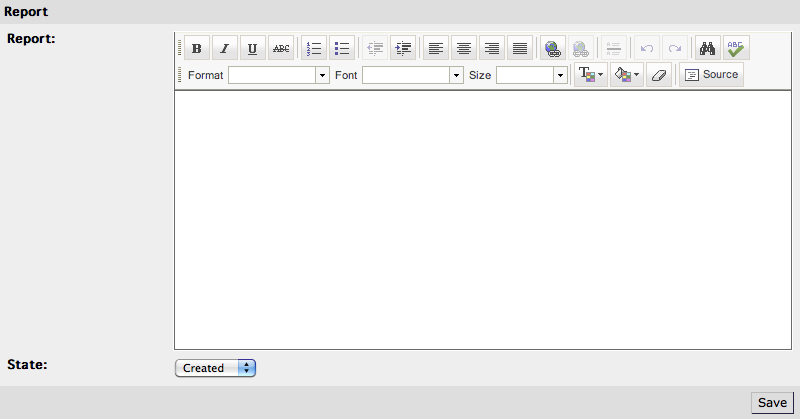
In addition to these attributes, the assigned Work Order agent can collect attributes through the "Report" feature, which is explained in detail in the "Work Order Agent Report" chapter.
The following entries for the "Work Order Type" attribute are available in the standard installation of OTRS::ITSM Change Management:
Approval
Work Order
Backout
Decision
PIR (Post Implementation Review)
The administrator can freely define and specify Work Order types, as well as add new types.
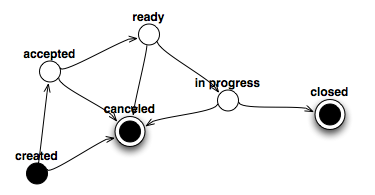
OTRS::ITSM features a State Machine which defines valid statuses and possible result statuses for a Work Order. The standard installation generates suggestions based on the following logic model:
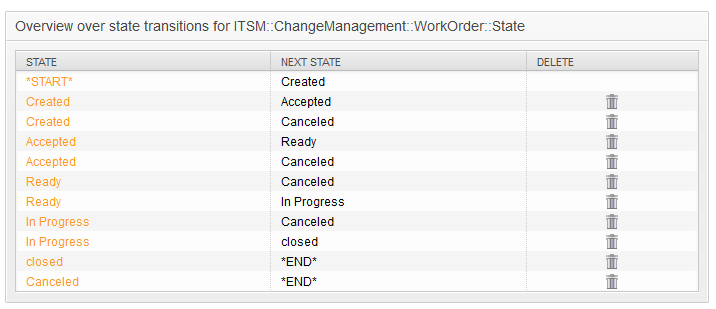
Adjustments to the State Machine can be made by the system administrator in the administration front end, under menu option "State Machine". The statuses and possible result statuses should be defined here. In OTRS::ITSM, this is illustrated as a table:
Where necessary, additional statuses can be defined under the menu option "General Catalog" -> "ITSM::ChangeManagement::WorkOrder::State".
Each Work Order can be assigned to a "Work Order agent", i.e. a person responsible for the execution of the Work Order.
The system offers access to all connected agent back-ends here. It is important to note that only agents who have full access rights to the user group "itsm-change" are displayed.

The assigned Work Order agent can document related information such as comments, the actual Work Order start and end times, required processing time and status.
Within a Work Order, OTRS::ITSM allows linking to other objects.
In the standard installation, a Work Order can be linked to the following objects:
CIs
CI-Class Computer
CI-Class Hardware
CI-Class Location
CI-Class Network
CI-Class Software
Services
Tickets
These settings are defined via SysConfig under "Core -> LinkObject" and can be extended when desired.
A Work Order can be saved as a template through the "Template" feature, within the Work Order itself.
The dialog box requires the Change Builder to give the template a name and an optional comment. Once the user leaves the dialog box by clicking the "Add" button, the Work Order will be available as a template when a new Work Order is being created.